Microsoft 365 folder colors
365 OneDrive, Teams and Sharepoint folder colours
Use colours to help you find important or frequently used folders in OneDrive for Business, Teams, and Sharepoint.
This option can help you pick out folders rapidly in long lists. Also, you can colour-code files to distinguish between content.
Click on the headers below to find out how to use this option for OneDrive for Business and Teams/Sharepoint.
Change a folder's colour in OneDrive
- Open OneDrive for Business
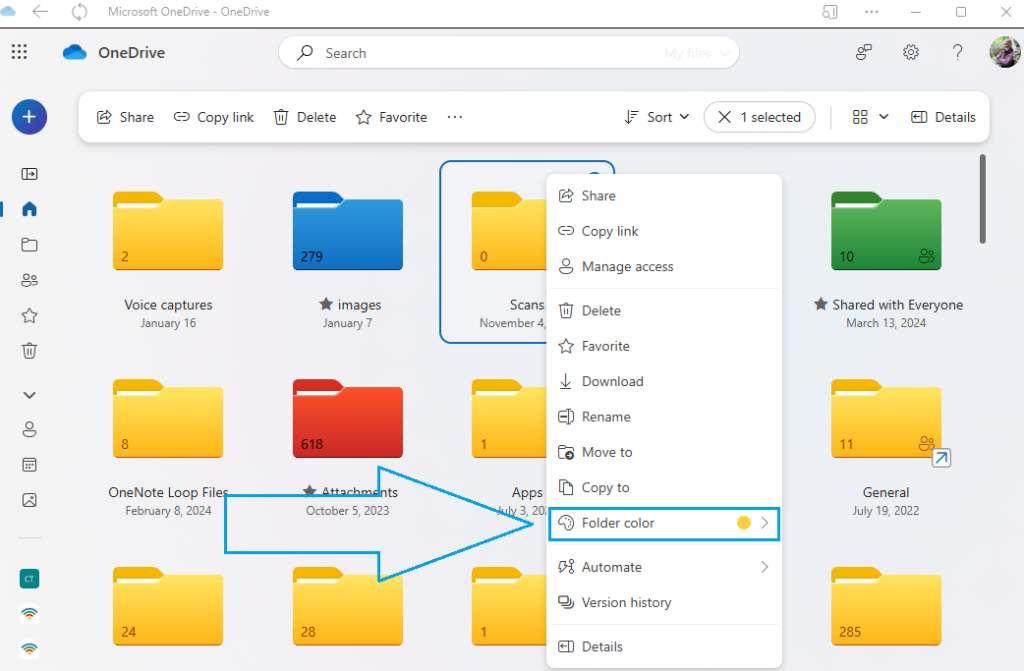
- Right-click on the folder you want to modify
- From the drop-down list, click on <Folder Color>
- Choose from the available colours.
Changing a folder’s colour in OneDrive for Business will only be visible to you. This is because OneDrive is designed to store your own working files. So, even if you share a folder to another user, only you will see the modified colour.
To change a folder’s colour so that the modification is visible to shared users, your folder would need to be stored in Sharepoint or Teams.
Change a folder's colour in Teams and Sharepoint
Microsoft 365 Teams libraries are housed in Sharepoint. So, you can change a Teams folder colour by switching the library into Sharepoint layout. The steps below explain how to do this. Remember that you need to own a folder to be able to change its colour.
Using Sharepoint
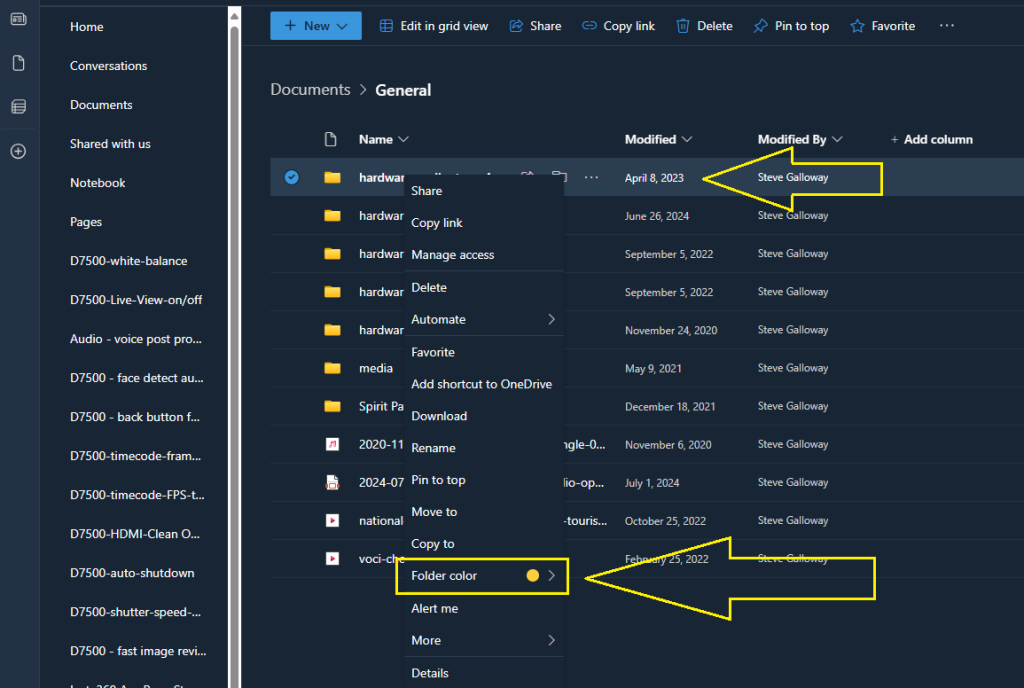
In Sharepoint, navigate to the folder where you want to make changes. Then, follow the list below.
Using Teams
To change a folder’s colour in a Teams Library:
- Open the <File> tab in your Group or Channel
- Click <Open in Sharepoint> along the tab bar above the folder list. You might need to click down the three dots to find the option.
- Right click on the folder you want to change or click the three dots in the folder’s row
- From the drop-down list click on <Folder color> and choose your new colour.
Summary
Customizing folder colours is a great way to help you and others find content easily, especially in large folder lists. Remember, you can also “favourite” a folder to help find your content faster.
Changing a folder’s colour in OneDrive will only be visible to you.
Changing a folder’s colour in Sharepoint will be visible to users who you share it to.
Since Teams stores folders and files in Sharepoint, Teams administrators can change folder colours by opening a Teams’ file library using <View in Sharepoint>.
Lastly, Sharepoint’s broader capabilities means that advanced users can automate folder properties including folder colours.
Outlook templates
Resend Message tool for email templates
<Resend message> is an easy method for creating and managing email templates in Outlook.
Template tools are not intuitively easy to organize in Outlook and require detailed knowledge. One option is to use Signatures to manage templates. Signatures can be inconvenient too when you want to save a longer of standardised emails this way.
Instead, use <Resend Message> to build a library of standard form emails to improve efficiency.
Click on the headers below to find how to use this option.
About Resend message utility
To use <Resend message> in Outlook open a previously sent email. Then, using <Resend message> Outlook strips the email headers from the original email leaving you with a draft email and subject header which only needs a new email address adding to it. before sending or scheduling as normal.
You can copy emails that you want to save as templates this way to a folder which you could, for instance, call Templates. Also, you could use Outlook Categories to tag emails in Sent Items as templates.
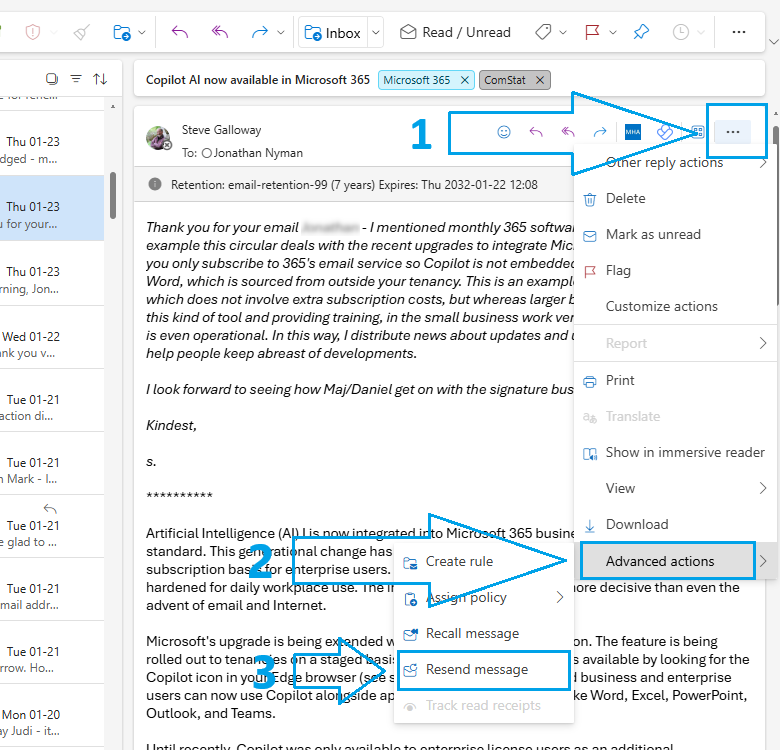
Use Resend Message in Advanced Options
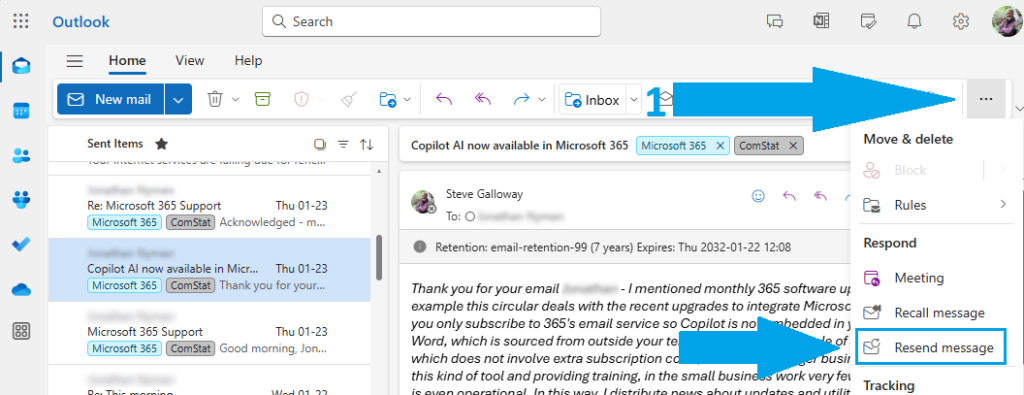
Use Resend Message using More Options
Summary
Outlook can be difficult to use at face value for some tasks like templates. Partly, this is because larger organizations rely on IT deparatments to automate functions like templates at a server level so that staff have ready-made presets.
Those same tools are available in smaller business that use Microsoft 365/Exchange/Outlook. In smaller businesses, staff tend to have to do more for themselves because server level presets are not usually deployed.
Using <Resend message> is the simplest of Outlook’s desktop options for creating and managing templates.
Exchange connectors
Microsoft Exchange Online can route outbound mail through an on-premises server or a hosted service (sometimes called “smart hosting”). This enables organizations to deliver email to business partners through private networks, use data loss prevention (DLP) appliances, and perform custom post-processing of outbound email. Exchange Online also supports Address Rewrite, in which outbound email is routed through an on-premises gateway that modifies the addresses. This feature enables organizations to hide sub-domains, make email from a multi-domain organization appear as a single domain, or make partner-relayed email appear as if it were sent from inside the organization. Administrators configure custom email routing within the Exchange admin center (EAC).
Change Office 365/email password
Office 365 help series – Changing passwords using OWA
Password security
It is good practice to change email passwords occasionally. Sometimes, ComStat may ask you to change passwords if we suspect that a third party has compromised your account. If you have forgotten your password, we can force a password change.
Users are responsible for their passwords at all times. If we force a password change, users should log in to their email accounts and overwrite forced password changes with passwords of their own. Good passwords include:
- 8-15 characters
- Capital letters
- Numbers
- Special characters
Email passwords cannot be changed using your desktop version of Outlook. To change your email account password, login to your Office 365 online control panel with your email address and existing password with a web browser like Internet Explorer, Firefox, or Chrome.
There is more than one way to change passwords in Office 365. For instance, users can log into http://portal.office365.com and locate settings from the portal home page. Users are familiar with Outlook Web Access, so the tutorial here should be a convenient method.
Read this article first before you begin. Click open each step below to understand the steps you need to follow. If you need to contact us to force a password for you, get in touch with your usual network administrator or contact us using the information on our contact page.
Office 365 Home Page
Using your web browser, login to Office 365’s control panel at http://mail.office365.com. Login with your email address and existing password. Your Office 365 home page looks like this:
Open OWA settings
Change password
Follow the 3 steps in the illustration below:
- Click open Office 365 settings
- Click on Password
- Change your password and click submit in the last screen
Remember, you need to know your old password to create your new password, so you may have to ask us to force a password change for you. Also, changing your password will mean you need to update settings on any devices that connect to your Office 365 account, including desktops, laptops, tablets, or mobile phones. Lastly, you may be asked to authenticate your password change by verifying your mobile phone number and inputting a short code which your server will text you, so your mobile phone should be available.
Change Office 365 credit/debit card information
Office 365 help series – Updating credit/debit cards
Updating Office 365 credit/debit card details
This article explains how to edit or change the credit/debit card details used for paying for Office 365 subscriptions.
Office 365 subscriptions are paid direct to Microsoft on a monthly or annual basis by credit/debit card. Occasionally, card information needs to be updated, for instance when a card is nearing its expiry date. Sometimes new card information needs to be lodged with Microsoft if a card has been replaced.
Click open the sections below to find out how to manage your Office 365 payment arrangements with Microsoft.
1 - Log into Office 365
Information about your Office 365 account is kept in the “Billing” section your Office 365 admin center dashboard. In Billing, you can keep track of Office 365 licenses, payment history, and payment information which includes your active credit/debit card details.
Follow the steps below to find your way to the Office 365 Admin Center dashboard. If you use Outlook Web Access (OWA) to manage your email, and you already know how to login to services, you can go straight to the second image. If you do not know your password, you will need to contact us to help you reset your password.
Sign in to Office 365
Log into your dashboard my pointing your web browser to either:
- https://portal.office.com
- http://mail.office365.com
The landing page will look similar to the screenshot below. Enter your email address and password and click Sign In
Open the Office 365 Admin Center
Click open the pull down the tile menu at the top left of the page (see below) and click open Admin. If you have logged into Outlook Web Access (OWA) you will land on your email inbox, but the same tile menu is at the top left of your screen. If you have logged in using the portal.office.com, the page will look more like the example below. The example shows a fully featured Office 365 account. The tile menu will look different depending on the services you are subscribed to, however you will still have an Admin tile.
Click open the next section to learn how to navigate to your Billing section.
2 - Navigating Office 365 Admin Center
The Office 365 Admin Center manages all your services in one dashboard. Information about your account with Microsoft is handled under Billing.
Click on Billing, and then click on Subscriptions to manage your credit/debit card information. Go to the next section for guidance on changing your credit/debit card details.
3 - Update Credit/Debit Card Details
The Billing > Subscriptions page summarizes information at a glance about your account with Microsoft, including the licenses you are subscribed to, payment frequency, status, and forthcoming payments.
To modify your card details, click “Change payment details” and click “Edit” on the right hand sidebar which subsequently opens.
- If you have a brand new card, click “add a card” to replace your old card.
- If your new card uses the same account number, you may only need to change the expiry date. In this case, click “edit existing card” and make the changes.
- Click “Save“.
This completes the process for updating an existing credit/debit card or setting up a new card.
Exchange Email – EOP antivirus/spam
With effect from September 1st, ComStation.co.uk is providing support network administration for EOP security tools for email.
EOP (Exchange online Protection) is a Microsoft solution for managing virus, spam, phishing and other malicious formats. Critically, the service is managed at the data centre for incoming AND outgoing email. Managing incoming email in this way reduces the risk of contaminated email reaching users’ machines.
Microsoft estimates that over two thirds of email transiting the Internet is junk, spam, or malicious. In the field, ComStat devotes significant time to repairing customer equipment compromised by users inadvertently opening suspect email.
EOP includes control panels for customising filtering, IP blocks, domain name blocks, and more. EOP also integrates with ComStation.co.uk tools for data leakage protection, enabling organisations to manage senstive information in outgoing email which might include regulated personal data, credit card numbers, other company information, etc. Invoking data policies in thi way helps organisations to educate employees. Systems can be configured to allow users to override system recommendations while logging user decisions, and also unilateral suppression of sensitive information (e.g. credit card numbers, passwords, etc.)
EOP does not manage over PC security, however is a game changing solution for end users because it minimizes risk of costly damage to buiness networks and machines. Also, because the security process is managed at the data centre, ComStat is able to deliver “clean” email not only to user workstations, but also to the user’s connected devices like mobile phones, laptops and tablets.
EOP was orginally developed to support Microsoft Exchange, and is more than anything else specialised software that deals with email. In this respect, EOP’s email protection services are often more comprehensively tooled than conventional Anti Virus applications, and is used widely by the world’s largest businesses.
EOP is included in ComStat’s subscription email services for business users. EOP can be provided as a standalone solution (£2.00/mo per user account, £20.00 annual) for services provided by third party data centres.
Exchange Online Protection – EOP
Microsoft Exchange Online Protection (EOP) is a cloud-based email filtering service that helps protect Exchange users against spam and malware. EOP includes tools to safeguard organizations from messaging-policy violations. EOP runs within Microsoft data centres as a bundled provision for licensed Office 365 and Exchange users reducing problematic customer bandwidth risks, protecting email before delivery to all user devices, and simplifying the management of on-premise messaging environments and alleviating inherent costs that come with maintaining conventional on-premises hardware and software.
Microsoft Exchange EOP Features:
- Eliminates threats before they reach your business firewall with multi-layered, real-time anti-spam and multi-engine anti-malware protection.
- No extra hardware or software installation – EOP is a bundled service and runs from data centre, managing email before it is delivered to user devices.
- Protects your company’s IP reputation by using separate outbound delivery pools for high-risk email.
- Provides 5 financially backed SLAs, including protection from 100% of known viruses and 99% of spam.
- Active content, connection, and flexible policy-based filtering enables compliance with corporate policies and public sector/IT departmental governance.
- Leverages a globally load-balanced network of data centres helps to ensure a 99.999% network uptime.
- Managed and administered from the Exchange Administration Centre with a single web-based interface.
- Near real-time reporting and message trace capabilities provide insight into email environments by retrieving the status of any message that Exchange Online Protection processes.
- Available to non-Exchange users.
Email signatures in Office 365
Email signatures are included at the end of emails to disclose contact information like trading names, addresses, and other useful contact information. Signatures are created individually for email accounts. Users who rely on desktop clients like Outlook should create email signatures using Outlook. Users who manage email should create signatures in Outlook Web Access (OWA) should create their signatures in OWA. Users who use both Outlook and OWA should create signatures in both Outlook and OWA.
This article shows how to create a signature using OWA. Follow these steps:
– log into Office 365 at http://mail.office365.com
– open the apps dashboard on the left of the toolbar and click open Mail in the dropdown menu
– next, click open the setting icon on right side of the toolbar, and click ope “Options” in the dropdown menu:
– look down the options in the next page and click open “Signatures”. Complete the signatures using the editing tools. Also, depending on the operating system you use, you may be able to copy and paste content from Word. Save the the signature when completed.
Exchange Email – data leakage & loss protection
From October 1st ComStat can provide support to help organisations and users manage data leakage and data protection.
On a large scale, data leakage is a serious issue which finds its way into national headlines. American retailer Target faced enormous losses and serious reputational damage in November 2013 when the company lost 40 million credit card numbers to hackers.
Small businesses may argue they do not face such risks, however small businesses are subject to the same data protection governance for due diligence regarding personal information, and even if a small business does not store credit card numbers electronically, users can still “leak” senstive date to third parties that can come back to haunt businesses.
ComStat network administrators have access to a large array of geographically relevant “policies” which can be established monitor outgoing email for sensitive information like credit card numbers, drivers licenses, passwords, in fact just about anything. On identification of an imminent “leak” users are notified with a number of options:
1. Users can override and permit transit of email, although the event is logged,
2. Sensitive information can be masked by the system,
3. Sensitive information can be delted,
4. Entire emails can be deleted with user notification.
ComStat’s engineers work with businesses with a strategy of using these kinds of tools to educate users of risk while enabling them to conduct their business with minimal obstruction.
In addition to monitoring email textual content, services also extend to identify attachments, which might comprise forms like applications, patents, etc.
Data leakage and data protection issues are difficult to meaasure because the risk of loss is usually hard to quantify until a significant event, by which time businesses can be exposed to substantial threat. As a lowest common denominator, however, businesses have an strict obligation to protect customer and third party personal information, and increasingly free email services like GMail, Yahoo, and Live do not provide tools to manage with the responsibilities European and UK law impose on businesses.
Although these services are aimed primarily at ComStat’s Exchange email users, the same tools are being expanded in 2014 and 2015 to encompass raw data storage like document libraries, spreadsheets, pdf’s, etc.
Please contact us to find out more about how our data protection services can help you.
Miscrosoft ActiveSync
Microsoft Exchange ActiveSync enables users of desktop and mobile devices to access email, calendar, contacts, and tasks from their organization’s Microsoft Exchange server.
Microsoft Exchange is the de facto standard in public sector and corporate IT and is the email backbone of Microsoft’s Office 365 Office suite. Given Exchange’s dominance in premium email services, Exchange ActiveSync is licensed to all major mobile devices manufacturers, although there may be minor variations in subsets of the application used by Windows Phone, Apple, and Android.
The major advantage this brings to users is that it decentralises reliance on a “primary” workstation from which emails etc. have to be co-ordinated. ActiveSync cordinates all devices to a centralised server so that each device has access to all information equally.
Network administrators can limit availability of data to user devices, which is useful in industries where data sensitivity, or in cases where devices are lost or stolen. This usually depends on in-house organisational competency, or in the case of small businesses, access to “delegated” administrators – Microsoft approved third party engineers. ComStat is an authorised delegated network administrator.
ActiveSync is a protocol. In the past, POP3 and IMAP protocols have been widely adopted by manufacturers and users. As modern technology becomes more widely adopted however, POP3’s limitations particularly make it an awkward protocol for users who want to mirror email, contact, and calendaring information between multiple devices. As small business adopts Microsoft’s Office 365 applications, technologies like POP3 which cannot synchronise data between devices “organically” are losing their popularity.
Microsoft Exchange supports POP3, IMAP, MAPI, all of which are widely recognized email distribution protocols. In its native environment, however, MS Exchange performs optimally with ActiveSync. Office 365 users can connect up to 5 devices to their account services.


