by Steve Galloway | May 10, 2026
What Is an Email System Audit and Recovery Review?
An email system audit and recovery review is a structured assessment of your company’s email environment. It examines how your system is configured, how secure it is, and how well it can recover from failure or attack.
Most modern businesses rely on platforms such as Microsoft 365. These systems are powerful, but they are also complex. Over time, settings drift, risks increase, and gaps appear. An audit brings clarity.
A proper email system audit and recovery review answers three key questions:
- Is the system secure?
- Is it configured correctly?
- Can it recover quickly if something goes wrong?
Click open the headers below to learn more about how a professional email system audit helps meet IT compliance standards. Support options are available for professional assistance. You can return to our Index of Articles by clicking here.
What Does an Email System Audit Cover?
An email system audit and recovery review focuses on several core areas. Each one plays a role in protecting your business.
Security and Access
This aspect of an email system audit includes checks on:
- Multi-factor authentication (MFA)
- Admin permissions and access levels
- Legacy protocols such as IMAP or POP
- Conditional access policies
The goal is to reduce the risk of account compromise, which is one of the most common entry points for attackers.
Mail Flow and Protection
At this stage of an email system audit we review how email enters and leaves your system:
- SPF, DKIM, and DMARC records
- Anti-spoofing protection
- Anti-phishing and malware filtering
- A well-configured system stops threats before they reach users.
Mailbox and Data Configuration
As your email system audit progresses, the focus of this exercise deals with how data is stored and managed:
- Mailbox permissions and shared access
- Retention policies
- Archiving and audit logging
Often, businesses discover that data is either not protected enough, or kept longer than needed.
What Is a Recovery Review?
While the audit looks at your current state, the recovery element looks at your future resilience.
A strong email system audit and recovery review will assess:
Backup and Restore Capability
Microsoft 365 includes retention, but it is not a full backup solution. Other email systems make no provision for retention or broader backups at all. A review checks:
- Whether backups exist
- How quickly data can be restored
- How granular recovery is (single emails vs full mailboxes)
Incident Response Readiness
If an account is compromised, speed matters. The review looks at whether you can:
- Revoke sessions quickly
- Reset access securely
- Remove malicious rules or forwarding
Business Continuity
- You should also know what happens if:
- DNS settings fail
- A widespread outage occurs
Few organisations have a good understanding of these areas.
Why This Matters for Modern Businesses
Email is still the backbone of business communication. It is also a primary attack vector. A thorough email system audit and recovery review helps to:
- Reduce the risk of phishing and account takeover
- Protect sensitive client data
- Protect sensitive client data
- Improve compliance and record keeping
- Provide confidence for directors and stakeholders
In many cases, it also highlights unused features within your existing licensing—especially in Microsoft 365—that can improve security without increasing cost.
A Practical Approach: Audit in Stages
Many assume an audit must be a large, one-off exercise. In reality, a staged approach is often more effective.
An email system audit and recovery review can be delivered in phases:
Phase 1: Security Baseline
- Address critical risks such as MFA, admin access, and mail spoofing.
Phase 2: Configuration and Data
- Review policies, permissions, and retention settings.
Phase 3: Recovery and Resilience
- Assess backup, monitoring, and incident response processes.
This staged model allows work to be budgeted and managed over time. It also reflects how systems evolve, rather than treating the audit as a fixed snapshot.
A useful comparison is financial accounting. Accounts show a position at a moment in time. By contrast, an email system audit and recovery review can act as an ongoing process, adapting as your business grows and risks change.
What You Should Expect from an Audit
A professional email system audit and recovery review should deliver:
- A clear findings report
- Risk ratings (critical, high, medium, low)
- Plain English explanations
- A prioritised action plan
The aim is not just to highlight issues, but to give practical steps that improve your system.
Summary
An email system audit and recovery review is not just a technical exercise. It is a way to protect your operations, your data, and your reputation.
Handled correctly, a dsicipline like this provides both immediate improvements and a long-term roadmap. Whether delivered in one piece or in stages, it helps ensure your email system is secure, resilient, and fit for purpose.
Comstat provides independent advice on business IT choices that reduce risk, protect continuity, and support long‑term growth. If you need help managhing email, please get in touch, or use our contact page to organize an appointment which suits your timetable. You can return to our Index of Articles by clicking here .
by Steve Galloway | Aug 15, 2025
Configuring Microsoft 365 Connector for Web Server Email Relay
Use this summary to successfully configure a Microsoft 365 Exchange Online connector to relay email from a cPanel web server.
Some web server applications might not be equipped to connect to Microsoft 365 to relay email from your web server If you use Multifactor Authentication (MFA) to login to your email and 365 services.
Instead, an Exchange Online connector recognizes your web server as a legitimate mail server within your Micrsosoft 365 email environment. This means that a properly configured Exchange online connector relays email via Microsoft 365 to recipients without having to deal with MFA.
This article shows you how to configure an Exchange Online connector in Microsoft 365 to accept incoming traffic from your web server on port 25 using TLS. This assumes that your web server application, such as Clientexec, is:
- properly configured to send email using SMTP on port 25.
- your web server’s email routing configuration is established for “remote mailer”.
- your web server uses a static IP address
- in our default web server congiuration, you will need to contact us to arrange an IP address, which is subject to annually renewable cost.
Click open the headers below to find out more about how you can properly configure your Microsoft Exchange connector on your server.
1. Verify proper admin privileges in 365
Before you create an Exchange online connector, make sure your Microsoft 365 admin account has the correct permissions, even if you are already a Global Administrator:
- Go to Microsoft 365 Admin Center > Roles > Admin Roles
- Assign your account, or the user you want to authorize to <Organization Management> if not already enabled
To add your user account to Organization Management role, click open Organization Management and add your user account. If you belong to a group, you can add that group to this role too.

This role is required to access and configure TLS settings in connectors. Without this role, TLS options may be hidden even in the new Exchange Admin Center.
2. Access the New Exchange Admin Center
Use the Microsoft 365’s modern interface to create and edit an Exchange Online connector:
Note: be sure you are logged in to the new Exchange Admin Center. The legacy admin center will not support the options you need. Log into the new Exchange admin centre for managing roles and mailflow > connectors. You can tell by checking that the path in your browser navigation bar includes the link above.
3. Create a New Connector
Use these settings:
- From: Partner organization
- To: Microsoft 365
- Purpose: Accept email from your web server
Important configuration steps:
- Connector Type: Must be set to Partner (not Internal)
- Sender IP Address: Add your web server’s public IP address
- TLS settings:
- Require TLS: Must be checked
- Require that the subject name of the certificate matches this domain name: Must be checked
- the domain name you enter must also be registered in your Microsoft 365 tenancy.
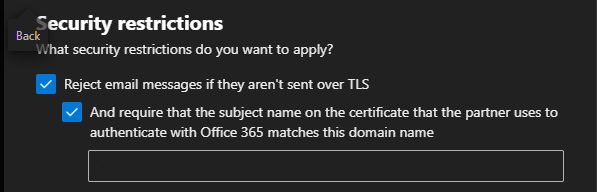
If you do not see these TLS preferences, you either have insufficient privileges, or you have chosen the wrong type of connector
The last preference enforces certificate validation during an SMTP handshake
4. Testing the Connector from the Web Server
Verify DNS and SMTP Connectivity
On your web server, use teh Linux “dig command to confirm mailflow routing using SSH or cPanel’s terminal. This demonstrates that by showing a Microsoft IP address in output, the outgoing message is not intercepted by Exim or other processes on your web server.
# Check MX records
dig “yourdomainname.com” MX |
Use openSSL to confirm TLS handshake with SMTP server with SSH or terminal. You may need to llok up your mailhost in 365. Usually it looks like “yourdomainname-com” rather than “yourdomainname.com”
| openssl s_client -starttls smtp -connect “yourmailhost”.mail.protection.outlook.com:25 |
Send a test email via PHP using a script like:
|
$to = “insert valid 365 email address”;
$subject = “Test Email from Web Server”;
$message = “This is a test message.”;
$headers = “From: insert email address”;
if (mail($to, $subject, $message, $headers)) {
echo “Email sent successfully.”;
} else {
echo “Email sending failed.”;
}
|
Use different From: and To: addresses to avoid spoofing or loopback issues. Also, this can be saved as a script, uploaded to public_html on your web server, and run via a browser by pointing yout browser to the php file you have saved. Delete the file after testing.
5. Verify Connector Status with PowerShell
.Use Windows PowerShell 5.1 with the Exchange Online Management Module. Powershell 7.x does not currently carry the inventory of commandlets used for Exchange Online that v5.1 supports. If you are not familiar with Powershell, find help on checking and enabling “ExecutionPolicy” to enable scripts to run. Also, you may need to install a module called Connect-ExchangeOnline.
# Connect with MFA
Connect-ExchangeOnline -UserPrincipalName youradmin@yourdomain.com
# List connectors
Get-InboundConnector | Format-Table Name, ConnectorType, Enabled, RequireTLS, TlsSenderCertificateName
# Detailed view
Get-InboundConnector -Identity “YourConnectorName” | FL Name, ConnectorType, Enabled, RequireTLS, TlsSenderCertificateName, SenderDomains |
6. Understand Sent Items Behavior
Emails sent via the connector:
- Do not appear in Sent Items of the mailbox listed in the From: field
- Are treated as externally relayed messages, not user-initiated
Summary
Microsoft 365 connectors are powerful but require
- properly configured 365 admin roles
- TLS enforcement
- Correct connector type and IP configuration
- Careful testing from the sending server
About ComStat.uk: Internet Service Provider Comstat provides IT support, web hosting, and media services including website design, Microsoft 365 setup, and audio/video production, serving businesses across Denbighshire, North Wales and Wirral from Ruthin, and Lancashire and the Northwest from Bolton.
by Steve Galloway | Jan 28, 2025
Resend Message tool for email templates
<Resend message> is an easy method for creating and managing email templates in Outlook.
Template tools are not intuitively easy to organize in Outlook and require detailed knowledge. One option is to use Signatures to manage templates. Signatures can be inconvenient too when you want to save a longer of standardised emails this way.
Instead, use <Resend Message> to build a library of standard form emails to improve efficiency.
Click on the headers below to find how to use this option.
About Resend message utility
To use <Resend message> in Outlook open a previously sent email. Then, using <Resend message> Outlook strips the email headers from the original email leaving you with a draft email and subject header which only needs a new email address adding to it. before sending or scheduling as normal.
You can copy emails that you want to save as templates this way to a folder which you could, for instance, call Templates. Also, you could use Outlook Categories to tag emails in Sent Items as templates.
Use Resend Message in Advanced Options
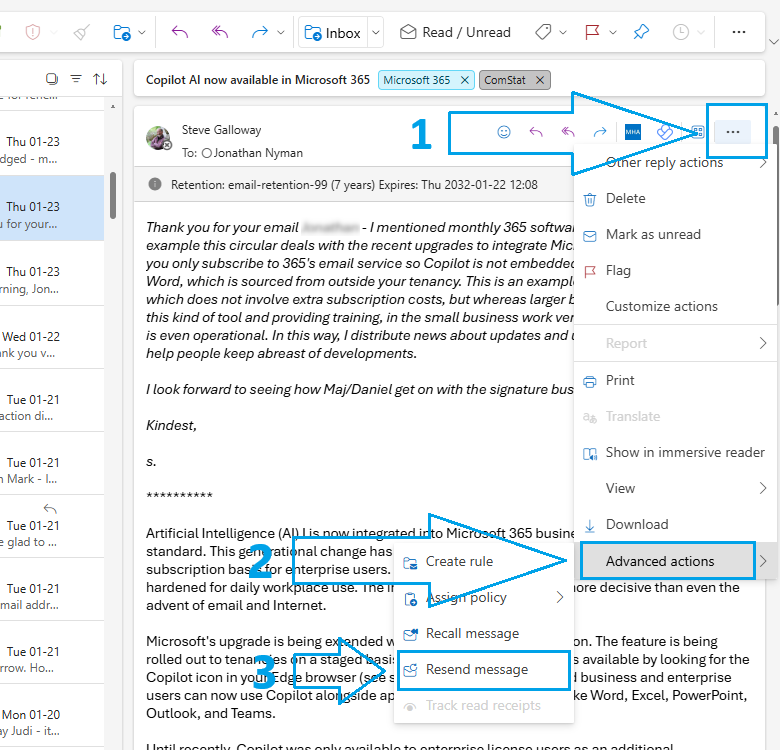
To use the <Resend message> option see screenshot below and follow this workflow:
- Open the e-mail you want to send again
- Click down the three dots towards the upper right of the editing window
- Click <Advanced Options>
- Click <Resend message>
- Edit the e-mail as necessary
- Send as normal
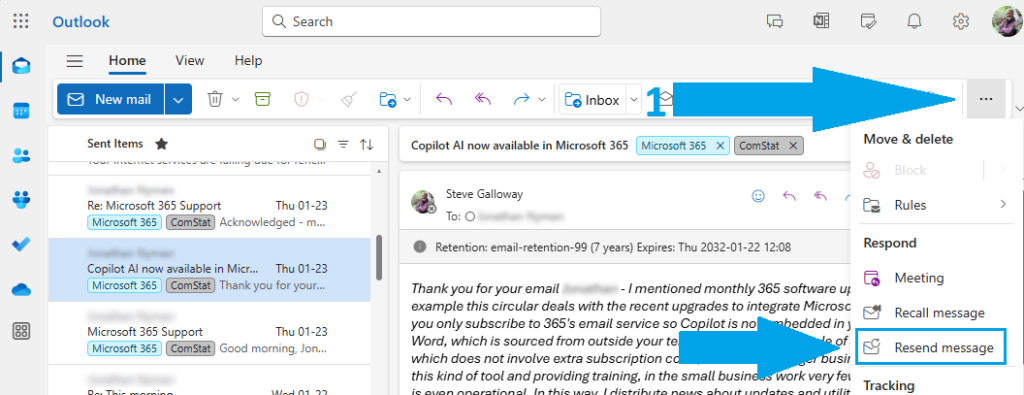
Use Resend Message using More Options
Often, <Resend message> is available on Outlook message editor toolbar. Click on the three dots for <More options> and select <Resend message> from the drop down menu. At time of writing, <Resend message> cannot be added to the toolbar with a button.
Summary
Outlook can be difficult to use at face value for some tasks like templates. Partly, this is because larger organizations rely on IT deparatments to automate functions like templates at a server level so that staff have ready-made presets.
Those same tools are available in smaller business that use Microsoft 365/Exchange/Outlook. In smaller businesses, staff tend to have to do more for themselves because server level presets are not usually deployed.
Using <Resend message> is the simplest of Outlook’s desktop options for creating and managing templates.
by Steve Galloway | Aug 20, 2024
1. What Is Inline Archiving in Microsoft 365?
Inline archiving in Microsoft 365 is a feature designed to help users manage large volumes of email. It provides an additional mailbox—called the archive mailbox—where older messages can be stored automatically or manually. This helps keep your primary mailbox uncluttered and improves performance.
This feature is especially helpful. You do not need advanced skills to use it, and inline archiving works seamlessly with Outlook and Outlook Web App. Once enabled by your organization’s IT admin, you’ll see an “In-Place Archive” folder in your mailbox. You can move emails there manually or set up rules to do it automatically.
Click open the headers below to learn how to use Microsoft 365 inline archiving to manage emails, automate archiving, and keep your mailbox clean—even in the archive.
2. Why Inline Archiving Is Useful
Managing email can be overwhelming, especially when your inbox grows quickly. Inline archiving helps by:
- Improving performance: A smaller mailbox loads faster
- Reducing clutter: Older emails are moved out of your main inbox
- Supporting compliance: Archived emails are stored securely and can be retained according to company policies.
For organizations with strict data retention rules, inline archiving ensures that emails are preserved without taking up space in the active mailbox. It’s a win-win for both users and IT departments.
3. How to Automate Archiving in Microsoft 365
To make archiving easier, you can set up automatic rules. This is how to do it:
- Use Retention Policies: These are set by your IT admin or global administator and can automatically move emails older than a certain age to the archive mailbox
- Manual Setup in Outlook:
- Right-click on a folder and choose Properties
- Go to the Policy tab
- Choose a retention policy that moves items to the archive after a set time (e.g., 6 months)
- Use Sweep Rules in Outlook Web App: Sweep is a terrific innovation to move emails from specific senders like newsletters, or with emails that you can indentify with certain keywords, to the archive
Establishing a routine means checking your inbox weekly, archiving emails you no longer need immediately, and letting automated rules handle the rest. This keeps your mailbox tidy without constant effort.
4. Managing Your Archive: Why Deletion Still Matters
Even archived emails can pile up over time. Subject to your organization’s data retention policies, it’s important to manage your archive just like your inbox.
This is what you can do:
- Review old content: set a reminder every few months to check your archive
- Delete outdated emails: iIf your company allows it, remove emails that are no longer needed.
- Use retention tags: retention tags can be applied to archived items to automatically delete them after a set period.
Summary
Imagine letting your morning postal deliveries pile up on the kitchen table for 15 years – who would do that? Yet that is what we do with our email. Without management, we suffer from slower access to ever increasing data volumes, and we risk exposing data to breaches which could breach data protection policies. So, managing our spent email is an important habit.
Remember, archiving is not the same as permanent storage. Keeping your archive clean helps with compliance, improves search speed, and ensures you’re not holding onto unnecessary data.
About ComStat.uk: Internet Service Provider Comstat provides IT support, web hosting, and media services including website design, Microsoft 365 setup, and audio/video production, serving businesses across Denbighshire, North Wales and Wirral from Ruthin, and Lancashire and the Northwest from Bolton.
by Admin | Sep 1, 2023
With effect from September 1st, ComStation.co.uk is providing support network administration for EOP security tools for email.
EOP (Exchange online Protection) is a Microsoft solution for managing virus, spam, phishing and other malicious formats. Critically, the service is managed at the data centre for incoming AND outgoing email. Managing incoming email in this way reduces the risk of contaminated email reaching users’ machines.
Microsoft estimates that over two thirds of email transiting the Internet is junk, spam, or malicious. In the field, ComStat devotes significant time to repairing customer equipment compromised by users inadvertently opening suspect email.
EOP includes control panels for customising filtering, IP blocks, domain name blocks, and more. EOP also integrates with ComStation.co.uk tools for data leakage protection, enabling organisations to manage senstive information in outgoing email which might include regulated personal data, credit card numbers, other company information, etc. Invoking data policies in thi way helps organisations to educate employees. Systems can be configured to allow users to override system recommendations while logging user decisions, and also unilateral suppression of sensitive information (e.g. credit card numbers, passwords, etc.)
EOP does not manage over PC security, however is a game changing solution for end users because it minimizes risk of costly damage to buiness networks and machines. Also, because the security process is managed at the data centre, ComStat is able to deliver “clean” email not only to user workstations, but also to the user’s connected devices like mobile phones, laptops and tablets.
EOP was orginally developed to support Microsoft Exchange, and is more than anything else specialised software that deals with email. In this respect, EOP’s email protection services are often more comprehensively tooled than conventional Anti Virus applications, and is used widely by the world’s largest businesses.
EOP is included in ComStat’s subscription email services for business users. EOP can be provided as a standalone solution (£2.00/mo per user account, £20.00 annual) for services provided by third party data centres.
