Index of articles

Click open the Index headers below to browse FAQ

Our support articles address the most common issues we deal with “in the field” about Windows, Microsoft 365 Business, web server support, and web design. Click open the accordion sections below to look for self-serve help. Often, issues rely on a knowledge of IT concepts and language. Also, Microsoft, cPanel, and other software houses featured in these articles often update practice notes and procedures without notice. We review our pages regulalry, however you are advised to contact us for further help about these articles especially concerning issues around sovereign account identity and Multifactor Authentication (MFA).

Microsoft 365 configuration and user tips and tricks
  1. Why Professional IT Support Still Matters in the Age of AI
  2. How to Use Folder Color Coding in Microsoft 365 to Boost Productivity
  3. How to Set Up a Microsoft 365 SharePoint Site for a Small Business
  4. OneNote Sync Troubleshooting
  5. Create a Microsoft 365 Exchange Online connector
  6. Configure SPF, rDNS, DKIM, and DMARC for email

The following articles can be found using <Search> or scrolling through our list of articles. Procedures may have changed since and therefore this content is either being eidted or deprecated. So, although we are editing this content, you might still find useful information to help with issues.

  1. – Exchange Online – room and equipment resources
  2. – Reset Office 365 password expiration policy
  3. – Exchange Email – EOP antivirus/spam
  4. – Exchange Online Protection – EOP
  5. – Microsoft 365 Exchange Email – data leakage & loss protection
  6. – Microsoft ActiveSync

How to Search by Category in Outlook (Using Favourites & Search Folders)

Using Categories to search for emails

Searching your email by category is a fast way to stay organised, especially for volume email users and if you rely on colour‑coded workflows. Outlook now offers two reliable ways to do this. The simplest method uses categories which you have saved as favourites in your Outlook folder pane.

For more complex needs, Search Folders still offer the most control. This guide shows Microsoft’s recommended approaches and explains what currently works on Windows, web, and Mac.

Hot Tip!! This guidance is written for “New” Outlook. Outlook Classic is scheduled for deprecation in the medium term.

Click open the headers below to learn more about how you can use categories to simplify your searches in Outlook. You can jump to associated articles about Outlook Categories here:

You can return to our Index of Articles by clicking here.

1. The fastest method: using favourited categories in New Outlook

If your goal is simply to search by category in Outlook, the quickest method is to favourite the categories you use most.

How it works

When you favourite a category, it appears in the left‑hand folder pane. Selecting a favourited category instantly filters your mailbox to show every message tagged with that category. It behaves like a dynamic “saved search” without requiring any setup.

Why use this method?

  • Instant filtering without typing a query
  • Always up to date as new mail arrives
  • No Search Folder required
  • Works in:
    • New Outlook for Windows
    • Outlook on the web
    • New Outlook for Mac

Find out how to create Outlook Categories in this article.

2. When you need more: use Search Folders for complex searches

Favourited categories handle single‑category scenarios well. But if you need multi‑criteria filtering—for example:

  • Category + specific sender
  • Category + unread items
  • Category + timeframe
  • OR combinations (e.g., Category A or Category B)

…then a Search Folder is still the best solution.

What is a Search Folder?

A Search Folder is a virtual folder that stores criteria and updates in real time. It works like a reusable saved search. Although the new Outlook does not let users “save a search,” it does support Search Folders.

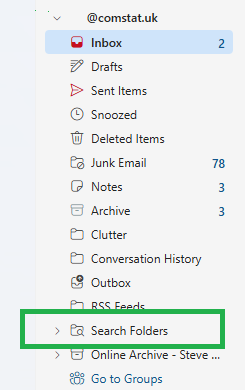
Outlook default saved search folder

Outlook provides a saved searchesd folder in your folder pane to which you can add search folders.


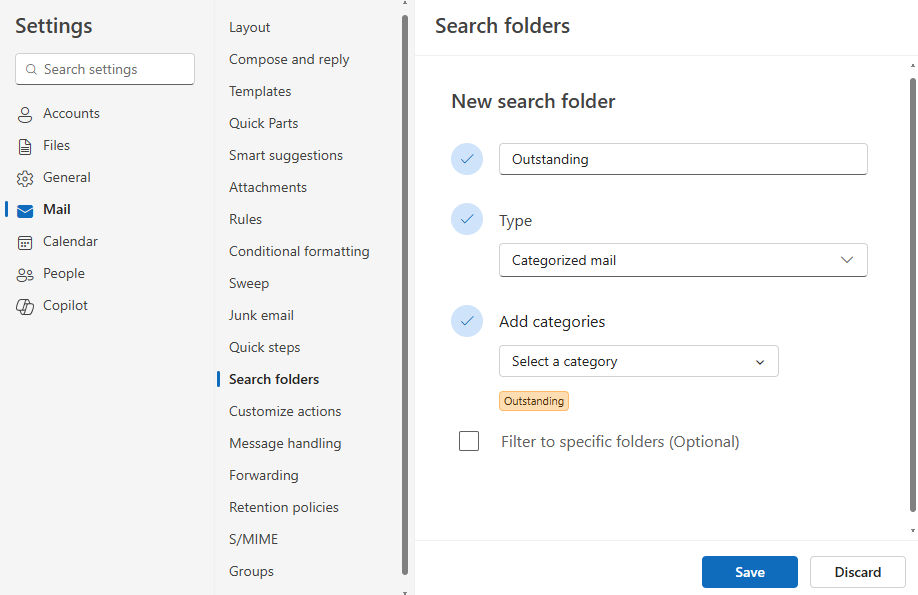
Creating a Search Folder (New/Classic Outlook for DESKTOP)
  1. Right click on Saved Searches Folder → select New (or Add) Search Folder
  2. Choose a preset, or select Create a custom Search Folder
  3. Select Criteria to define filters such as:
    1. Category
    2. From:
    3. Subject
    4. Keywords
    5. Date
  4. Name the folder clearly (e.g., Finance, Categorised, 2026 invoices) and Save.

in this example, a category caslled “Outstanding” has been selected. More attributes can be added to filter your search further.

Add your saved search to Favourites

For extra convenience you can make your saved search a Favourite. This puts a shortcut towards the top of your folder pane near Inbox, Sent, etc. The folder still resides in your Saved Searches folder.

Outlook on the Web: mixed support

Outlook on the web supports Search Folders at the mailbox level, but it does not allow you to pin them to Favourites in the same way the Windows desktop app does.

Practical notes:

  • Search Folders still work and remain visible
  • You cannot favourite saved search folders
  • For quick access, Microsoft recommends using favourited categories instead

If you need to reliably search by category in Outlook on the web, favouriting categories remains the simpler option.

New Outlook for Mac: saved searches exist, but pinning does not

At time of writing, Outlook for Mac allows users to create search queries and save them. However, adding saved searches or Search Folders to the Favourites pane is not supported. Drag‑and‑drop behaviour sometimes appears to work, but it is inconsistent and not officially documented.

Mac users who need fast access to tagged mail should rely on favourited categories until Microsoft expands this feature.

Practical tips for smoother workflows
  • Use meaningful names
    • For Search Folders, name them for purpose: e.g., Client Work – Categorised or Finance – Outstanding.
  • Combine categories with other filters
    • Ideal when you need more than a simple category filter.
  • Keep the list clean
    • Remove old Search Folders to reduce clutter.
  • Use categories as your backbone
    • Especially if your primary aim is to search by category in New Outlook
  • Plan a taxonomy that can be managed over time
    • planning a structure helps to reduce bloat and redundant categories. Also, a documented taxonomy helps colleagues who may need to duplicate categories – remember. categories operate at a user level, not an organisational level.
Summary

If you want to search by category in Outlook, the fastest and most widely supported method is simply to favourite your categories and use the dynamic filter. This works across Windows, web, and Mac.

For advanced filtering, Windows users can rely on Search Folders, which remain the best way to create a complex, reusable saved search. On the web and Mac, Search Folder support is more limited, so categories offer the most consistent experience.

If you need help or want advice about planning a category taxonomy, please get in touch, or use our contact page to organize an appointment which suits your timetable. You can return to our Index of Articles by clicking here.

How Outlook Categories Transform Email Management: A Simple Guide for Everyday Users

Introduction

Most Outlook users still rely on folders to store and manage their email. It’s familiar, and for small volumes of email it works well enough. But as your mailbox grows, folders start to break down. Messages fit into multiple topics, threads get split across separate folders, and it becomes harder to find what you need quickly. Outlook categories solve this problem.

Outlook Categories turns your Inbox or Sent Items into a dynamic, instantly searchable workspace. Instead of dragging email into rigid folders, you add one or more coloured tags – i.e. Outlook Categories to an email. These tags make it possible to filter and group messages on the fly—exactly the way people already search the web using keywords, not folders.

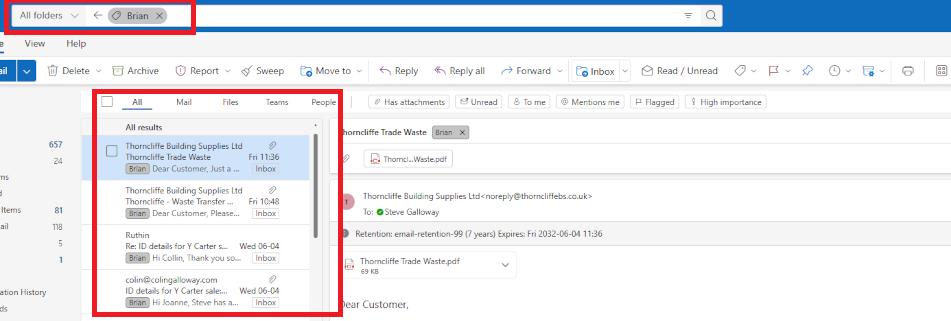
virtual email folder

Enter the name of a category you want to filter in “search” and turn your Inbox into a dynamically generated folder which lists activty associated with your tag, e.g all items tagged with “Brian” in this screenshot.

Click open the headers below to learn more about Outlook Categories. You may also be interested in these associated articles.

Support options are available for professional assistance.For help planning a taxonomy that can be managed over time, please contact us.

Why Folders Don’t Scale

Folders are great for tidy filing cabinets, but email doesn’t behave like paperwork. Common problems include:

  • Emails often belong to more than one folder. A message from a supplier might relate to two different projects. Which folder should it go in?
  • Moving an email breaks the thread. If part of the conversation is in another folder, you lose context.
  • Folder structures change over time. Projects evolve, businesses reorganise, priorities shift. Your folder tree becomes a maze.

As your mailbox grows, rigid storage (folders) become harder to maintain, not easier. This is why search engines like Google and Bing are so successful. We search by keyword (or category) and it works. So, we already use keywords every day to sort information. As your email volumes grow, keywords or categories become the logical way to rapidly find emails and threads.

Why Outlook Categories Work Better

Outlook Categories act like keywords or tags. An Outlook Category is a  flexible, stackable, colour-coded label that help you recognise and organise email instantly. You can:

  • apply multiple categories to a single email
  • search or filter by category in seconds
  • change categories without moving the message
  • build dynamic, instant “views” of your Inbox

In other words, your Inbox becomes a smart workspace—no filing cabinet required.

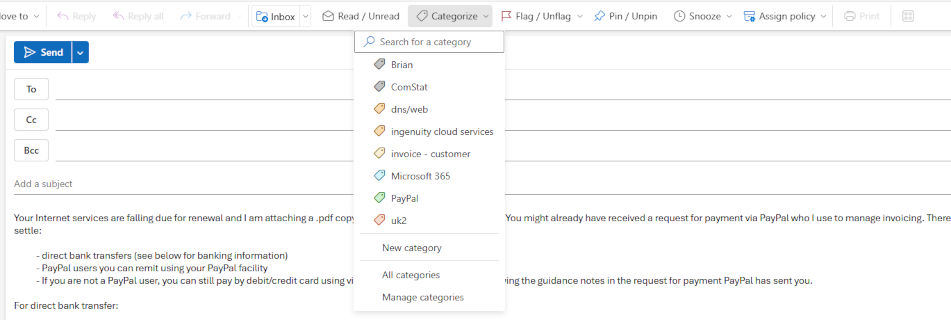
outlook categories

Use categories to filter large Inboxes for emails tagged with a category to create a dynamic folder from your Inbox or Sent Items

Real Example: Tracking Deliveries Using Outlook Categories

Consider this scenario: at any one time we might have several outstanding orders from retailers or suppliers. If everything is delivered “next day”, that’s fine. Sometimes, though, a delivery may take weeks to despatch. We can put our Inbox to work to track deliveries using Outlook Categories to know what you have ordered and what has arrived.

Outlook Categories: example workflow setup

You need two categories (see this article to learn how to create a category):

  • Outstanding (colour-coded, for items not yet received)
  • Delivered (or “Complete”, for orders that have arrived)

Outlook Categories: track deliveries

This how the workflow looks once your categories are established:

  1. When you receive an order confirmation, apply the Outstanding category.
  2. When the goods arrive, change it to Delivered
  3. Use Outlook’s filter (i.e. Search) options to show only Outstanding emails when you want to check what you’re still waiting for.
  4. Switch filters to Delivered if you need to confirm what has arrived

Rather than using a tag called Delivered, you could call the tag Completed – this way you could use one tag to deal with other projects or tasks that are completed. This becomes an issue of planning and category management. When creating categories it is helpful to have a plan of how tags should be organised to make it easier to manage your “taxonomy” over time.

At their simplest level, Outlook Categories can manage individual recipients, groups, subjects/projects, and more.

To find out how to create an Outlook Category, see this article.

How to Filter Emails by Category

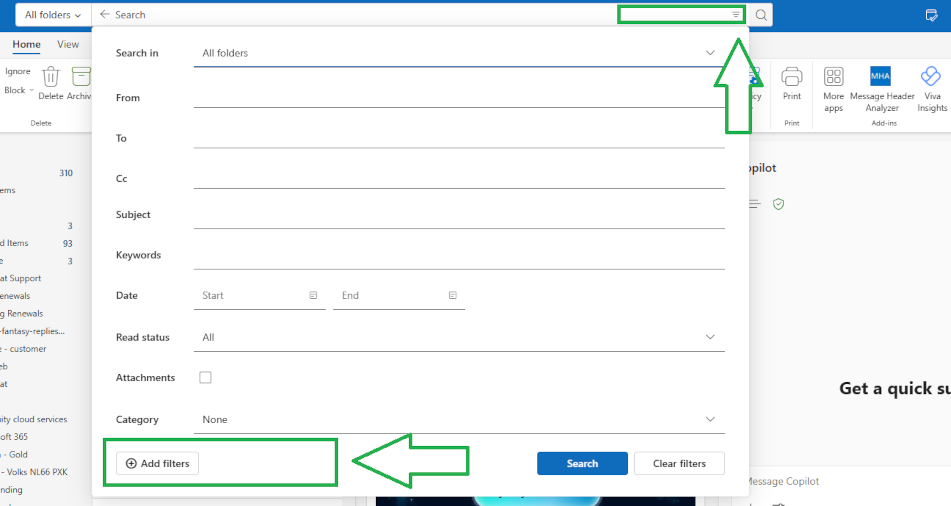
To bring fingertip power to Categories powerful, first add them to Outlook’s filter options in the Search utility.

  1. Go to your Inbox or Sent Items
  2. Click the Filter icon at the right of the Outlook Search field*
  3. Choose Add, More Filters or Search Tools → Advanced Find (depending on version).
  4. Add Categories as a filter field

Optionally, you can add Categories as their own field to make frequently used or topically important Categoires available in your Search drop-down.

*Hot Tip: the fliter icon does not appear by default inthe Outlook Search field. Instead, hover your mouse over the right side of your Search field to reveal the filter options icon.

configure Outlook categories

Why Outlook Categories Beat Folders for Productivity

With Outlook Categories, you gain several long‑term advantages:

  • Speed: Find what you need in seconds
  • Flexibility: One email can have multiple categories
  • Reduced clutter: Your folder list stays simple
  • Consistency: Categories remain relevant even as your work changes
  • Better search: Filters turn your Inbox into a powerful, dynamic dashboard

Most importantly, categories match how people already think. We tag photos, tag social media posts, tag documents—and we search the internet using tags or keywords. Categories simply bring that same modern approach to email.

Try Outlook Categories

If you struggle to keep on top of overflowing folders, or if you feel like you can never find the right message when you need it, give Outlook categories a try.

Start small with your Outstanding and Delivered tags, and once you see how much time you save, you can expand categories into other areas—projects, clients, personal admin, travel, invoices, support requests, and more.

Your email doesn’t need more folders. It needs better visibility. For large volumes, several emails can be selected (for instance in a folder) and categorised. However, with long established folder structures it mighjt not be practical to try to convert all emails to categories. Often, categories and folders co-exist. Folders become important in situations where a multiple users need access to a folder. 

Lastly, note that categories are not easily assigned at an organizational level. So, if you work within an organizational group, it makes sense to establish a policy that colleagues can conform to.

About ComStat.uk: Internet Service Provider Comstat provides IT support, web hosting, and media services including website design, Microsoft 365 setup, and audio/video production, serving businesses across Denbighshire, North Wales and Wirral from Ruthin, and Lancashire and the Northwest from Bolton.

OneNote Sync Troubleshooting: Fixing Missing Sections and Notebook Conflicts on Android

Case Study: OneNote Sync Troubleshooting

When OneNote works well, it offers a seamless experience across devices: imagine having your post-it notes: searchable, everywhere you go. Sometimes sync issues appear without warning, though. This case study explains a real example of OneNote sync troubleshooting where a user found that some notebook sections were missing on Android, Quick Notes were not syncing correctly, and another notebook caused unexpected behaviour.

This guide shows what happened, why it happened, and how a simple OneNote sync troubleshooting fix restored proper synchronisation across desktop, web, and mobile devices. This article uses an Android deployment as an example, and a workflow is included in *** explaining how to resolve OneNote sync in Apple iOS in section <How to reset OneNote for mobile sync> below.

Click open the headers below to learn more about keeping OneNote firing on all cylinders.

You can return to our Index of Articles by clicking here.

OneNote sync symptoms

The issue arose when a user noticed that the 2026 section of their notebook was visible on OneNote for Windows desktop and OneNote for the web, but the 2026 section did not appear on OneNote Mobile for Android. The older sections (2022–2025) appeared normally, and Quick Notes worked on desktop, but new Quick Notes did not show up in the correct place on mobile.

The user colour-coded his sections so that the current year is always coloured green. However, on his Android phone, last year’s section – 2025 – was coloured green. On his desktop and web notebook instances, 2025 was coloured grey and 2026 was green. This turned out to be instructructive as we will see later.

So, only part of the notebook structure was syncing, and section colours on Android mobile did not match the desktop or web versions. Partial mismatches are a classic signal that OneNote Mobile has cached an outdated version of the notebook.

At the same time, the user noticed a second notebook on his mobile. Let’s call this “Charlie’s Notebook.” This notebook was not open in Charlie’s desktop version, yet OneNote app on Charlie’s Android treated it as the default notebook on his mobile phone. This meant a feature called Quick Notes that were created on the phone were silently routed into Charlie’s Notebook whch the user never used, instead of the main M365 notebook where our user keeps all his client meeting notes in a date ordered journal. This meant that notes created in his desktop “Quick Notes” did not sync to the expected location on his mobile phone – instead, the “quick notes” were routing to Charlie’s notebook too.

This combination of missing sections, mismatched colours, and a phantom notebook is a common pattern addressed through OneNote sync troubleshooting. It is easily fixed – when you know how.

Click open the next section to find out more about fixing this OneNote sync problem.

Root Cause: A Cached Notebook Structure on Android

OneNote Mobile caches each notebook’s structure when it is first opened. It continues to use that cached structure until the app is forced to refresh it. Even when new sections are added on desktop or web, Android may not notice new sections unless the OneNote cache on the Android handset is fully cleared.

In this case, the “Charlie’s Notebook” entry was an old OneDrive notebook created years earlier when the user first setup OneNote. Android had continued treating it as the default notebook. The result was:

  • Quick Notes were sent to the wrong notebook
  • New sections like 2026 never appeared
  • Notebook colours stayed out of date
  • Recent Notes showed pages from two different notebooks

All of this pointed toward a stale cached notebook that needed a proper reset.

The Fix: Resetting OneNote’s Data on Android

The correct solution for this type of OneNote sync troubleshooting is not reinstalling the app, but clearing its cached notebook data through Android’s app settings. This approach forces OneNote Mobile to:

  • Forget all cached notebook versions
  • Re-download the correct structure from SharePoint
  • Rebuild section lists and colours
  • Refresh the default notebook
  • Drop any old notebooks that should no longer sync
How to reset OneNote for mobile sync

This workflow was performed on Android 12. The steps might vary from device to device, but the process is similar. For Apple iOS devices, see 2. Apple iOS below.

1. Android

  1. Open Android Settings
  2. Go to Apps
  3. Choose OneNote
  4. Open Storage & Cache
  5. Tap Clear Storage
  6. relaunch OneNote and sign in again if asked
  7. Reopen only your principle notebook
  8. do not open other notebooks

2. Apple iOS

iOS does not offer a “Clear data/cache” button like Android. So, to achieve the same result:

  1. Remove the app (or offload it), which deletes local data.
  2. Reinstall the app, which causes OneNote to rebuild its notebook list and download fresh copies from the cloud.

Once your mobile app downloads a fresh notebook structure, sections and notes will sync properly. Check for icon and colour-coding behaviours and compare to your OneNote desktop installation. Now, all Quick Notes (automatically installed when a notebook is created) will sync across desktop, web, and mobile exactly as expected. Test this by creating a test note in Quick Notes

Summary

The important point here is that when a notebook has changed significantly on OneNote desktop or Web, Android and Apple may need a full cache reset to see the updated structure.

This problem is not uncommon. Unfortunately, users often shrug their shoulders when this kind of sync fails and OneNote loses its utility as. Not unreasonably, users are not sure where to look for the problem or even what the problem is. Happily, functionality is easily fixed and this article should help you understand that OneNote caches on mobile devices can be easily remedied.

If you would like help exploring OneNote features implementing OneNote across devices, feel free to get in touch, or use out contact page to organize an appointment which suits your timetable. You can return to our Index of Articles by clicking here.

Microsoft Authenticator iPhone backup

Backup Microsoft Authenticator credentials to iCloud

iPhone users can use Microsoft Authenticator iPhone Backup utility to save Microsoft 365 credentials to their iCloud account.

Using Microsoft Authenticator iPhone Backup, you can restore your existing 365 MFA credentials to a new iPhone. Also, you can restore your MFA account if your iPhone’s working MFA settings are corrupted. If you are a 365 tenancy owner or a Global Administrator (GA) ou would need another global administrator (GA) to create new credentials. Without a second GA (see this article about creating a secondary “break-glass” Global Administrator) a Microsoft 365 tenancy owner could lock themselves out of their tenancy. So, backing up 365 Authenticator settings is critically important if you are a tenancy owner.

This article explains how to configure your handset, iCloud, and Microsoft Authenticator iPhone Backup.

Click open the headers below to learn more about Microsoft Authenticator iPhone Backup. Support options are available for professional assistance. You can return to our Index of Articles by clicking here.

How Microsoft Authenticator iPhone Backup Works

On an iPhone, Microsoft Authenticator does not use a Microsoft account for backup. Instead, Microsoft Authenticator relies entirely on Apple iCloud.

There is no backup button inside the app in Microsoft’s version of Microsoft Authenticator for iPhone. Instead, once your iPhone is set up correctly, your MFA settings are synchronised and periodically checked in iCloud and iCloud keychain in the background.

The key requirement is that your iPhone is:

  • Signed in to your Apple ID
  • Using iCloud
  • Using iCloud Keychain

If those conditions are met, Microsoft Authenticator iPhone backup is already working. Click open the next sections to learn how to set up your iPhone.

Important note about your Apple ID – your Apple ID, like a Google, Microsoft (personal) and a Microsoft 365 account – is what is called a sovereign account. Be sure that sovereign accounts are configured with secondary sign-in alternatives, and be sure to verify your record and review your user account contact preferences no less than annually.

Step‑by‑Step: Enabling Microsoft Authenticator iPhone Backup

These steps take about two minutes and only need to be done once. Please read through the workflow before you begin. Also, bear in mind that Microsoft and Apple can change processes from time to time and the workflow may vary depending on your iOS version and iPhone model. In any event, the objective is to enable iCloud, iCloud keychain, and enable iPhone to execute connectivity for Microsoft Authenticator.

1. Confirm You Are Signed In to Your Apple ID

  1. Open iPhone Settings
  2. Look at the very top of the screen
    1. If you see your name, then you are signed in
    2. If not, sign in with your Apple ID

Microsoft Authenticator iPhone backup needs to be associated with your Apple ID, so this step is essential.

2. Make Sure iCloud Is Turned On

  1. Open Settings
  2. Tap your name
  3. Tap iCloud
  4. Ensure iCloud is switched ON

Without connectivity to iCloud, Authenticator cannot backup your credentials.

3. Turn On iCloud Keychain (Most Important Step)

  1. Go to Settingsyour nameiCloud
  2. Tap Passwords & Keychain
  3. Turn iCloud Keychain ON

iCloud Keychain securely stores your 365 MFA settings so that they can be retreived later. If you store Microsoft Authenticator credentials for other services, you can back these up too.

4. Allow Microsoft Authenticator to Use iCloud

  1. Go to Settingsyour nameiCloud
  2. Tap Show All
  3. Ensure Microsoft Authenticator is switched ON

If Microsoft Authenticator is turned OFF, Microsoft Authenticator iPhone backup will not work. So, be sure to check this setting.

Using Microsoft Authenticator Day to Day

Once these settings are in place, you can use Microsoft Authenticator normally:

  • Add your Microsoft work account if 365 MFA is not already configured
  • Add any other supported accounts
  • Approve sign‑ins as usual

There is nothing else to manage. On an iPhone, backup happens automatically in the background.

What Happens When You Get a New iPhone?

If your phone is lost, damaged, or replaced, restoring Microsoft Authenticator is straightforward:

  1. Sign in to the same Apple ID on the new iPhone
  2. Turn on iCloud and iCloud Keychain
  3. Install Microsoft Authenticator from the App Store
  4. Open the app

Your Microsoft Authenticator accounts/credentials will reappear automatically. You may be asked to sign in again to some services, but the Authenticator entries themselves are restored. This is why Microsoft Authenticator iPhone backup is so important to set up early.

Hot Tip: Microsoft Authenticator requires iOS 16 or later to work. If Microsoft Authenticator is not available in your App Store inventory, it is usually because your iPhone does not support minimum hardware/software requirements.

Common Questions About Microsoft Authenticator iPhone Backup

Do I need a Microsoft personal account for backup?

  • No. On an iPhone, backup uses Apple iCloud only.

Can I choose where the backup is stored?

  • No. Microsoft Authenticator iPhone backup always uses iCloud.

Is the backup secure?

  • Yes. The data is encrypted and protected by iCloud Keychain.
Summary

For iPhone users, Microsoft Authenticator iPhone backup is simple, automatic, and secure — as long as iCloud and iCloud Keychain are enabled, and iOS is configured to connect Microsoft Authenticator to iCloud. Microsoft does not back up your MFA credentials to your Microsoft 365 account because if you have lost your credentials, you cannot login to 365 to retreive them. Therefore, MFA credentials need to be stored elsewhere.

Google users and Microsoft (personal) account users save their MFA settings in Microsoft (personal) accounts. Click here for guidance to backup 365 MFA settings using Android.

Spending two minutes checking these settings now can save hours of disruption later, and possibly catastrophic loss. For 365 tenancy owners and Global Administrators, this is a critically important utilitiy. If you manage devices or Microsoft 365 for your business and want help configuring this service correctly, Comstat can assist: feel free to get in touch, or use out contact page to organize an appointment which suits your timetable.

You can return to our Index of Articles by clicking here