
How to Change Your Email Password in Roundcube Webmail
How to Change Your Email Password using Roundcube Webmail
The easiest and safest way to update or change your email password is through Roundcube Webmail. Roundcube is the Webmail utility you access your email with using a laptop or desktop computer.
You could change your email password using cPanel. Unlike cPanel, which includes advanced server management tools, Roundcube focuses on email functionality. So, managing your email preferences including out-of-office responders, redirects, etc. reduces the risk of accidental changes to your other web server settings while still giving you full control over your account credentials.
When you need to contact us
If you do not know your current password, please contact Comstat Support so we can securely reset it for you.
Click open the headers below to learn how to change your email password.
Step 1: Log in to Roundcube
Using your desktop computer, laptop, or tablet, open your web browser and go to your webmail login page using your browser’s navigation field, not your Google Search field.
Your Webmail URL will depend on the domain name you own. For example, if your domain name you use for your email is “yourdomain.com” you would follow these steps.
- Point your browser to https://yourdomain.com/webmail substituting your own domain name.
- Enter your email address
- Enter your password
- Click “Log In”
Step 2: Access Settings
Once you have succesfully log in to Roundcube, you will either land on your Roundcube home page. You might have configured Roundcube to go straight to your inbox.
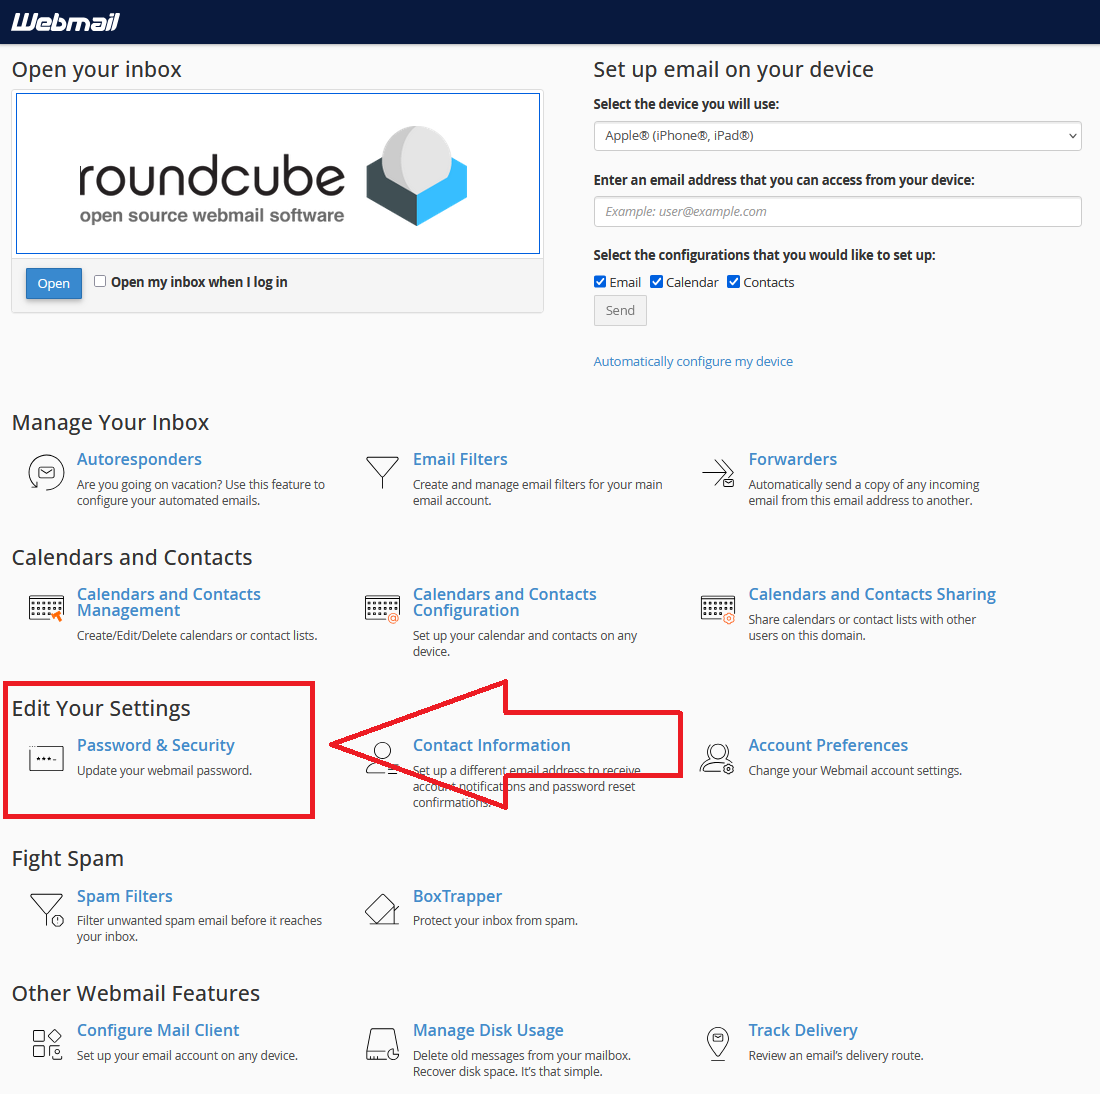
Change your email password using Roundcube Home Page
- Scroll down to <Edit Your Settings>
- Click <Password & Security>
- Change your password
- Click Save or Update
Tip: Use a strong password with uppercase, lowercase, numbers, and symbols. Avoid reusing old passwords.
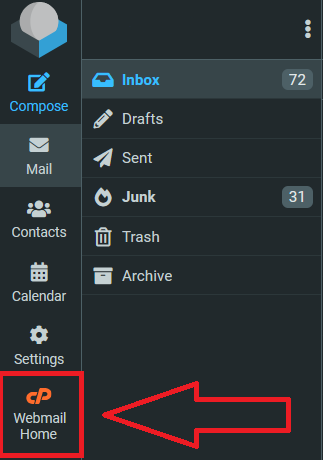
Change your email password from your Inbox
From the preferences bar on (usually on the left of your Inbox page)
- Click <Webmail Home>
- Scroll down to <Edit Your Settings>
- Click <Password & Security>
- Change your password
- Click Save or Update
Tip: Use a strong password with uppercase, lowercase, numbers, and symbols. Avoid reusing old passwords.
Your Webmail home page includes a fully featured list of utilities, including:
- instructions for configuring email accounts on Windows, Apple, Linux, and Android devices.
- Spam controls.
- Autoforwarding
- email tracking
- much more.
Step 3: Update Your Devices
After changing your password, you will have to modify the password in al the devices that you use to connect to your email account.
Best Practices and Summary
- Change passwords regularly.
- Never share your password.
- • Contact support immediately if you suspect unauthorized access.
Roundcube is a comprehensive email solution and you can find answers to issues here.

Microsoft 365 Global Administrator: Why You Need a Second Admin and How to Assign Roles
Introduction
The Microsoft 365 Global Administrator role is the most powerful role in your tenant. It grants full control over users, groups, and settings. However, many small businesses assume that one global admin is enough—and that this role automatically includes every privilege. In reality, some critical capabilities, such as billing and advanced authentication management, require additional roles. This article explains what a global administrator does, why you need a second Microsoft 365 global administrator, and how to organize roles for maximum security and continuity.
Click open the headers below to learn more about how to protect your IT assets by establishing a second Microsoft 365 Global Administrator to protect your Microsoft 365 tenancy in the event of force majeure. Support options are available for professional assistance.
What Is a Microsoft 365 Global Administrator?
A global administrator in Microsoft 365 (also known as an Entra ID global admin) can manage all aspects of your tenant, including user accounts, licenses, and security settings. This role is essential for tasks such as:
- Adding or deleting users
- Resetting passwords
- Assigning licenses
- Configuring security policies
However, global admin privileges do not automatically include billing or advanced security functions. For example, managing invoices for your tenancy, buying/cancelling licenses, or overriding multifactor authentication (MFA) blocks requires additional separate roles.
Why Is a Seond Micrsoft 365 Global Administrator Is Essential
Microsoft recommends having at least two global administrators. This ensures:
- Business continuity during emergencies
- Shared responsibility for critical changes
- Reduced risk of lockouts caused by lost credentials or MFA issues
Establishing a second Microsoft 365 Global Administrator in your 365 tenancy protects against you against a situation arising that locks you out of server-level administration.
Roles That Complement a Microsoft 365 Global Administrator
To fully mirror the capabilities of your principal Microsoft 365 global administrator, assign these additional roles to the second admin:
- Billing Administrator – Manages invoices, payment methods, and subscriptions
- Privileged Authentication Administrator – Overrides MFA and security blocks
- Authentication Policy Administrator – Configures authentication methods and policies
- Service Support Administrator – Opens support tickets with Microsoft
These roles can be assigned in the Microsoft 365 Admin Center or Azure AD (Entra) under Roles and administrators.
Does Licensing Affect MFA for Microsoft 365 Global Administrators?
No. If a second Microsoft 365 global administrator account does not have a Microsoft 365 license assigned to it, it can still perform MFA authentication. MFA enforcement is identity-based, not license-based. The only limitation is that an unlicensed admin cannot use services like Outlook or Teams. For email alerts and notifications, consider assigning at least an Exchange Online license.
How to Organize Your Admin Accounts
- Create a second global admin account
- Assign MFA to both global admins
- Add complementary roles (Billing, Privileged Authentication, etc.)
- Document your admin strategy for continuity
About ComStat.uk: Internet Service Provider Comstat provides IT support, web hosting, and media services including website design, Microsoft 365 setup, and audio/video production, serving businesses across Denbighshire, North Wales and Wirral from Ruthin, and Lancashire and the Northwest from Bolton.
Microsoft 365 Global Administrator: Why Business Continuity needs 2 global admins
Introduction
For many small businesses, Microsoft 365 is the backbone of daily operations—email, files, collaboration, and security all depend on it. At the heart of this system is the Microsoft 365 Global Administrator, the most powerful role in your tenant. But what happens if the person holding that role leaves suddenly or becomes unavailable? Without planning, this scenario can lead to a catastrophic lockout, halting your business operations. This article explains the risk and how to prevent it.
Click open the headers below to learn more about how to protect your IT assets by establishing a second Microsoft 365 Global Administrator to protect your Microsoft 365 tenancy in the event of force majeure. Support options are available for professional assistance.
The Risk of a Single Global Administrator
When you set up Microsoft 365, the first account created becomes the principal global administrator. This account controls everything: user management, licenses, security settings, and more. If that person leaves the company, passes away, or loses access because their account has been hijacked, your organization could face:
- Inability to renew licenses or update billing details
- Locked-out users due to MFA or security blocks
- No way to add or remove accounts or assign roles
This is not just inconvenient—it can catastrophically disrupt your organization’s IT.
Why a Second Global Admin Is Crucial
Microsoft recommends having at least two global administrators. This ensures:
- Business continuity during emergencies
- Shared responsibility for critical changes
- Reduced risk of lockouts caused by lost credentials or MFA issues
Establishing a second Microsoft 365 Global Administrator in your 365 tenancy protects against you against a situation arising that locks you out of server-level administration.
Best Practices for Setting Up a Second Global Administrator
1. Create a second Microsoft 365 global administrator account
- Use a strong password and enable MFA
2. Assign complementary roles
- Billing Administrator
- Privileged Authentication Administrator
- Authentication Policy Administrator
3. Document access and recovery procedures
- Store credentials securely in a password vault
4. Consider a break-glass account
- A highly secured emergency account with no MFA, monitored for unusual activity.
See our second article in this series to learn more about how network administrators can configure a second Microsoft 365 Global Administrator. Intervention in Microsoft 365, Entra, and and other advanced services can cause catastrophic operational problems so we recommend that you contact us for experienced assistance.
Do I need to buy another 365 license?
No. If your second Microsoft global administrator does not have a Microsoft 365 license, it can still perform MFA and manage the tenant. Licensing only affects access to services like Outlook or Teams—not administrative capabilities.
In our experience, most users lose access to their Microsoft, Apple, and Google accounts via breaches that happen as a consequence of email scams. So, a tenancy owner who operates a solitary Microsoft 365 global administrator user which also handles daily email poses a significant risk.
An unlicensed Microsoft 365 account cannot operate email which helps to protect the account from breach. However, without email, a non-licensed Microsoft 365 global administrator account might not see system-level emails. This is usually not an issue in a small business. In larger businesses, an inexpensive Exchange Online license is assigned to professional network administrators.
Summary
A single Microsoft 365 global administrator is a single point of failure. By adding a second global admin and assigning the right roles, you protect your business from catastrophic lockouts and ensure continuity. See our following article in this series to learn how network administrators configure roles like Billing Administrator and Privileged Authentication Administrator to mirror the principal Microsoft 365 global administrator account.
About ComStat.uk: Internet Service Provider Comstat provides IT support, web hosting, and media services including website design, Microsoft 365 setup, and audio/video production, serving businesses across Denbighshire, North Wales and Wirral from Ruthin, and Lancashire and the Northwest from Bolton.

How to Backup Microsoft 365 Outlook Email to a PST File
Introduction
Backing up your email is one of the most important steps you can take to protect your data. If you use Microsoft Outlook for desktop app, you can backup Outlook email to create a PST file to save your emails, contacts, and calendar entries. This guide explains how even non-technical users can do this easily, why PST files are useful, and what limitations exist.
Click open the headers below to learn more about Microsoft 365 work accounts. Support options are available for professional assistance.
What is a PST File and Why Use It?
A PST file (Personal Storage Table) is a data file used by Outlook to store your email messages, contacts, and calendar items. Here’s why it matters:
- Backup: If something goes wrong with your mailbox, you can restore your data from the PST file.
- Migration: Moving to a new computer? A PST file lets you transfer your Outlook data easily.
- Archiving: Free up space in your mailbox by storing older emails in a PST file.
Important: You can only backup Outlook email this way using Outlook for desktop. The feature is not available in Outlook Web Access (OWA). This is because OWA is server-based (not PC-based), so Microsoft does not provide a PST export option OWA.
In Exchange Online, network administrators backup Outlook email mailbox using Exchange Admin Center (EAC) or PowerShell export tools, which require admin-level permissions and technical expertise. You can read about these procedures here. If you are not familiar with Powershell or admin-level procedures in Exchange Online please contact us for help.
What Can You Backup with a PST File?
When you create a PST file, you can include:
- Emails from all folders or just one mailbox.
- Contacts so you don’t lose important details.
- Calendar entries for meetings and reminders.
You can even export specific folders or individual mailboxes if you don’t need everything.
Step-by-Step: How to Create a PST File in Outlook
Follow these steps to backup Outlook email, and/or contacts, and/or calendars:
- Open Outlook (Desktop Version).
- Click File > Open & Export > Import/Export.
- Choose Export to a file and click Next.
- Select Outlook Data File (.pst) and click Next.
- Select the folders you want to back up (e.g., Inbox, Contacts, Calendar).
- Choose a location to save the PST file and click Finish.
- (Optional) Add a password for extra security. If you add a password, record the password in a place that you can be sure to refer to in future. If you lose this password, you will not be able to access the backup.
Your PST file is now ready. You can store it on an external drive or cloud storage for safekeeping.
Limitations and Advanced Options
- You can only backup Outlook email using Outlook for desktop. The feature is not available in Outlook Web Access (OWA), for reasons explained above.
- You can backup Outlook email using Exchange Admin Center (EAC): PST export/import is possible here, but it requires advanced skills. See these guidance notes. In addition to importing/exporting individual accounts, network administrators can manage procedures at scale. For instance, EAC is appropriate for importing multiple user accounts simultaneously. If you need this kind of support, contact us for expert help.

Windows 11 Setup for Privacy-Focused Users: Why Microsoft 365 Business Matters
Why Windows 11 Setup Matters for Privacy-Conscious Users
Setting up Windows 11 is not just about a sleek interface—it is about securing your digital environment from day one. For privacy-conscious users, your initial configuration is critical. Default settings often prioritize convenience over security, leaving sensitive data exposed. By taking control during Windows 11 setup, you can ensure your system aligns with your privacy and compliance goals.
Click open the headers below to learn more about how Microsoft’s security operates in Windows 11. Support options are available for professional assistance. You can return to our Index of Articles by clicking here.
The Role of Microsoft 365 Business in Secure Configuration
Microsoft 365 Business is a security backbone. When integrated during Windows 11 setup, Microsoft 365 Business adds enterprise-grade protections like conditional access, multi-factor authentication, and data loss prevention. These features safeguard your files, emails, and identity against breaches. Microsoft 365 Personal or Family subscriptions do not offer this level of security.
For users handling confidential data or operating in regulated industries, combining Windows 11 and Microsoft 365 Business is more than a convenience—it is a necessity, and an explicitly recommended Microsoft procedure.
Steps to Combine Windows 11 Setup with Microsoft 365 Business
1. Start with a Clean Install
- Ensure your Windows 11 installation is fresh and free from legacy vulnerabilities.
2. Link Your Microsoft 365 Business Account Early
- During setup, sign in with your Microsoft 365 Business credentials to enable policy enforcement.
3. Enable Security Defaults
- Activate features like BitLocker encryption and Defender for Endpoint for layered protection.
4. Configure Compliance Policies
- Use Microsoft 365 Business admin tools to enforce password complexity, device compliance, and secure sharing.
Final Thoughts: Privacy and Professionalism in the Modern Workspace
Windows 11 setup is your first line of defense. Pairing it with Microsoft 365 Business transforms your device into a secure, professional-grade workstation. For users who value privacy and data integrity, this approach is a stategic implementation to avoid unauthorised breaches and data theft. You can return to our Index of Articles by clicking here

Windows 11: Why One Microsoft Account Isn’t Enough for Home and Small Business Users
Introduction
Microsoft markets Windows 11 as simple: “Anyone can use it off the shelf.” But marketing oversimplifies, reality complicates. Most users—and even small businesses—set up their computers with a single Microsoft account. It feels convenient, but convenience poses serious security risks. This guide explains why and what you can do to protect yourself.
Click open the headers below to learn more about how Microsoft’s security operates in Windows 11. Support options are available for professional assistance. You can return to our Index of Articles by clicking here.
1. Why Microsoft’s Windows 11 Consumer Model Creates Risk
Microsoft assumes home users want simplicity. One account controls email, OneDrive, Office apps, and device recovery. But attackers don’t care if you’re “personal” or “business”—the same phishing and credential theft tactics apply whether you are a personal user or a business user.
Small businesses are especially vulnerable:
Home users and small businesses tend to rely on consumer practices to manage their business IT. These introduce vulnerabilities:
- They often use consumer-grade setups to save costs.
- They handle financial transactions without enterprise protections.
- They lack dedicated IT security.
The result means a single compromised account can mean total loss of control—your files, your device, your office network, and your money.
2. Email Exposure and Admin Account Compromise
Your Microsoft account is the “master key” for your PC. If you use it for daily email, it is exposed to phishing and malware. This matters because:
- If an attacker steals your Admin account credentials, they gain full control of your device.
- Attackers can access BitLocker recovery keys, OneDrive files, and even your Microsoft 365 subscription.
Hot Tip: Keep subscription credentials secure and separate from daily email exposure.
Best practice:
- Use a Standard account for aily work and email.
- Keep the Admin account for system control only.
- Enable Multi-Factor Authentication (MFA) on the Admin account.
3. Microsoft 365 Subscription Implications
Your Microsoft 365 Personal or Family subscription is tied to your primary Microsoft account (usually the Admin account).
What this means:
- You can sign into Office apps with the Admin account while using a Standard Windows profile.
- OneDrive can sync under either account—but storage is linked to the Admin account.
This still means that your admin account is still processing ptoentially compromised email which could cause security breaches. Instead of using a Microsoft 365 Personal or Family subscription, consider subscribing to Microsoft 365 Business services instead. If security is crucial, the minor difference in costs is inconsequential.
Hot Tip: Keep subscription credentials secure and separate from daily email exposure.
4. BitLocker and Recovery Key Management
BitLocker protects your data by encrypting your drive. The recovery key is stored in the Microsoft account that enabled BitLocker—usually the Admin account. If you lose access to that account:
- You cannot unlock your device after major updates or hardware changes.
Action steps:
- Save the recovery key offline (print or store in a password manager).
- Verify that it is listed in your admin Onedrive account at: https://account.microsoft.com/devices/recoverykey
- You can manually record Bitlocker keys in a .txt file for secondary storage
5. Small Business Risk Profile
Real-world example: A client recently stopped nearly £100K in fraudulent attempts after a breach. Small businesses are prime targets because attackers know consumer setups lack enterprise safeguards.
If you run a business on a “home” configuration:
- Treat your Admin account like a global admin in enterprise IT—never expose it to email.
- Consider upgrading to Microsoft 365 Business for stronger security controls.
6. Practical Mitigation Steps
- Enable MFA on all Microsoft accounts.
- Use a password manager for secure credential storage.
- Log into the Admin account periodically to prevent inactivity closure.
- Create a recovery drive and store it safely.
- Decide if two accounts make sense for you:
- One account = convenience, higher risk.
- Two accounts = complexity, stronger security.
- upgrading to Micrsoft 365 Business may be a more desirable alternative.
For nerds: Why Windows isn't like Linux
So, why isn’t Windows such a seeminlgy awkward proposition for security by comparison to Unix/Linux?
Unix/Linux systems were designed from the ground up for multi-user environments. They enforce granular file and folder permissions and separate local privilege (root) from user identity. This means:
- Admin tasks are isolated using sudo or root access.
- Daily work happens under a non-privileged account without needing separate cloud identities.
Windows, by contrast, was intended to cater for individual or personal use. So, its architecture is different. Today, Windows merges local admin privileges with cloud identity for licensing, recovery, and sync using a Microsoft account as its building block. This hybrid model creates complexity: to maintain security, Microsoft recommends two accounts—but most users never hear why this has come to be. This causes problems for personal or home office situations. However, Microsoft windows works well at scale in some of the largest enterprises. This is because Microsoft 365 for Business is more forensically tuned for enhanced security at scale.
Summary
Folder colour coding is a small but powerful feature in Microsoft 365 that enhances file organization and team collaboration. While OneDrive for Business is best suited for personal work-in-progress, SharePoint and Teams are ideal for shared group resources, especially when managed by global administrators.
This feature is another example of how Microsoft 365 continues to evolve beyond traditional desktop capabilities, offering smarter tools for modern work environments.
About ComStat.uk: Internet Service Provider Comstat provides IT support, web hosting, and media services including website design, Microsoft 365 setup, and audio/video production, serving businesses across Denbighshire, North Wales and Wirral from Ruthin, and Lancashire and the Northwest from Bolton. You can return to our Index of Articles by clicking here.

How to Set Up a New Windows PC to Sign In Directly with a Microsoft 365 Work Account
Introduction: Why Use a Microsoft 365 Work Account for Windows Sign-In?
When setting up a new computer for business use, the workstation is typically configured with a Microsoft (personal) account. This means signing in to Windows as a personal user, and then finding one’s way to business email and files in Micrsoft 365’s business profile.
Confusing? …we know. Instead, configure a new computer to sign in directly to a Microsoft 365 account with a Microsoft 365 Work Account.
Businesses configure Windows workstations to sign in directly to a Microsoft 365 work account. This streamlines Windows and offers significant benefits for user and business alike. It ensures seamless access to Microsoft 365 apps, centralized security policies via Microsoft Entra ID, and simplified device management. This approach is ideal for organizations using Microsoft 365 Business or Enterprise plans. Also, this approach offers Enterprise security for high net worth users and for those who are focused on privacy protection.
This way, a work computer does not need a Microsoft personal account operating in the background. This has been a problematic inconvenience in the past.
If your computer is already set up using a personal Microsoft account, you can follow the steps in this article to add a Microsoft 365 work account:
How to Transition Users to Microsoft 365 Sign-In and Entra ID
Click open the headers below to learn more about configuring workstations with Microsoft 365 work accounts. Support options are available for professional assistance. You can return to our Index of Articles by clicking here.
Step 1: Choose the Right Setup Path
When setting up a new Windows PC, you’ll encounter options during the Out-of-Box Experience (OOBE). To link the device to your Microsoft 365 environment, select “Set up for work or school” instead of a personal account. This ensures the device joins your organization’s Microsoft Entra ID (formerly Azure AD).
This option is sometimes under “Domain join instead” or “Join Azure AD”, depending on the version.
Key Options During Setup
- Sign in with your Microsoft 365 credentials: Enter your work email and password associated with your Microsoft 365 subscription.
- Device Join Type:
- Microsoft Entra ID Join: Recommended for full integration with Microsoft 365 and centralized management.
- Hybrid Join: For organizations using on-premises Active Directory alongside Microsoft 365.
Step 2: Configure Policies and Security
Once signed in, the device will apply organizational policies automatically if you have Microsoft Intune or similar management tools enabled. This includes:
- Using a Personal Microsoft Account Instead of Work Account
- This prevents proper device enrollment and policy enforcement.
- Skipping Device Management Enrollment
- Without Intune or similar, you lose centralized control and compliance features.
- Incorrect Licensing
- Ensure the user has a Microsoft 365 Business Premium or Enterprise license that supports Device join.
- Network Connectivity Issues During Setup
- A stable internet connection is essential for authentication and policy application.
Why This Matters for Businesses and High net worth users
Direct sign-in with a Microsoft 365 work account improves security, simplifies IT management, and enhances productivity. It also ensures compliance with organizational standards from day one.
If your computer is already set up using a personal Micrsoft account, you can follow the steps in this article to add a Microsoft 365 work account:
How to Transition Users to Microsoft 365 Sign-In and Entra ID
You can return to our Index of Articles by clicking here.
Windows 11 Setup Guide: 1. How to Configure Your PC Securely with Microsoft Accounts
Introduction
Most Microsoft Windows 11 users—and even many small businesses—manage their Windows 11 setup with a single Microsoft account because it seems like the natural thing to do. This simplicity can create serious security gaps, though. This article decribes how Microsoft recommends your workstation should be set up conventionally using two Microsoft accounts using an administrator account and a standard users account.
Why two accounts?
If your admin account is exposed through daily email use, a single phishing attack could give an attacker full control of your computer, your files, and even your Microsoft 365 subscription. In our companion article, we explain why this risk exists, how Microsoft’s design choices contribute to it, and what practical steps you can take to protect yourself—whether you’re a home user or running a small business.
For more about why Microsoft recommends two accounts for securing Windows 11, see this article:
Windows 11: Why One Microsoft Account Isn’t Enough for Home and Small Business Users
Click open the headers below to learn more about how Microsoft Windows setup. Support options are available for professional assistance. You can return to our Index of Articles by clicking here
Preparation - document what you do
Your Microsoft account controls everything—your files, apps, and even your ability to unlock your laptop. If you lose access access you could lose everything tied to that account. So, the first thing to do is to make sure your credentials are documented, including secondary email address and your mobile phone number. If you are going to create a new Microsoft account, write down your user name and password first to be sure you enter credentials accurately.
Hot Tip: Keep accurate records of usernames, passwords, and recovery keys. Use a secure password manager or store a printed copy in a safe place. Review your account credentials periodically.
Why Two Separate Microsoft Accounts Are Recommended
Windows 11 does not allow the same Microsoft account for two different user profiles on the same machine. So, to secure your computer properly, you need:
- One Microsoft account for the Administrator profile
- A second Microsoft account for the Standard User profile
For a simpler approach to security, consider using a Microsoft 365 Business subscription rather than a Microsoft 365 Personal or Family subscription which operates in a less disciplined environment. Microsoft 365 Business requires a domain name, and its architecture segregates email and files from the less rigorously secured personal security provided by Microsoft’s consumer-oriented services.
Why Microsoft Designed It This Way
When Windows 11 is configured for consumer use:
- Each Microsoft account manages its own identity and cloud encryption (e.g., OneDrive), but the device-level BitLocker key is tied to the Administrator account.
- Sharing one account across profiles would break security boundaries—making administrator rights meaningless.
This feels complex, but Microsoft’s purpose is designed to provide strong security and identity separation.
Step-by-Step: Setting Up Two Accounts
- Create the Administrator Account
- During initial setup, sign in with your primary Microsoft account.
- Always use a Microsoft account—not a local account—for better recovery options.
- Create the Standard User Account
- Go to Settings > Accounts > Family & other users.
- Click Add account and sign in with a different Microsoft account (create a free Outlook.com account if needed).
- Set this account as Standard, not Administrator.
Use the Standard account for daily work. This reduces risk and keeps your system secure.
! Keep Your Admin Account active
Microsoft may close accounts that appear inactive for two years. If your Administrator account is rarely used for email or OneDrive, it could be flagged as inactive.
When Microsoft terminates a Microsoft account:
- You lose access to the Administrator profile.
- BitLocker recovery keys stored in that account become inaccessible.
- Device management and recovery options break.
How to keep a Microsoft account active after Wondows 11 setup:
- Sign in to your Microsoft Account for your administrator profile periodically via a browser.
- Link the account to your device.
- Enable a minimal service (OneDrive sync or Microsoft Authenticator).
- Keep your account credentials updated:
- secondary email address
- mobile phone number
Create a Windows 11 recovery drive
A recovery drive is your safety net if Windows won’t start or something goes wrong. After Windows 11 setup is and Microsoft has had a chance to update your computer’s Windows version from the original mirror installed during assembly:
How to create a recovery drive
- Allow about a week to allow for cumulative updates.
- Plug in a USB drive (at least 32GB).
- Search for Create a recovery drive in Windows Start menu.
- Follow the instructions (check “Back up system files”).
Store your recovery drive in a safe place. Often, professionals tether the USB stick to the computer’s power lead. The recovery drive is valuable. It is necessary to repair or re-install Windows in case of a catastrophic failure. If you lose your recovery drive, you may have to replace a damaged computer.
Schedule periodic recovery drive replacement
Windows is constantly upgraded with patches and fixes. No less that annually, recompile your recovery drive.
Understand BitLocker and Recovery Keys
BitLocker encrypts your data, protecting it if your laptop is lost or stolen.
If BitLocker is enabled, you will get a recovery key—a long code that unlocks your laptop if something goes wrong.
Where to find it:
- Saved to your Microsoft account online:
- https://account.microsoft.com/devices/recoverykey
You can also create a manual copy of your Bitlocker key which can be saved in a .txt file. This is a worthwhile additional method. In Wondows Start/Search, search for “Manage Bitlocker”. Professional guidance is recommended.
Summary: Why is Windows 11 setup so complicated?
Many users find Microsoft’s guidance for Windows 11 setup frustrating—and rightly so. However, Microsoft’s best practice guidance is aimed at these objectives:
- Stronger security boundaries
- Better integration with cloud services
- Easier recovery options
Another reason for this seeming complexity is often that users are hoping to achieve commercial levels of security using consumer grade solutions, and this means we have to make Windows bend to keep up with more robust disciplines which are already available in Microsoft 365 Business as standard.
Linux, is free and some believe it is simpler. Even so, Windows remains the dominant choice for compatibility with mainstream apps and small-office tools. Yo better understand the real-world security implications of conventional Windows 11 setup for consumer equipment, read our companion article:
Windows 11 Why One Account Isn’t Enough for Home and Small Business Users
You can return to our Index of Articles by clicking here.
How to Use Outlook Sweep to Declutter Your Outlook Inbox
What Is Outlook Sweep and Why Should You Use It?
If your inbox is overwhelmed with newsletters, promotions, and recurring emails, use Outlook Sweep to help you regain control. Available in both the Outlook desktop app and Outlook Web Access (OWA), Sweep lets you create simple rules to automatically manage emails from specific senders.
Sweep is especially useful for:
- Automatically deleting old messages
- Keeping only the latest email from a sender
- Setting expiration rules for newsletters or updates
Whether you’re using Outlook at work or at home, Sweep can help you stay focused by reducing clutter and keeping your inbox tidy.
Click open the headers below to learn how to Outlook Sweep to manage your email Inbox. Support options are available for professional assistance.
How to Use Sweep in Outlook Desktop and OWA
Using Outlook Sweep is straightforward. Here is how to get started in desktop and web versions of Outlook.
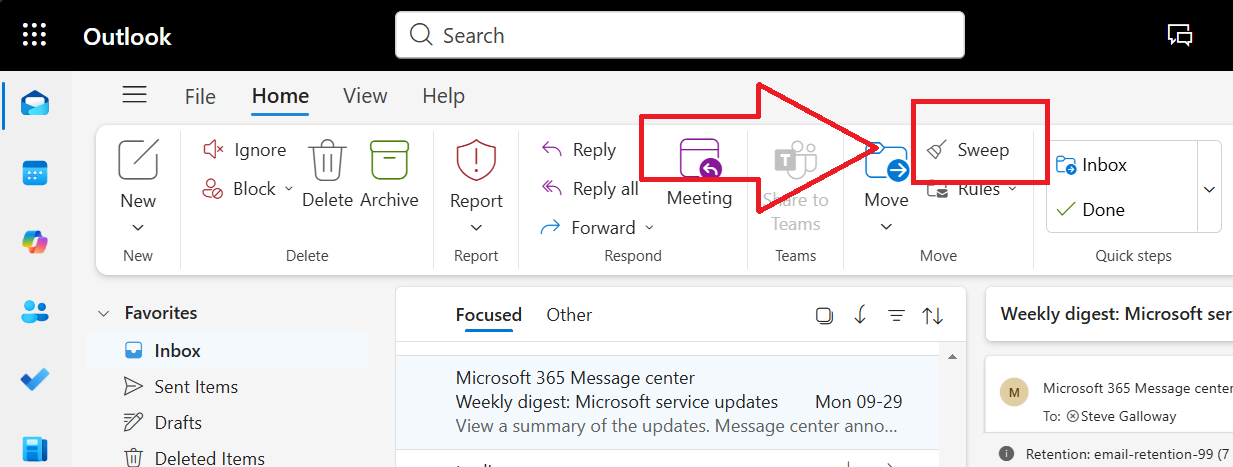
Outlook Sweep is available by default in Outlook toolbar. The button’s position differs according to how you might have customized your toolbar in Outlook desktop and OWA
Outlook Sweep in Desktop App
- Open your inbox and select an email from the sender you want to manage.
- Click on the Home tab.
- Select Sweep from the toolbar.
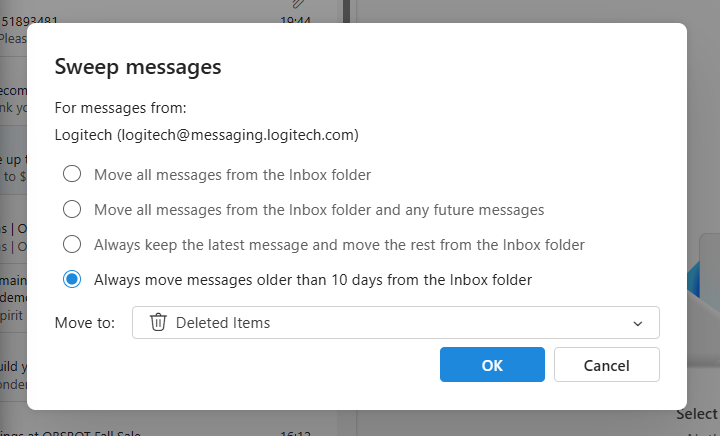
- Choose one of the available options:
- Move all messages from the sender
- Always keep the latest message and delete the rest
- Delete messages older than 10 days
- Move messages to a folder
Outlook Sweep in Outlook Web Access (OWA)
- Log in to Outlook on the web (OWA).
- Select an email from the sender.
- Click the Sweep icon in the toolbar above your inbox.
- Choose your preferred rule and confirm.
These rules apply automatically to future emails from the same sender, saving you time and effort.
Smart Ways to Use Sweep: Real-Life Examples
Outlook Sweep avoids the perceived complexity of Outlook Rules
Sweep does more than deleting emails—it’s about finessing your inbox. Here are a few clever ways to use it:
1. Scan and Auto-Delete Newsletters with Outlook Sweep
Often, we want to scan an incoming email newsletter but we do not need to see it again. You can use Use Outlook Sweep to delete messages older than 10 days. This gives you time to read the newsletter, and then purges the spent content to keep your Inbox clean.
2. Keep Only the Latest Update with Outlook Sweep
Some services send frequent updates—like DMARC delivery notifications, login confirmations, or system alerts. Use Sweep to keep only the latest message from the sender. This way, you always have the most current info without the clutter.
3. Organize by Category
You might want to keep promotional emails but store them separately. Use Outlook Sweep to move messages to a folder like “Promotions” or “Newsletters.” This keeps your main inbox clean while preserving the content.
See this 90 second video for other quick tips for dealing with unwanted emails in your inbox.
Summary
- Combine Sweep with Rules and Focused Inbox for even better control.
- Review your Sweep settings monthly to adjust for new senders or habits.
- Don’t forget to check your folders—Sweep moves emails but doesn’t delete them unless specified.
Outlook Sweep is a simple and powerful way to automate your inbox management. User feedback suggests that it the utility plays an increasing way to surgically prune bloat from inboxes. Espeically as inboxes start reaching storage capacity, Outlook Sweep is a great way to delet email in bulk without having to scroll, select, and delete manually.
About ComStat.uk: Internet Service Provider Comstat provides IT support, web hosting, and media services including website design, Microsoft 365 setup, and audio/video production, serving businesses across Denbighshire, North Wales and Wirral from Ruthin, and Lancashire and the Northwest from Bolton.

How to Use Microsoft 365 MailTips to Improve Email Performance
Introduction: What Are MailTips in Microsoft 365?
Microsoft 365 MailTips are real-time alerts that appear while you compose emails in Outlook or Outlook on the web. These tips help users avoid common mistakes like emailing external recipients, contacting someone who’s out of office, or sending messages that are too large. MailTips are built into Exchange Online and are designed to improve communication and reduce email-related errors. Lastly, mailtips are managed at server level by an adminustrator in Exchange Admin Center (EAC).
Click open the headers below to learn how mailtips can help your users get more from their work with email. Be sure to contact us for advice if you are in doubt, or if you need to deal with bulk application of mailtips using Powershell.
How Microsoft 365 MailTips Work
When a user begins composing an email, Outlook queries the Exchange server to check for conditions that trigger MailTips. If any conditions are met, a notification appears instantly. These alerts are designed to be helpful and informative. For instance, a mailtip might be established to warn a user if a file attachment would cause the email to exceed email size limits.
Common MailTips Include:
- Message size limit warnings
- Notice that a colleague has configured Automatic Out-of-Office replies
- Warning of Large distribution list in send:, cc:, and bcc: fields
- Restricted recipients
Configuring Microsoft 365 mailtips like these help users make smarter decisions before sending emails.
MailTips Limitations and Alternatives
MailTips do not scan email content for sensitive data like credit card numbers. For that, use:
- Data Loss Prevention (DLP): Detects and blocks sensitive content.
- Sensitivity Labels: Automatically classify and protect emails.
For example, in situation where it is inappropriate to include a full length credit card number in an email, conditions can be configured to automatically obscure all but a few numbers of the card as the server processes the outgoing email, ask the sender to edit the email, or block the email. In this way, Exchange Online can activeley monitor email traffic to help a business control personal data that might lead to loss ofr damage to customers. These utilities are especially useful in financial services and medicine.
DLP and Sensitivity labels are subject to adequate Microsoft 365 licensing – please ask if you need more information.
Example: Setting Up a MailTip for Large Attachments
Microsoft 365 allows admins to configure MailTips that warn users when their email might exceed the organization’s size limits. While the maximum message size can be set up to 150 MB, the default is often 25 MB or 35 MB, depending on your configuration. In theory, Microsoft 365 can handle large attachments. However, this causes problems for server storage at scale, and large emails are often dropped by external servers as they pass to recipients. For large files, use file sharing with links to files stored in OneDrive and Sharepoint.
Use this workflow to establish a custom Mailtip to warn users about large attachments:
Step-by-Step Guide Using Exchange Admin Center (EAC)
- Log in to the Exchange Admin Center\ Navigate to https://admin.exchange.microsoft.com and sign in with your admin credentials.
- Go to Recipients > Mailboxes\ Select the mailbox you want to configure.
- Open Mailbox Properties\ Click the mailbox name to open its details pane.
- Navigate to Others > Manage MailTip\ In the flyout panel, find the Manage mail tip option.
- Enter Your Custom MailTip\ Example:\ “Warning: This mailbox has a 25 MB attachment limit. Large files may cause delivery failure.”
- Save Changes\ Click Save to apply the MailTip.
!!! Note: MailTips are limited to 175 characters and support basic HTML formatting.
Optional: Use PowerShell for Bulk Configuration
If you need to handle several email accounts, it is easier to do this using Powershell to perform a batch operation. Powershell can be used to manage this indivdually, too. Powershell is beyond the scope of this article, and if you need help with Powershell, please contact us.
Summary
Microsoft 365 MailTips helps prevent email errors and improves communication. By configuring Microsoft 365 MailTips—especially for common issues like large attachments—admins can reduce support tickets, avoid non-delivery reports, and maintain a professional email environment.
About ComStat.uk: Internet Service Provider Comstat provides IT support, web hosting, and media services including website design, Microsoft 365 setup, and audio/video production, serving businesses across Denbighshire, North Wales and Wirral from Ruthin, and Lancashire and the Northwest from Bolton.