Configuring Microsoft 365 Connector for Web Server Email Relay
Use this summary to successfully configure a Microsoft 365 Exchange Online connector to relay email from a cPanel web server.
Some web server applications might not be equipped to connect to Microsoft 365 to relay email from your web server If you use Multifactor Authentication (MFA) to login to your email and 365 services.
Instead, an Exchange Online connector recognizes your web server as a legitimate mail server within your Micrsosoft 365 email environment. This means that a properly configured Exchange online connector relays email via Microsoft 365 to recipients without having to deal with MFA.
This article shows you how to configure an Exchange Online connector in Microsoft 365 to accept incoming traffic from your web server on port 25 using TLS. This assumes that your web server application, such as Clientexec, is:
- properly configured to send email using SMTP on port 25.
- your web server’s email routing configuration is established for “remote mailer”.
- your web server uses a static IP address
- in our default web server congiuration, you will need to contact us to arrange an IP address, which is subject to annually renewable cost.
Click open the headers below to find out more about how you can properly configure your Microsoft Exchange connector on your server.
1. Verify proper admin privileges in 365
Before you create an Exchange online connector, make sure your Microsoft 365 admin account has the correct permissions, even if you are already a Global Administrator:
- Go to Microsoft 365 Admin Center > Roles > Admin Roles
- Assign your account, or the user you want to authorize to <Organization Management> if not already enabled
To add your user account to Organization Management role, click open Organization Management and add your user account. If you belong to a group, you can add that group to this role too.

This role is required to access and configure TLS settings in connectors. Without this role, TLS options may be hidden even in the new Exchange Admin Center.
2. Access the New Exchange Admin Center
Use the Microsoft 365’s modern interface to create and edit an Exchange Online connector:
- Go to URL: https://admin.exchange.microsoft.com
- Navigate to Mail Flow > Connectors
Note: be sure you are logged in to the new Exchange Admin Center. The legacy admin center will not support the options you need. Log into the new Exchange admin centre for managing roles and mailflow > connectors. You can tell by checking that the path in your browser navigation bar includes the link above.
3. Create a New Connector
Use these settings:
- From: Partner organization
- To: Microsoft 365
- Purpose: Accept email from your web server
Important configuration steps:
- Connector Type: Must be set to Partner (not Internal)
- Sender IP Address: Add your web server’s public IP address
- TLS settings:
- Require TLS: Must be checked
- Require that the subject name of the certificate matches this domain name: Must be checked
- the domain name you enter must also be registered in your Microsoft 365 tenancy.
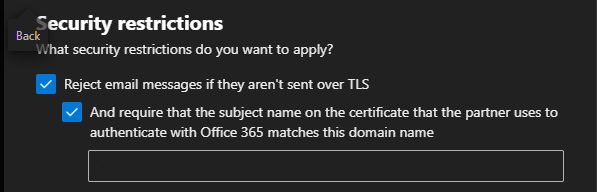
If you do not see these TLS preferences, you either have insufficient privileges, or you have chosen the wrong type of connector
The last preference enforces certificate validation during an SMTP handshake
4. Testing the Connector from the Web Server
Verify DNS and SMTP Connectivity
On your web server, use teh Linux “dig command to confirm mailflow routing using SSH or cPanel’s terminal. This demonstrates that by showing a Microsoft IP address in output, the outgoing message is not intercepted by Exim or other processes on your web server.
| # Check MX records dig “yourdomainname.com” MX |
Use openSSL to confirm TLS handshake with SMTP server with SSH or terminal. You may need to llok up your mailhost in 365. Usually it looks like “yourdomainname-com” rather than “yourdomainname.com”
| openssl s_client -starttls smtp -connect “yourmailhost”.mail.protection.outlook.com:25 |
Send a test email via PHP using a script like:
|
$to = “insert valid 365 email address”; if (mail($to, $subject, $message, $headers)) { |
Use different From: and To: addresses to avoid spoofing or loopback issues. Also, this can be saved as a script, uploaded to public_html on your web server, and run via a browser by pointing yout browser to the php file you have saved. Delete the file after testing.
5. Verify Connector Status with PowerShell
.Use Windows PowerShell 5.1 with the Exchange Online Management Module. Powershell 7.x does not currently carry the inventory of commandlets used for Exchange Online that v5.1 supports. If you are not familiar with Powershell, find help on checking and enabling “ExecutionPolicy” to enable scripts to run. Also, you may need to install a module called Connect-ExchangeOnline.
| # Connect with MFA Connect-ExchangeOnline -UserPrincipalName youradmin@yourdomain.com # List connectors Get-InboundConnector | Format-Table Name, ConnectorType, Enabled, RequireTLS, TlsSenderCertificateName # Detailed view Get-InboundConnector -Identity “YourConnectorName” | FL Name, ConnectorType, Enabled, RequireTLS, TlsSenderCertificateName, SenderDomains |
6. Understand Sent Items Behavior
Emails sent via the connector:
- Do not appear in Sent Items of the mailbox listed in the From: field
- Are treated as externally relayed messages, not user-initiated
Summary
Microsoft 365 connectors are powerful but require
- properly configured 365 admin roles
- TLS enforcement
- Correct connector type and IP configuration
- Careful testing from the sending server
About ComStat.uk: Internet Service Provider Comstat provides IT support, web hosting, and media services including website design, Microsoft 365 setup, and audio/video production, serving businesses across Denbighshire, North Wales and Wirral from Ruthin, and Lancashire and the Northwest from Bolton.