How to Change Your Email Password in Roundcube Webmail

How to Change Your Email Password using Roundcube Webmail

The easiest and safest way to update or change your email password is through Roundcube Webmail. Roundcube is the Webmail utility you access your email with using a laptop or desktop computer.

You could change your email password using cPanel. Unlike cPanel, which includes advanced server management tools, Roundcube focuses on email functionality. So, managing your email preferences including out-of-office responders, redirects, etc. reduces the risk of accidental changes to your other web server settings while still giving you full control over your account credentials.

When you need to contact us

If you do not know your current password, please contact Comstat Support so we can securely reset it for you.

Click open the headers below to learn how to change your email password.  

Step 1: Log in to Roundcube

Using your desktop computer, laptop, or tablet, open your web browser and go to your webmail login page using your browser’s navigation field, not your Google Search field.

Your Webmail URL will depend on the domain name you own. For example, if your domain name you use for your email is “yourdomain.com” you would follow these steps.

  1. Point your browser to https://yourdomain.com/webmail substituting your own domain name.
  2. Enter your email address
  3. Enter your password
  4. Click “Log In”


Step 2: Access Settings

Once you have succesfully log in to Roundcube, you will either land on your Roundcube home page. You might have configured Roundcube to go straight to your inbox.

change your email password using Roundcube Webmail home page

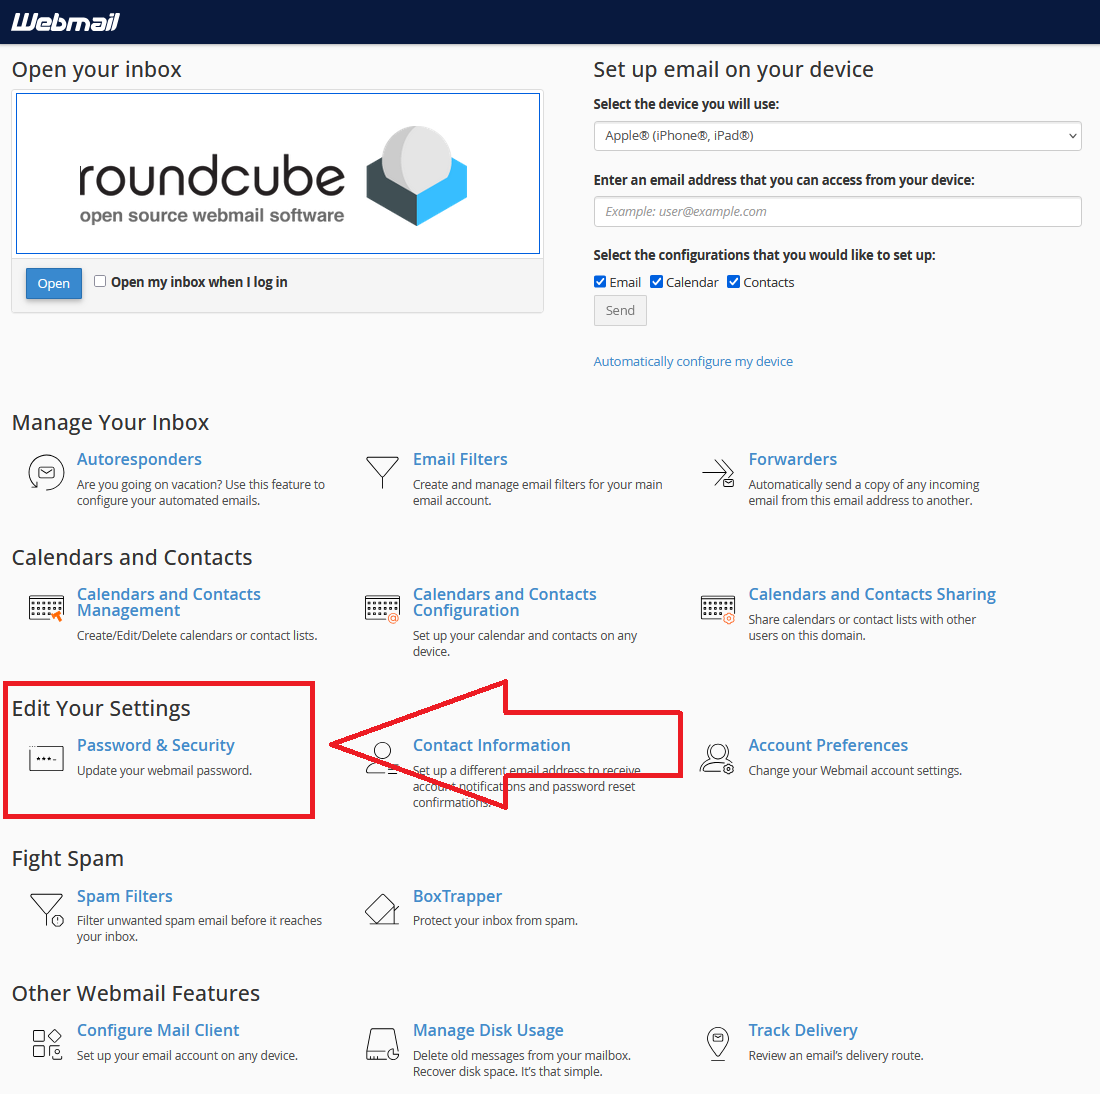
Change your email password using Roundcube Home Page

  1. Scroll down to <Edit Your Settings>
  2. Click <Password & Security>
  3. Change your password
  4. Click Save or Update

Tip: Use a strong password with uppercase, lowercase, numbers, and symbols. Avoid reusing old passwords.

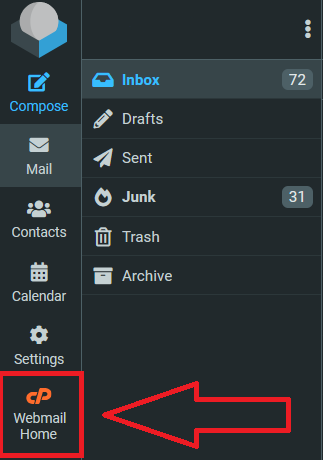
Change your email password from your Inbox

From the preferences bar on (usually on the left of your Inbox page)

  1. Click <Webmail Home>
  2. Scroll down to <Edit Your Settings>
  3. Click <Password & Security>
  4. Change your password
  5. Click Save or Update

change your email password using Roundcube Webmail

Tip: Use a strong password with uppercase, lowercase, numbers, and symbols. Avoid reusing old passwords.

Your Webmail home page includes a fully featured list of utilities, including:

  • instructions for configuring email accounts on Windows, Apple, Linux, and Android devices.
  • Spam controls.
  • Autoforwarding
  • email tracking
  • much more.
Step 3: Update Your Devices

After changing your password, you will have to modify the password in al the devices that you use to connect to your email account.

Best Practices and Summary
  • Change passwords regularly.
  • Never share your password.
  • • Contact support immediately if you suspect unauthorized access.

Roundcube is a comprehensive email solution and you can find answers to issues here.

How to Backup Microsoft 365 Outlook Email to a PST File

Introduction

Backing up your email is one of the most important steps you can take to protect your data. If you use Microsoft Outlook for desktop app, you can backup Outlook email to create a PST file to save your emails, contacts, and calendar entries. This guide explains how even non-technical users can do this easily, why PST files are useful, and what limitations exist.

Click open the headers below to learn more about  Microsoft 365 work accounts. Support options are available for professional assistance.

What is a PST File and Why Use It?

A PST file (Personal Storage Table) is a data file used by Outlook to store your email messages, contacts, and calendar items. Here’s why it matters:

  • Backup: If something goes wrong with your mailbox, you can restore your data from the PST file.
  • Migration: Moving to a new computer? A PST file lets you transfer your Outlook data easily.
  • Archiving: Free up space in your mailbox by storing older emails in a PST file.

Important: You can only backup Outlook email this way using Outlook for desktop. The feature is not available in Outlook Web Access (OWA). This is because OWA is server-based (not PC-based), so Microsoft does not provide a PST export option OWA.

In Exchange Online, network administrators backup Outlook email mailbox using Exchange Admin Center (EAC) or PowerShell export tools, which require admin-level permissions and technical expertise. You can read about these procedures here. If you are not familiar with Powershell or admin-level procedures in Exchange Online please contact us for help. 

What Can You Backup with a PST File?

When you create a PST file, you can include:

  • Emails from all folders or just one mailbox.
  • Contacts so you don’t lose important details.
  • Calendar entries for meetings and reminders.

You can even export specific folders or individual mailboxes if you don’t need everything.

Step-by-Step: How to Create a PST File in Outlook

Follow these steps to backup Outlook email, and/or contacts, and/or calendars:

  1. Open Outlook (Desktop Version).
  2. Click File > Open & Export > Import/Export.
  3. Choose Export to a file and click Next.
  4. Select Outlook Data File (.pst) and click Next.
  5. Select the folders you want to back up (e.g., Inbox, Contacts, Calendar).
  6. Choose a location to save the PST file and click Finish.
  7. (Optional) Add a password for extra security. If you add a password, record the password in a place that you can be sure to refer to in future. If you lose this password, you will not be able to access the backup.

Your PST file is now ready. You can store it on an external drive or cloud storage for safekeeping.

Limitations and Advanced Options
  1. You can only backup Outlook email using Outlook for desktop. The feature is not available in Outlook Web Access (OWA), for reasons explained above.
  2. You can backup Outlook email using Exchange Admin Center (EAC): PST export/import is possible here, but it requires advanced skills. See these guidance notes. In addition to importing/exporting individual accounts, network administrators can manage procedures at scale. For instance, EAC is appropriate for importing multiple user accounts simultaneously. If you need this kind of support, contact us for expert help.

Windows 11 Setup for Privacy-Focused Users: Why Microsoft 365 Business Matters

Why Windows 11 Setup Matters for Privacy-Conscious Users

Setting up Windows 11 is not just about a sleek interface—it is about securing your digital environment from day one. For privacy-conscious users, your initial configuration is critical. Default settings often prioritize convenience over security, leaving sensitive data exposed. By taking control during Windows 11 setup, you can ensure your system aligns with your privacy and compliance goals.

Click open the headers below to learn more about how Microsoft’s security operates in Windows 11. Support options are available for professional assistance. You can return to our Index of Articles by clicking here.

The Role of Microsoft 365 Business in Secure Configuration

Microsoft 365 Business is a security backbone. When integrated during Windows 11 setup, Microsoft 365 Business adds enterprise-grade protections like conditional access, multi-factor authentication, and data loss prevention. These features safeguard your files, emails, and identity against breaches. Microsoft 365 Personal or Family subscriptions do not offer this level of security.

For users handling confidential data or operating in regulated industries, combining Windows 11 and Microsoft 365 Business is more than a convenience—it is a necessity, and an explicitly recommended Microsoft procedure.

Steps to Combine Windows 11 Setup with Microsoft 365 Business

1. Start with a Clean Install

  • Ensure your Windows 11 installation is fresh and free from legacy vulnerabilities.

2. Link Your Microsoft 365 Business Account Early

  • During setup, sign in with your Microsoft 365 Business credentials to enable policy enforcement.

3. Enable Security Defaults

  • Activate features like BitLocker encryption and Defender for Endpoint for layered protection.

4. Configure Compliance Policies

  • Use Microsoft 365 Business admin tools to enforce password complexity, device compliance, and secure sharing.
Final Thoughts: Privacy and Professionalism in the Modern Workspace

Windows 11 setup is your first line of defense. Pairing it with Microsoft 365 Business transforms your device into a secure, professional-grade workstation. For users who value privacy and data integrity, this approach is a stategic implementation to avoid unauthorised breaches and data theft. You can return to our Index of Articles by clicking here