Adding background images with Sitejet
Background images in web pages
This note briefly describes how to use background images with Sitejet. Bcckground images are difficult for a few reasons. The biggest problem is rendering an image, or a repetition of an image as a “tiles” so that it appears consistently on large screens, laptops, tablets, and mobile devices. For background images, consider using expert help.
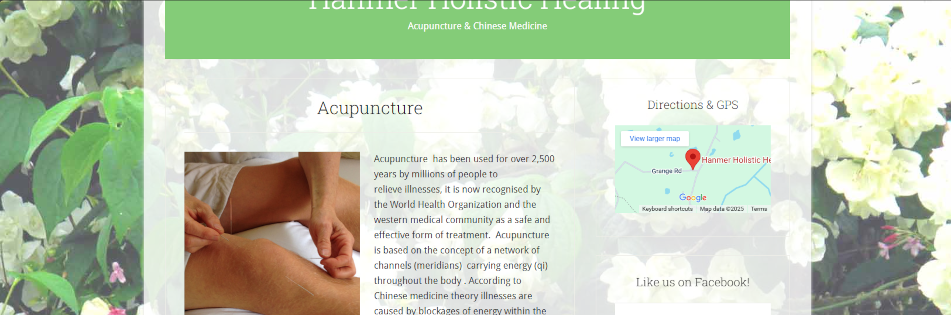
In this example, a website owner uses a semi-transparent section to overlay a background image.
Click on the headers below to learn more about managing background images using Sitejet Builder’s “no-code” option.
Where does the image belong?
A web page is not like a sheet of A4 paper – unless we specify an area in which to contain our content, a web page has limitless dimensions. So, the first issue to decide is where does an image belong?
Web site layout elements
Conventionally, a web page has a global element called a CONTAINER. Within a container there can be one or more SECTIONS, which in turn can have one or more MODULES.
Background images can be inserted in any of these elements. A background image can fill an entire container, or it can fill an element as finite as a row within a module. An image can fill any element in between. An image could include a simple solid fill colour like light grey to distinguish between alternate rows.
How big should the image be?
Image dimensions
Unfortunately, what works for one web site may be disastrous elsewhere, and image content itself can become a problem. You may have to crop or scale an image after seeing what it looks like when you insert the image into a background.
The best starting point is an image that measures 1920w x 1080h. This will usually resolve satisifactorily for desktop/laptops. However, background images need to be sized differently for tablet and mobile, so you may need 2 or 3 images which can be called upon to suit viewers’ devices. However, this is not an absolute rule. Headers (especially) and sections/rows may require a sizizing compromise to work efficiently with a page layout.
File size and type
Files should be no more than 500KB. For home use, file size is not critical, however mobile users may experience slow page loads in areas where mobile coverage is minimal, and those who carry minimum data limits are more susceptible to possible service drop-outs as they reach monthly targets.
webp may be desirable file formate for images that tend to err towards large file sizes. jog/jpeg is a standard file format for static images, and png is used for images where image transparency or other effects are required.
Image Considerations
How the image is programmed depends on a few factors. For instance, you may want a static image that “covers” the container area. A background image can be anchored to text as you scroll, but it can remain static so that text moves as you scroll. Also, a background image may need to have some opacity – i.e. fading so that textual content is clearly legible. This can be handled by your desktop graphics software before you add the picture to your web site image library. Or a background image can be managed by introducting “opacity” or “transparency” in html coding on your web site dashboard. This can make an image look like a watermark when heavily applied. If you are using a pattern, it would be possibe to use a small square or rectangular image which your web server replicates across a container area.
Embedding background image using Sitejet dashboard
This workflow is for a situation where an image is to be applied to a website page “container”. The options are available at section and module levels.
1. Select the Container: Click on the container you want to edit.
2. Open the Style Settings: In the right-hand panel, go to the “Style” tab.
3. Background Settings:
• Scroll to the Background section.
• Choose “Image” as the background type.
• Click to upload or select an image from your media library.
4. Adjust Display Options:
• Set background size (e.g., cover, contain).
• Choose position (e.g., center, top-left).
• Set repeat options if needed.
• Optionally, add a background overlay for contrast.
Options like “cover”, “contain” and placement all have drastic effects on rendering and may need individual configuration for tablet and mobile view.
Summary
Background colours, like a light grey or light blue solid colour, are effective and easily implented. Background images can be visually appealing, but are awkward to render and are probably better reserved for expert intervention unles you are prepared to spend a lot of time configuring layout settings. You can use Sitjet’s “no-code” approach to configure background images at container level, and the principle applies to section and module elements. Advanced effects may require using the HTML authoring tool in sitejet to configure xHTML features.
About ComStat.uk: Internet Service Provider Comstat provides IT support, web hosting, and media services including web design, Microsoft 365 setup, and audio/video production, serving businesses across Denbighshire, North Wales and Wirral from Ruthin, and Lancashire and the Northwest from Bolton.