How to configure DNS for a contact form
Integrating contact forms with an external email service
This guide walks you through modifications you need to make to your domain name’s DNS zone record so that your contact form mail can reliably connect to your external email service, like Microsoft 365 or another email supplier.

This article is written for web designers who know websites but may not be as familiar with DNS.
Click on the headers below to find out how to modify DNS records and other steps in the order shown. Click on images to view at full-sized resolution.
1. Why?
One of the biggest reasons spam happens is because a hacker can purport to be you by sending email using your email address from email servers that you do not control. This means end users have to constantly combat rogue email, and email services have to make educated guesses about what is good email before passing it to your Inbox.
These modifications to SPF, rDNS, DKIM, and DMARC help a receiving email server determine that the email it receives really does come from an email server in your control.
If a receiving server cannot validate the source of your email, the receiving server is likely to conclude that your email has been sent from a spammer, in which case the email will be dropped. Your server can implement some tools, but your domain name has to be configured to co-ordinate with your server too.
2. Scenario
This example assumes that a web site owner uses Microsoft 365 for email and the domain name which governs the web site and email is managed at a registrar like GoDaddy where the authoritative zone record is held. In reality, the registrar might be different. For instance, the domain name might be managed at Cloudflare or even Microsoft 365 itself.
The important point is to understand where your authoritative zone record is managed. the web server will have a zone record. However, if the domain name is regitered at a regisrar like Tucows and the domain name uses Tucow’s nameservers, then the authoritative nameserver for your domain is at Tucows.
This workflow assumes:
- Your website is hosted on at IP address 88.202.183.10
- The domain’s authoritative DNS is managed at a registrar like GoDaddy
- Email for the domain (e.g., yourdomain.co.uk) is handled by Microsoft 365
- You want your contact forms to send email from the domain (e.g., info@yourdomain.co.uk) using your web server’s mail system
This assumes that you already have a valid email address called info@yourdomain.co.uk. Also, this assumes that DKIM and DMARC are already configured for Microsoft 365. Microsoft organises its DKIM records using CNAME records – this means that Microsoft can handle DKIM identifiers in-house.
This is useful because most other entities use an A record which means multiple there would be multiple DKIM records in your authoritative zone. This is possible, but it might affect reliability. So, if you already have DKIM records in your authoritative zone to cope with another email server, it might be worth considering options.
Preparation
Review the existing authoritative zone record to check for SPF, DKIM, and DMARC. You will need:
- credentials for the domain name registrar control panel access
- credentials for cPanel to edit and get records from your web server
- credentials for any other services that might be implicated, like Microsoft 365
- if DKIM is not already configured, refer to this guidance note
- if DMARC is not already configured, refer to this guidance note
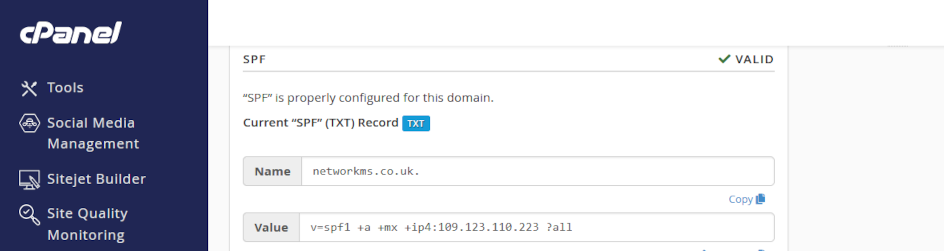
3. SPF (Sender Policy Framework)
SPF tells receiving email servers which IP addresses you have approved to send mail for your domain. Usually, this record is already posted in your zone record. In the example below, the record is only configured to recognize Microsoft 365:
v=spf1 include:spf.protection.outlook.com -all
So, now we need to include your web server’s IP address to verify that your web server is a valid email server too.
What to do:
- Log into the DNS editor where your domain name is managed (e.g. GoDaddy)
- Find your existing SPF TXT record (it starts with v=spf1).
- Add your server’s IP: ip4:88.202.183.10 before the -all.
Example:
v=spf1 include:spf.protection.outlook.com ip4:88.202.183.10 -all
The syntax is not absolute. For instance, the following record also works:
v=spf1 ip4:88.202.183.10 include:spf.protection.outlook.com -all
Adding your web server’s IP address to the SPF record authenticates both Microsoft 365 and your web server as valid mail servers for your domain.
4. rDNS (Reverse DNS / PTR Record)
Unless you rely on exceptional settings, you do not need to do anything about rDNS. A PTR record is already established in the reverse zone for our servers. This means that the IP address for your server is already mapped to your hostname.
A PTR record can only be created where a reverse zone is accessible. Usually, this means having to post a support ticket at your domain registrar, or asking the owner of the IP address you have been granted to map the setting for you.
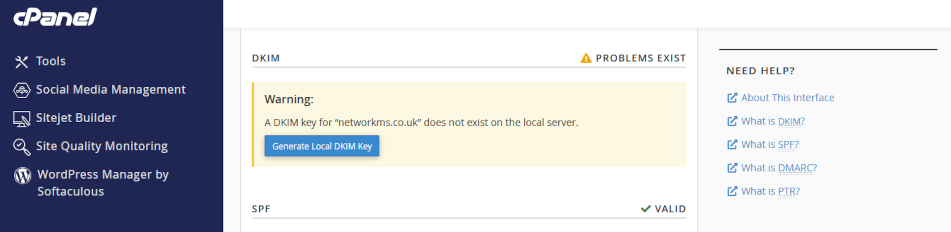
5. DKIM (DomainKeys Identified Mail)
DKIM adds a digital signature to your emails.
Usually, DKIM is established with an A record. Microsoft 365 already uses DKIM via CNAME records. This is convenient. Other registrars might already require an A record that you rely on. It is possible to have multiple A records establishing DKIM records for different servers. This might cause some reliability issues though. So, you might need to monitor traffic flow after making this kind of change. In any event, your web server needs its own DKIM setup if it sends mail too.
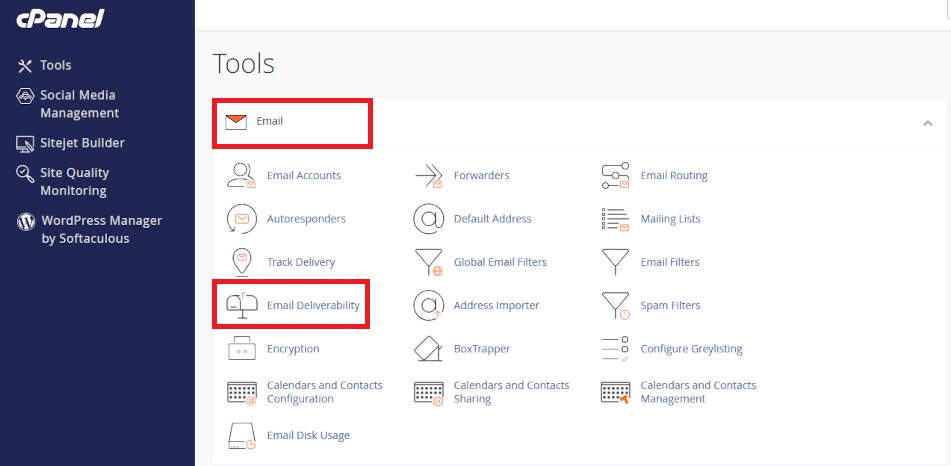
What to do in cPanel:
- Log into cPanel
- Go to Email > Email Deliverability
- Click open <Manage>
- Do not enable DKIM. Instead:
- Copy the TXT Name and Value fields shown for DKIM
- Add this TXT record to your DNS at GoDaddy
This allows receiving servers to verify that your server’s emails are legitimate.
6. DMARC (Domain-based Message Authentication, Reporting & Conformance)
DMARC tells receiving servers how to handle emails that fail SPF or DKIM checks. settings. This may already be established in your authoritative zone and that record would already be valid as long as:
- your SPF record already includes for your web server’s IP address
- or DKIM passes for your server (if you set it up)
Example
You can use the values suggested in cPanel > Email > Email Deliverability to create a DMARC record. DMARC uses an industry defined instruction set which is universally adhered to. For now, it is probably only necessary to operate DMARC in “test” mode. However, some services like Microsoft 365 may be sensitive (especially to “contact form” mail and require an elevated metric like p=quarantine.
Name: _dmarc.domainname.co.uk
Value: v=DMARC1; p=quarantine; rua=mailto:your-alias@domainname.co.uk
The three incremental states for DMARC are:
- p=none
- p=quarantine
- p=reject
8. cPanel Mail Routing
Lastly, check that your server expects email to be managed externally. As the records above are being added to your authotitative zone, cPanel will often detect that external email servers are now in use. However, you need to check this setting.
What to do:
- log into cPanel > Email > Email Routing
- check <Remote Mail Exchanger> if it is not already enabled
- save the setting
This ensures your server sends contact form emails to Microsoft 365 instead of trying to deliver them locally.
Testing and Summary
After updating your DNS:
- Use MXToolbox to check SPF, DKIM, and DMARC
- Send test emails from your contact form to Gmail or Outlook and inspect the headers
- Look for spf=pass, dkim=pass, and dmarc=pass
Summary
By configuring SPF, rDNS, DKIM, and DMARC correctly, your contact forms can send email reliably—even when Microsoft 365 or other suppliers handle your domain’s email. This setup helps prevent your messages from being flagged as spam and protects a client’s domain reputation and brand intact.
About ComStat.uk: Internet Service Provider Comstat provides IT support, web hosting, and media services including web design, Microsoft 365 setup, and audio/video production, serving businesses across Denbighshire, North Wales and Wirral from Ruthin, and Lancashire and the Northwest from Bolton.