
How to Use Outlook Sweep to Declutter Your Outlook Inbox

What Is Outlook Sweep and Why Should You Use It?

If your inbox is overwhelmed with newsletters, promotions, and recurring emails, use Outlook Sweep to help you regain control. Available in both the Outlook desktop app and Outlook Web Access (OWA), Sweep lets you create simple rules to automatically manage emails from specific senders. 

Sweep is especially useful for:

  • Automatically deleting old messages
  • Keeping only the latest email from a sender
  • Setting expiration rules for newsletters or updates

Whether you’re using Outlook at work or at home, Sweep can help you stay focused by reducing clutter and keeping your inbox tidy.

Click open the headers below to learn how to Outlook Sweep to manage your email Inbox. Support options are available for professional assistance.

How to Use Sweep in Outlook Desktop and OWA

Using Outlook Sweep is straightforward. Here is how to get started in desktop and web versions of Outlook.
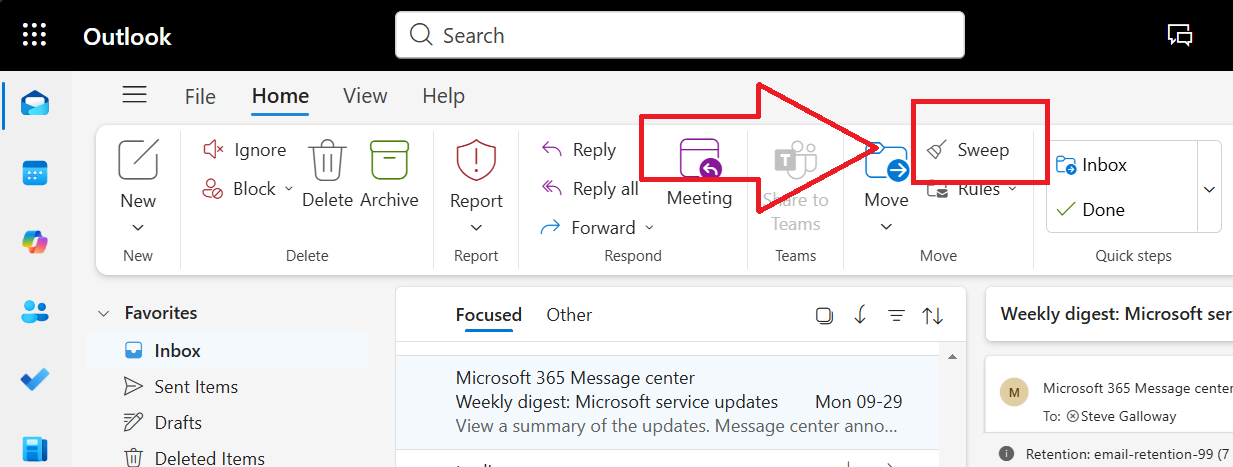
outlook sweep button

Outlook Sweep is available by default in Outlook toolbar. The button’s position differs according to how you might have customized your toolbar in Outlook desktop and OWA

 Outlook Sweep in Desktop App

  1. Open your inbox and select an email from the sender you want to manage.
  2. Click on the Home tab.
  3. Select Sweep from the toolbar.
  4. Choose one of the available options:
    1. Move all messages from the sender
    2. Always keep the latest message and delete the rest
    3. Delete messages older than 10 days
    4. Move messages to a folder

Outlook Sweep in Outlook Web Access (OWA)

  1. Log in to Outlook on the web (OWA).
  2. Select an email from the sender.
  3. Click the Sweep icon in the toolbar above your inbox.
  4. Choose your preferred rule and confirm.

These rules apply automatically to future emails from the same sender, saving you time and effort.

Smart Ways to Use Sweep: Real-Life Examples
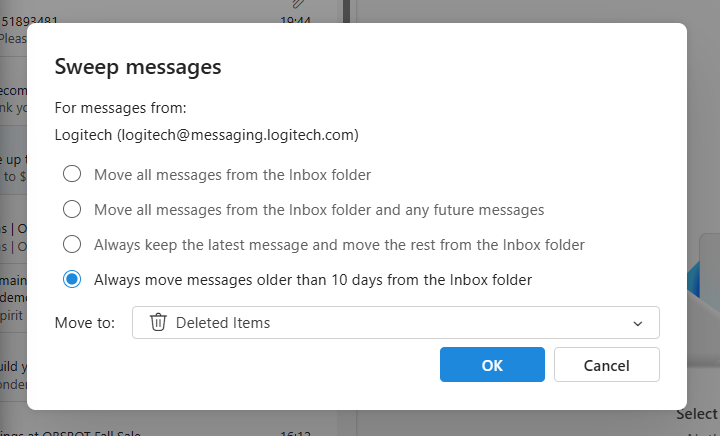
outlook sweep control panel

Outlook Sweep avoids the perceived complexity of Outlook Rules


Sweep does more than deleting emails—it’s about finessing your inbox. Here are a few clever ways to use it:

1. Scan and Auto-Delete Newsletters with Outlook Sweep

Often, we want to scan an incoming email newsletter but we do not need to see it again. You can use Use Outlook Sweep to delete messages older than 10 days. This gives you time to read the newsletter, and then purges the spent content to keep your Inbox clean.

2. Keep Only the Latest Update with Outlook Sweep

Some services send frequent updates—like DMARC delivery notifications, login confirmations, or system alerts. Use Sweep to keep only the latest message from the sender. This way, you always have the most current info without the clutter.

3. Organize by Category

You might want to keep promotional emails but store them separately. Use Outlook Sweep to move messages to a folder like “Promotions” or “Newsletters.” This keeps your main inbox clean while preserving the content.

See this 90 second video for other quick tips for dealing with unwanted emails in your inbox.

Summary
  • Combine Sweep with Rules and Focused Inbox for even better control.
  • Review your Sweep settings monthly to adjust for new senders or habits.
  • Don’t forget to check your folders—Sweep moves emails but doesn’t delete them unless specified.

Outlook Sweep is a simple and powerful way to automate your inbox management. User feedback suggests that it the utility plays an increasing way to surgically prune bloat from inboxes. Espeically as inboxes start reaching storage capacity, Outlook Sweep is a great way to delet email in bulk without having to scroll, select, and delete manually.

About ComStat.uk: Internet Service Provider Comstat provides IT support, web hosting, and media services including website design, Microsoft 365 setup, and audio/video production, serving businesses across Denbighshire, North Wales and Wirral from Ruthin, and Lancashire and the Northwest from Bolton.

How to Use Microsoft 365 MailTips to Improve Email Performance

Introduction: What Are MailTips in Microsoft 365?

Microsoft 365 MailTips are real-time alerts that appear while you compose emails in Outlook or Outlook on the web. These tips help users avoid common mistakes like emailing external recipients, contacting someone who’s out of office, or sending messages that are too large. MailTips are built into Exchange Online and are designed to improve communication and reduce email-related errors. Lastly, mailtips are managed at server level by an adminustrator in Exchange Admin Center (EAC).

Click open the headers below to learn how mailtips can help your users get more from their work with email. Be sure to contact us for advice if you are in doubt, or if you need to deal with bulk application of mailtips using Powershell.

How Microsoft 365 MailTips Work

When a user begins composing an email, Outlook queries the Exchange server to check for conditions that trigger MailTips. If any conditions are met, a notification appears instantly. These alerts are designed to be helpful and informative. For instance, a mailtip might be established to warn a user if a file attachment would cause the email to exceed email size limits. 

Common MailTips Include:

  • Message size limit warnings
  • Notice that a colleague has configured Automatic Out-of-Office replies
  • Warning of Large distribution list in send:, cc:, and bcc: fields
  • Restricted recipients

Configuring Microsoft 365 mailtips like these help users make smarter decisions before sending emails.

MailTips Limitations and Alternatives

MailTips do not scan email content for sensitive data like credit card numbers. For that, use:

  • Data Loss Prevention (DLP): Detects and blocks sensitive content.
  • Sensitivity Labels: Automatically classify and protect emails.

For example, in situation where it is inappropriate to include a full length credit card number in an email, conditions can be configured to automatically obscure all but a few numbers of the card as the server processes the outgoing email, ask the sender to edit the email, or block the email. In this way, Exchange Online can activeley monitor email traffic to help a business control personal data that might lead to loss ofr damage to customers. These utilities are especially useful in financial services and medicine.

DLP and Sensitivity labels are subject to adequate Microsoft 365 licensing – please ask if you need more information.

Example: Setting Up a MailTip for Large Attachments

Microsoft 365 allows admins to configure MailTips that warn users when their email might exceed the organization’s size limits. While the maximum message size can be set up to 150 MB, the default is often 25 MB or 35 MB, depending on your configuration. In theory, Microsoft 365 can handle large attachments. However, this causes problems for server storage at scale, and large emails are often dropped by external servers as they pass to recipients. For large files, use file sharing with links to files stored in OneDrive and Sharepoint.

Use this workflow to establish a custom Mailtip to warn users about large attachments:

Step-by-Step Guide Using Exchange Admin Center (EAC)

  1. Log in to the Exchange Admin Center\ Navigate to https://admin.exchange.microsoft.com and sign in with your admin credentials.
  2. Go to Recipients > Mailboxes\ Select the mailbox you want to configure.
  3. Open Mailbox Properties\ Click the mailbox name to open its details pane.
  4. Navigate to Others > Manage MailTip\ In the flyout panel, find the Manage mail tip option.
  5. Enter Your Custom MailTip\ Example:\ “Warning: This mailbox has a 25 MB attachment limit. Large files may cause delivery failure.”
  6. Save Changes\ Click Save to apply the MailTip.

!!! Note: MailTips are limited to 175 characters and support basic HTML formatting.

Optional: Use PowerShell for Bulk Configuration

If you need to handle several email accounts, it is easier to do this using Powershell to perform a batch operation. Powershell can be used to manage this indivdually, too. Powershell is beyond the scope of this article, and if you need help with Powershell, please contact us.

Summary

Microsoft 365 MailTips helps prevent email errors and improves communication. By configuring Microsoft 365 MailTips—especially for common issues like large attachments—admins can reduce support tickets, avoid non-delivery reports, and maintain a professional email environment.

About ComStat.uk: Internet Service Provider Comstat provides IT support, web hosting, and media services including website design, Microsoft 365 setup, and audio/video production, serving businesses across Denbighshire, North Wales and Wirral from Ruthin, and Lancashire and the Northwest from Bolton.

How to Manage Microsoft 365 Email Signatures for Small Business Admins

Why Email Signatures Matter for Small Businesses

Microsoft 365 email signatures are more than just contact details—they’re a branding tool, a compliance requirement, and a way to maintain professional consistency across your organisation. In small businesses, it’s common for employees to create their own signatures in Outlook or Outlook Web App (OWA). While this offers flexibility, it can lead to:

  • Inconsistent branding
  • Broken formatting
  • Blocked images
  • Compliance risks

To avoid these issues, Microsoft 365 offers both user-level and server-level options for managing email signatures. Lastly, email signatures can be used as a method for generating email templates.

Click open the headers below to learn how to use Microsoft 365 email signatures. Please read through this entire article before starting the proceudure. Be sure to contact us for general advice if you are in doubt. Support options are available for professional assistance.

User-Level Signature Management

Admins can guide users to create their own signatures in Outlook or OWA. This is suitable for small teams but requires oversight to ensure consistency.

How to create a signature in Outlook (Desktop)

  • Go to File > Options > Mail > Signatures
  • Click New, name your signature
  • Add contact info, branding, and disclaimers
  • Set default signature for new emails and replies

How to create a signature in Outlook Web App (OWA)

  • Go to Settings > Mail > Compose and Reply
  • Create or edit your signature
  • Choose when it should be applied (new messages, replies)

Formatting tips

  • Use web-safe fonts (e.g., Arial, Calibri)
  • Avoid large images or logos that may be blocked
  • Keep layout simple for mobile compatibility
Server-Level Signature Management with Microsoft 365

For better control, admins can create organisation-wide signatures using Exchange Online mail flow rules. Using Microsoft 365 email signatures this way prevents end users from using email signatures that could be inaccurate or misleading. It gives your business the chance to guarantee uniformityy and accuracy.

Benefits

  • Centralised management
  • Consistent branding
  • Automatic application to all outgoing emails

How to set up server-side Microsoft 365 signatures

  1. Go to Microsoft 365 Admin Center > Exchange Admin Center
  2. Navigate to Mail Flow > Rules
  3. Create a new rule: “Apply disclaimers or signatures”
  4. Set conditions (e.g., apply to all users or specific groups)
  5. Add HTML-formatted signature content
  6. Save and test the rule

Note: Server-side signatures are appended after the email is sent, so users won’t see them while composing.


Using Signatures as Email Templates

Signatures can also be used creatively as email templates. This is useful for:

  • Customer service replies
  • Standard form memos
  • Internal announcements

How to use signatures as templates using Outlook (Desktop) or Outlook OWA

  • Create multiple signatures for different scenarios
  • Include full email body text along with contact info
  • Select the appropriate signature when composing a message

Using Microsoft 365 email signatures this way is a creative solution for quickly inserting pre-written content, saving time and ensuring consistency. Micrsoft Outlook does provide a utility for template generation, however user feedback indicates that Outlook’s approach to generating templates is awkward. Another solution for templates is to use Outlook’s Resend Message option. See this article for help with “Resend Message”

Summary

Microsoft 365 email signatures maintain professionalism, brand identity, and compliance. Whether you choose user-level or server-level management—or a mix of both—make sure formatting and image use are carefully considered, and check output with users in Gmail and Apple envirnments to check how your output works. Lastly, do not overlook the power of signatures as a simple way to build a library of reusable email templates.

About ComStat.uk: Internet Service Provider Comstat provides IT support, web hosting, and media services including website design, Microsoft 365 setup, and audio/video production, serving businesses across Denbighshire, North Wales and Wirral from Ruthin, and Lancashire and the Northwest from Bolton.

How to add a new employee with Microsoft 365 User Onboarding

Introduction to Microsoft 365 User Onboarding

When a new employee joins your business, setting them up with Microsoft 365 is a straightforward process—but it is important to follow best practices to ensure security, productivity, and compliance. This guide outlines Microsoft’s conventional workflow for onboarding a standard user with a Microsoft 365 Business or Enterprise license.

Step 1: Create a New User Account

Microsoft 365 user onboarding begins with a Global Administrator creating a new user in the Microsoft 365 Admin Center. This includes:

  • Assigning a primary email address (e.g., john.doe@yourcompany.com)
  • Optionally adding email aliases (e.g., sales@yourcompany.com), which forward incoming mail to the primary address.

Note: Additional aliases cannot send or receive mail independently unless they are assigned a separate paid license. If you are creating the first user for a Microsoft 365 tenancy, make sure that your domain name is verified and your organization’s naming conventions for email addresses are followed.

Step 2: Assign a Microsoft 365 License

Once Global Administrator has created a new user, the the next step in Microsoft 365 user onboarding is to assign a license. This can be done in three ways in Microsoft 365 Admin centre > Billing > Licenses:

  • Using an available license
    • If your tenancy already has unused licenses, these can be assigned directly.
  • Reassigning licenses
    • Licenses are portable and can be removed from one user and reassigned to another as needed.
  • Buy a new license
    • Licenses typically include access to Exchange email only (Outlook), and more fully specified licenses include Outlook, Teams, OneDrive, SharePoint, and Office apps, depending on the plan.

Once you have an available license, this can be assigned to the user.

Step 3: Configure Multi-Factor Authentication (MFA)

This stage of Microsoft 365 user onboarding is for your new employee to organize. Security is critical in commercial situations because of your business’ oblgations under GDPR. Microsoft recommends enabling MFA for all users. Here’s how a new user can set multifactor authentication using their mobile phone:

  • Install Microsoft Authenticator from the App Store or Google Play.
  • Sign in to the app using their Microsoft 365 credentials.
  • Scan the QR code provided during the MFA setup process.
  • Enable backup in the Authenticator app to protect against device loss. This requires either a personal Microsoft account or an iCloud account so that Microsoft Authenticator can stores credentials securely in the cloud in awa that users can get to backups if they cannot access their Microsoft 365 account.

For complete notes about configuring Microsoft Authenticator, see this article.

To learn how to backup accounts in Microsoft Authenticator, see this article.

Step 4: Prepare Supporting Documentation

To ensure your employee’s Microsoft 365 user onboarding experience, provide the new user good documentation. This might include:

  • A welcome email with login instructions
  • A guide to using Microsoft 365 apps
  • MFA setup instructions
  • Company policies and acceptable use guidelines

These documents can be stored in SharePoint or sent via email. Usually, businesses include Microsoft 365 app guidance within company/IT policies.

When introducing the new user to their Micrsoft 365 account, include guidance on how to fill in their contact details in their profile. This improves their forward-facing identification when using Teams and other Microsoft 365 sharing services.

Additional Considerations for Microsoft 365 user onboarding

Before provisioning a license, consider:

  • Group membership: Assign users to relevant Microsoft 365 groups for access control.
  • Role-based access: Ensure the user has the correct permissions for their job function.
  • Device management: If using Intune, enroll the user’s devices for compliance and security.
    • This feature is usually a Microsoft 365 Enterprise licensing issue.
Summary

Microsoft 365 user onboarding is efficient and scalable. By following these steps, businesses can ensure that new employees are set up securely and productively from day one. Licenses are flexible, MFA enhances security, and aliases streamline communication—all managed easily through Microsoft 365 Admin Center.

About ComStat.uk: Internet Service Provider Comstat provides IT support, web hosting, and media services including website design, Microsoft 365 setup, and audio/video production, serving businesses across Denbighshire, North Wales and Wirral from Ruthin, and Lancashire and the Northwest from Bolton.

How to Manage Microsoft 365 When an Employee Leaves Your Business – Microsoft 365 offboarding

About Microsoft 365 Offboarding

When an employee leaves your business, it’s essential to handle their Microsoft 365 account properly to protect company data, maintain continuity, and ensure compliance. This is called Microsoft 365 offboarding. For small businesses, the procedure is managed by Global Administrator.

This guide outlines Microsoft’s recommended workflow for managing a departing user with a Microsoft 365 Business or Enterprise license, including email, OneDrive, SharePoint, Teams, and license reassignment. For users who only rely on email, the process for offboarding only includes email account processing.

Step 1: Disable Sign-In and Inform IT

Before making any changes, disable the user’s sign-in access via the Microsoft 365 admin center. This prevents unauthorized access while allowing administrators to manage the account.

  • Go to Users > Active Users
  • Select the user
  • Under Account, toggle Block sign-in to Yes

This step ensures the account remains intact while you prepare for data transfer and reassignment.

Step 2: Convert the Account to a Shared Mailbox

If the user had important email communications, you can convert their mailbox to a shared mailbox. This allows managers or team members to access the mailbox without consuming a license. Shared accounts do not require a subscription.

  • In Exchange Admin Center, select the user’s mailbox
  • Choose Convert to shared mailbox
  • Assign permissions to relevant users (e.g., manager or supervisor)

Note: Once converted, you can remove the license without losing the mailbox data.

Step 3: Reassign Ownership of Groups, Teams, and SharePoint Sites

Microsoft 365 users often own resources like Microsoft Teams, Microsoft 365 Groups, and SharePoint sites. These must be reassigned to avoid orphaned content. When managing a departing employee during Microsoft 365 offboarding:

  • Use Microsoft 365 Admin Center or PowerShell to:
    • Add a new owner to Teams and Groups
    • Transfer SharePoint site ownership to a global admin or supervisor.

This ensures continuity and prevents access issues for remaining team members.

Step 4: Transfer OneDrive Files

OneDrive files should be preserved and transferred to another user before deleting the account.

In Microsoft 365 aAdmin Centre:

  • Go to Users > Active Users
  • Select the user and choose OneDrive
  • Click Create link to files
  • Share the link with the manager or IT admin
  • Use PowerShell or admin tools to move files to another user’s OneDrive or SharePoint*

* At the simplest level, user with permission to files can download content and upload to new storage locations.

Files remain accessible for 30 days after license removal, so Microsoft recommends transferring files promptly.

Step 5: Remove License and Reassign to New Employee

Once data is secured and ownership reassigned, you can remove the license from the departing user.

  • Go to Billing > Licenses
  • Unassign the license from the old user
  • Assign it to a new employee who has already been added to your tenant

Microsoft 365 licenses are portable, meaning you can reassign them without purchasing a new license. This keeps costs down and simplifies onboarding. If you need to cancel the license because it is no longer needed, you can now cancel the license.

Summary

Using these recommended procedures for Microsoft 365 offboarding ensures a smooth transition and ensures continuity of access to email, files, and other content. By converting mailboxes, transferring files, and reassigning licenses, you maintain productivity and data integrity. Always follow Microsoft’s best practices to avoid disruptions and keep your digital workspace secure.

Final Checklist Before Deleting the Account

  1. Block sign-in access
  2. Convert mailbox to “shared” status
  3. Reassign Teams, Groups, and SharePoint ownership
  4. Transfer OneDrive files
  5. Remove license and reassign
  6. Delete the user account (optional, after 30 days)

About ComStat.uk: Internet Service Provider Comstat provides IT support, web hosting, and media services including website design, Microsoft 365 setup, and audio/video production, serving businesses across Denbighshire, North Wales and Wirral from Ruthin, and Lancashire and the Northwest from Bolton.