5 Best Calendar Booking Widgets for Sitejet Websites in 2025

Introduction

Calendar booking widgets are ideal for integrating with your Sitejet web site to allow customers, clients or patients to book appointments, reserve fixed-time slots, or buy tickets for events. Here, we explore widely used calendar booking widgets that work well with Sitejet. We will also explain how to embed calendar booking widgets easily—even if you are new to web design.

Click open the headers below to find out how more about expanding Sitejet Builder’s functionality with leading calendar booking widgets.

How to integrate your Calendar in Sitejet

Sitejet Builder makes it simple for you to add third-party calendar booking widgets, and for that matter any kind of widget, to your website. Here’s how:

Embed a calendar booking widget with a Sitejet element

  1. Use Sitejet Builde’s HTML Element: In Sitejet’s editor, drag and drop the “HTML” element onto your page.
  2. Paste the Embed Code: Copy the embed code from your chosen calendar tool and paste it into the HTML box.
  3. Preview and Publish: Click “Preview” to see how it looks, then publish your site when ready.

Link your web page to a third party calendar host

Alternatively, you can link to an external booking page hosted by the calendar provider. This is useful if you prefer not to embed anything directly. If you do this, you may need to review the candar host’s terms and conditions to satisfy yourself that personal data is properly safeguarded for GDPR purposes.

1. Microsoft Bookings (For Microsoft 365 Users)

Microsoft 365 subscribers with 365 Business or Enterprise licenses can integrate Bookings into their existing Exchange calendars. This provides GDPR compliance “out-of-the box” that many other calendar solutions do not provide. If Bookings is included in your subscription, there really is not a lot of point considering other calendar booking widgets. This is because Bookings leverages Microsoft’s dominant Exchange platform and provides options for multiple calendars, services, and much much more.
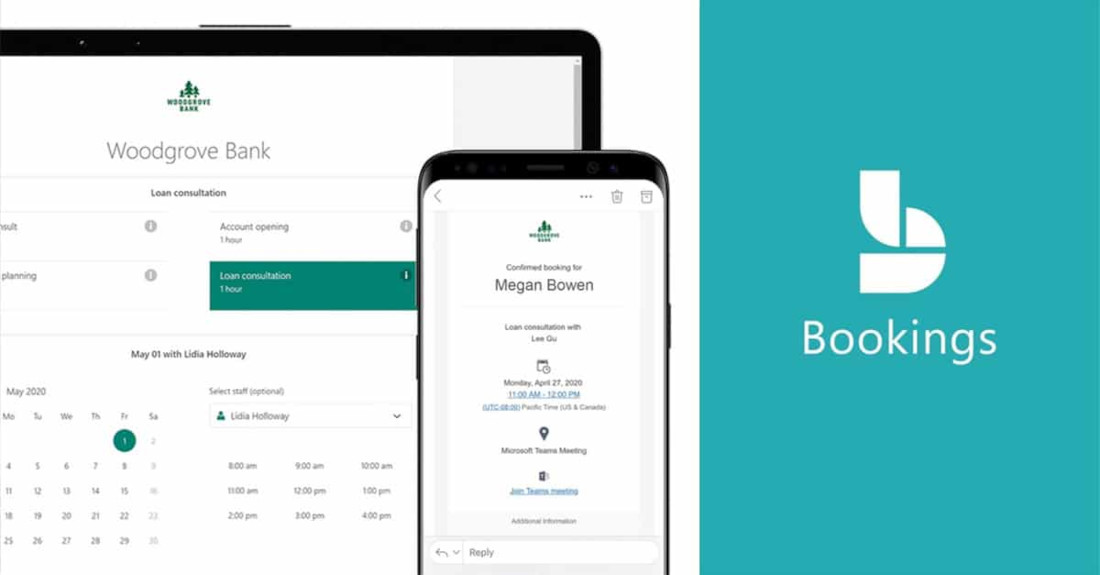
Microsoft 365 Bookings

Strengths

  • Seamless integration with Outlook and Teams
  • Customizable booking pages for individual staff or teams
  • Automatic email/SMS reminders (subject to geographical/license) to reduce no-shows
  • Excellent booking reliability per Exchange’s Enterprise-grade Activesync
  • Secure data storage within Microsoft 365

Weaknesses

  • Requires a Microsoft 365 subscription (Business Basic or higher)
  • Limited branding customization compared to other tools

Best For: Consultants, therapists, and solo practitioners. ComStat.uk uses Microsoft 365 Bookings to enable end users to book services – click here to view the page. This page is configured for servicing IT. Bookings can be flexibly configured within Microsoft 365 to suit industry sectors.

2. Calendly

Calendly is one of the world’s most wodely subscribed custom booking widgets. It is a leading scheduling platform with over 10 million users and a 21.45% market share, making it one of the most dominant tools in the appointment booking space. Its major features include seamless calendar integration (Google, Outlook, iCloud), automated reminders, timezone detection, and compatibility with over 100 apps like Zoom, Slack, and Salesforce. With 2.145 million paying customers and over 57,000 businesses using it globally, Calendly is especially popular among professionals and teams seeking a simple, user-friendly way to manage meetings and appointments.
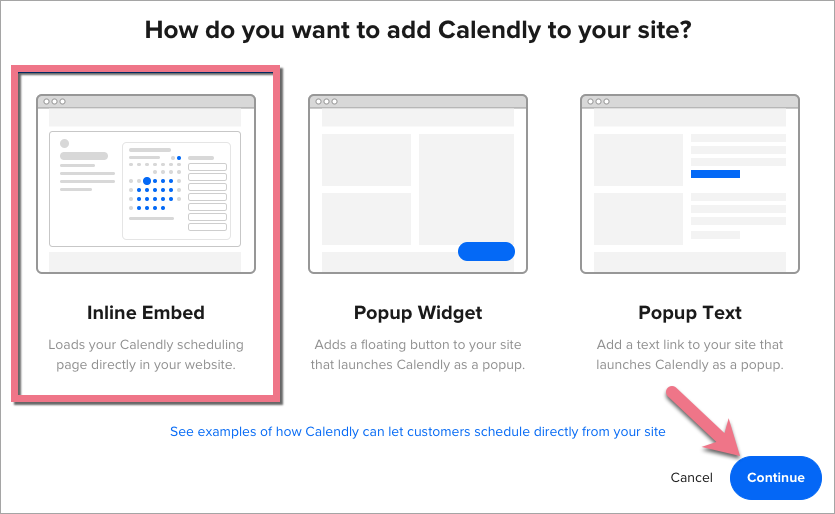
add calendly to website

Strengths:

  • Easy to use and set up
  • Integrates with Google, Outlook, and iCloud calendars
  • Supports payments via Stripe and PayPal
  • Offers automated reminders and timezone detection

Weaknesses:

  • Free version has limited customization
  • Branding options are restricted unless you upgrade

Best For: Consultants, therapists, and solo practitioners.

3. Common Ninja Calendar Widget

Common Ninja Calendar Widget is a flexible and visually appealing solution for displaying events on websites, catering to businesses, event organizers, and bloggers. It supports customizable designs, responsive layouts for mobile and desktop, and integration with popular calendar services like Google Calendar. Its ease of use and aesthetic focus make it ideal for users seeking a professional-looking event display without complex setup.
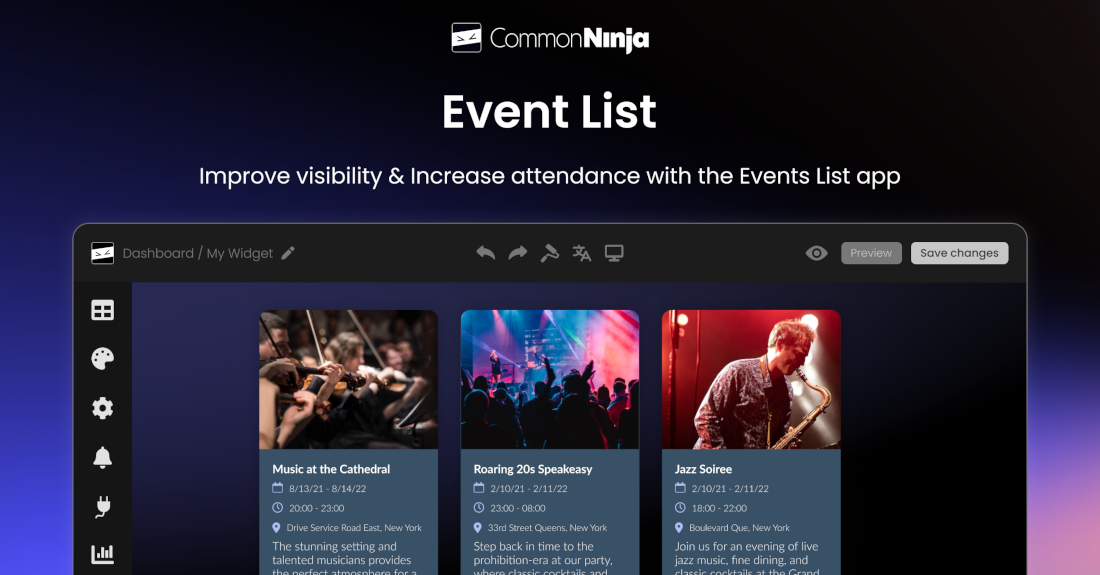
Common Ninja Calendar Widget

    Strengths

    • Drag-and-drop HTML embed setup
    • No technical knowledge required
    • multiple skins, color options, and layout views
    • add images and media to calendar entries

    Weaknesses

    • No built-In booking or Payment System
    • Best suited for basic booking needs
    • Intended for event display, does not handle bookings natively

    Best For: no-code deployment of visually impactful event showcasing

    4. Google Calendar

    Google Calendar can accept bookings from guest users, including those who do not have a Google account, through its Appointment Schedules feature.  This makes Google Calendar a viable option for professionals and clinics who want to offer easy, no-login-required appointment booking. However, most people use Google Calendar in it consumer “free-to-use” offering, which poses risks for data protection. Also, Google does not provide any Service Level Agreement in its consumer product, so this should be considered carefully in cases where data is sensitive and critical.

    5. Elfsight Appointment booking widget

    Elfsight Appointment Booking  is a popular resource for all kinds of website widgets. Indeed, Wix and Shopify users are no strangers to Elfsight’s widget library, including their flexible appointment and even calendars for small businesses, clinics, and service providers to streamline online appointment scheduling. The scheduler offers customizable calendar booking widgets with service descriptions, pricing, durations, and availability settings, along with automated email confirmations and Google Calendar integration to prevent double bookings. Trusted by over 2 million users, it is ideal for those seeking a professional, branded booking experience without needing technical expertise.

    elfsight

    Strengths

    • Easy Integration with Sitejet
    • Google Calendar Sync
    • Customizable and Professional Design

    Weaknesses

    • No Built-In Payment Processing
    • Basic Rescheduling, advanced workflow and Confirmation procedure

    Best for: not-for-profit organizations or social networking

    Summary

    Choosing the right calendar widget depends on your needs, budget, and technical comfort level. For Microsoft 365 users, Microsoft Bookings is a natural fit. If you’re in healthcare, Carepatron (not listed here) offers a robust free solution beyond  the scope of bookings. Common Ninja Calendar Widget is ideal for publiscising events. For general use, Calendly and  Google Calendar are reliable and widely adopted.

    About ComStat.uk: Internet Service Provider Comstat provides IT support, web hosting, and media services including website design, Microsoft 365 setup, and audio/video production, serving businesses across Denbighshire, North Wales and Wirral from Ruthin, and Lancashire and the Northwest from Bolton.

    Move a Sitejet website from a subdirectory to the root in cPanel

    Move your website without losing anything

    When you have built your Sitejet website in a subdirectory of the public_html folder on a virtual server managed by cPanel, the next stage is to move the website to the root directory of your public_html directory. Developers and novice IT users build websites this way to keep their live site untouched during development of their new content. Now you are ready to go live, it is time to move your Sitejet website to your web server’s root directory — and possibly replace an existing WordPress or other site.

    This guide walks you through the process step-by-step, including how to back up your Sitejet website content, avoid common pitfalls, and enjoy a smooth transition.

    Click open the headers below to find out how to publish your Sitejet website in your root directory.

    Step 1: Backup your Sitejet website first

    Before making any changes to your web site location, back up your Sitejet website using Sitejet’s built-in tools first. This is crucial in case something goes wrong during the move.

    To back up your Sitejet site:

    1. Log into your Sitejet dashboard.
    2. Navigate to the project you want to back up.
    3. Use the Export or Backup feature to download your site files.
    4. Save the backup locally or to cloud storage.

    This ensures you have a full copy of your site, including HTML, CSS, JS, and media files.

    Step 2: Prepare your web server's root directory

    Your Sitejet site will replace the current contents of the root directory (public_html). If there’s an existing WordPress or other site, you’ll need to:

    1. Backup your existing website using cPanel’s File Manager or your WordPress backup plugin if you use one.
    2. Delete or rename the current index.php or index.html file to avoid conflicts.
    3. Check for hidden files like .htaccess that might affect redirects or permissions.

    You could rename a file like index.php or index.html to “index-old.php” or “index-old.html”. This way you can always the change the file name back to its original name to restore the file if you need to. Also, when checking for hidden files, it is a good idea to edit File Manager settings to “hide” files again. System files that have global significance to your web site are often hidden to prevent accidental delation during daily management.

    Step 3: Move Sitejet files to your root directory

    Understand Sitejet’s File Structure and Editing Model

    When you publish a Sitejet website to a subdirectory (e.g., public_html/sitejet), Sitejet manages your website files there and allows you to edit content using Sitejet builder.

    You could manually move your Sitejet files to the root (public_html) directory. If you do this, however, The pages will be rendered as static pages. When this happens, Sitejet will no longer recognize or manage those pages. There are some reasons why you might want to do this. However, it is likely that you would want to continue to edit and develop your website. Therefore, you can move the website to root and continue to edit it by changing the “publish path” in Sitejet Builder.

    Change the Publish Path in Sitejet

    In case you have not completed Step 2 above, be sure that you have done these things if you have an existing web site in root first:

    1. Back up any existing site (e.g., WordPress) using cPanel File Manger > Backup or a WordPress plugin.
    2. Remove or rename conflicting files like index.php, index.html, or .htaccess.
    3. Ensure the root directory is clean to avoid file conflicts.

    This helps Sitejet publish cleanly and ensures your domain loads the correct content.

    After making sure you have backed up any existing website in your root directory, this is how to relocate your website to your web server’s root directory so that you can continue to edit the website with Sitejet:

    1. Log into Sitejet and open your project.
    2. Go to Project Settings > Publishing.
    3. Change the publish path from /sitejet (or your current subdirectory) to /public_html or simply / depending on how Sitejet references the root.
    4. Save the changes
    5. Publish the website.

    This way, Sitejet will deploy your website directly to the root directory, replacing any existing content there.

    Step 4: Test and Confirm

    Once you have published your web site to its new location in Sitejet Builder:

    • Visit your domain (e.g., yourdomain.com) to confirm the Sitejet site is live.
    • Log into Sitejet and verify you can still edit the site.
    • Check for broken links or missing assets — especially if your site previously referenced the subdirectory.

    Final notes:

    • Do not manually move files from the subdirectory to the root if you want to keep editing access.
    • Always use Sitejet’s publishing tools to relocate the site
    • If you’re unsure about the correct publish path, Sitejet support can help confirm it based on your server setup.

    About ComStat.uk: Internet Service Provider Comstat provides IT support, web hosting, and media services including website design, Microsoft 365 setup, and audio/video production, serving businesses across Denbighshire, North Wales and Wirral from Ruthin, and Lancashire and the Northwest from Bolton.

    Adding background images with Sitejet

    Background images in web pages

    This note briefly describes how to use background images with Sitejet. Bcckground images are difficult for a few reasons. The biggest problem is rendering an image, or a repetition of an image as a “tiles” so that it appears consistently on large screens, laptops, tablets, and mobile devices. For background images, consider using expert help.

    sample background image

    In this example, a website owner uses a semi-transparent section to overlay a background image.

    Click on the headers below to learn more about managing background images using Sitejet Builder’s “no-code” option.

    Where does the image belong?

      A web page is not like a sheet of A4 paper – unless we specify an area in which to contain our content, a web page has limitless dimensions. So, the first issue to decide is where does an image belong?

      Web site layout elements

      Conventionally, a web page has a global element called a CONTAINER. Within a container there can be one or more SECTIONS, which in turn can have one or more MODULES.

      Background images can be inserted in any of these elements. A background image can fill an entire container, or it can fill an element as finite as a row within a module. An image can fill any element in between. An image could include a simple solid fill colour like light grey to distinguish between alternate rows.

      How big should the image be?

      Image dimensions

      Unfortunately, what works for one web site may be disastrous elsewhere, and image content itself can become a problem. You may have to crop or scale an image after seeing what it looks like when you insert the image into a background.

      The best starting point is an image that measures 1920w x 1080h. This will usually resolve satisifactorily for desktop/laptops. However, background images need to be sized differently for tablet and mobile, so you may need 2 or 3 images which can be called upon to suit viewers’ devices. However, this is not an absolute rule. Headers (especially) and sections/rows may require a sizizing compromise to work efficiently with a page layout.

      File size and type

      Files should be no more than 500KB. For home use, file size is not critical, however mobile users may experience slow page loads in areas where mobile coverage is minimal, and those who carry minimum data limits are more susceptible to possible service drop-outs as they reach monthly targets.

      webp may be desirable file formate for images that tend to err towards large file sizes. jog/jpeg is a standard file format for static images, and png is used for images where image transparency or other effects are required. 

      Image Considerations

      How the image is programmed depends on a few factors. For instance, you may want a static image that “covers” the container area. A background image can be anchored to text as you scroll, but it can remain static so that text moves as you scroll. Also, a background image may need to have some opacity – i.e. fading so that textual content is clearly legible. This can be handled by your desktop graphics software before you add the picture to your web site image library. Or a background image can be managed by introducting “opacity” or “transparency” in html coding on your web site dashboard. This can make an image look like a watermark when heavily applied. If you are using a pattern, it would be possibe to use a small square or rectangular image which your web server replicates across a container area.

      Embedding background image using Sitejet dashboard

      This workflow is for a situation where an image is to be applied to a website page “container”. The options are available at section and module levels.

      1. Select the Container: Click on the container you want to edit.

      2. Open the Style Settings: In the right-hand panel, go to the “Style” tab.

      3. Background Settings:
          • Scroll to the Background section.
          • Choose “Image” as the background type.
          • Click to upload or select an image from your media library.

      4. Adjust Display Options:
          • Set background size (e.g., cover, contain).
          • Choose position (e.g., center, top-left).
          • Set repeat options if needed.
          • Optionally, add a background overlay for contrast.

       Options like “cover”, “contain” and placement all have drastic effects on rendering and may need individual configuration for tablet and mobile view. 

      Summary

      Background colours, like a light grey or light blue solid colour, are effective and easily implented. Background images can be visually appealing, but are awkward to render and are probably better reserved for expert intervention unles you are prepared to spend a lot of time configuring layout settings. You can use Sitjet’s “no-code” approach to configure background images at container level, and the principle applies to section and module elements. Advanced effects may require using the HTML authoring tool in sitejet to configure xHTML features.

      About ComStat.uk: Internet Service Provider Comstat provides IT support, web hosting, and media services including web design, Microsoft 365 setup, and audio/video production, serving businesses across Denbighshire, North Wales and Wirral from Ruthin, and Lancashire and the Northwest from Bolton.