
How to Set Up Microsoft Authenticator MFA for 365
Introduction: Why MFA Setup in Entra Matters
Multi-Factor Authentication (MFA) is the principal sign-in method for Microsoft 365 accounts. Microsoft Authenticator MFA for 365 setup establishes a vital layer of protection by requiring you to verify your identity using more than just a password. Your Microsoft 365 tenancy manages MFA from its Entra portal. not your Microsoft 365 admin dashboard.
This guide helps you understand how Microsoft Authenticator MFA for 365 setup works, including:
- Logging into Microsoft Entra with your 365 credentials to configure Microsoft Authenticator.
- Enabling SMS authentication (if your tenancy is configured to allow this).
- Adding a second device for secondary/fallover access
Read our associated article discusses how to backup your MFA credentials. For support notes about restoring services to Microsoft 365 when your MFA credentials are lost, read this article.
Click open the headers below to learn how to create your MFA credentials. Please read through this entire article before starting the proceudure. Be sure to contact us for general advice if you are in doubt. Support options are available for professional assistance.
What Is Microsoft Entra and Why Use It for MFA?
MFA procedures are consistent with an industry move towards passwordless sign-ins. Consumer-level password protection in Gmail, Yahoo, and other platforms is convenient, but password protection alone is inadequate for meeting GDPR Compliance standards in commerce. Even consumer platforms like Gmail now encourage passwordless sign-in. MFA helps to:
- Ensure your 365 account remains accessible
- Helps build compliant GDPR practices
- Reduce the risk of malicious infiltration and identity theft
Microsoft Entra centralizes your security settings, including MFA, passwordless login, and device authentication. If you are a Microsoft 365 user, you or your organization are already using Entra within your tenancy. So, you are not required to subscribe to Entra as an additional service for Microsoft Authenticator MFA for 365 setup.
Benefits of Using Entra for MFA
- Centralized control over authentication methods
- Enhanced security with multiple verification options
- Flexibility to add or remove devices securely
- Compatibility with SMS, app-based, and hardware token methods
Moving towards passwordless sign-in
The IT industry as a whole recognizes that password protection alone is flawed. So, MFA is increasingly adopted as industry players introduce secure passwordless security. This means that MFA, and similar technologies like 2FA, are here to stay. We can argue that you should adopt MFA to comply with GDPR. Instead, the bigger issue is the risk of catastrophic damage damage to your online identity and data. This way, the fact that MFA is “compliant” is incidental.
This is why MFA is the default sign-in method for Microsoft 365, so you and other users in your 365 tenancy users must configure at least one secure MFA method. This is most conveniently accomplished with Microsoft Authenticator app. SMS authentication is optional and we recommended that you use it as an secondary option for sign-in, especially if your tenancy supports SMS authentication. In situations where we have configured 365 MFA for you, or you retain us to support your Microsoft 365 tenancy, we usually configure support for SMS by default.
Step-by-Step: How to Set Up Microsoft Authenticator in Entra
reparation – what you need
MFA pairs your phone with your 365 account. So, you will need your mobile phone. Also, before you begin, check that your Microsoft 365 tenancy supports SMS authentication for end users and that you have access to your usual laptop or desktop computer. If you are not Global Administrator, you can check with your IT manager.
Allow for some flexibility in this workflow. For instance, it might be worth downloading Microsoft Authenticator App from either Apple App Store (iOS) or Google Play Store (Android) before you start. For instance, it is a good idea to check that your phone is capable of downloading Microsoft Authenticator before you begin. If your mobile phone is outdated or unsupported, Microsoft Authenticator App will not be available to you in your store. If so, consider upgrading your device or using SMS authentication.
Workflow to Set Up MFA with Microsoft Authenticator for 365
- Log into Entra Security Info Portal with your laptop/desktop computer:
- Visit https://mysignins.microsoft.com/security-info
- Sign in using your Microsoft 365 credentials.
- Add Microsoft Authenticator:
- Click + Add sign-in method
- Choose Authenticator App
- Follow the prompts to install the app on your mobile device
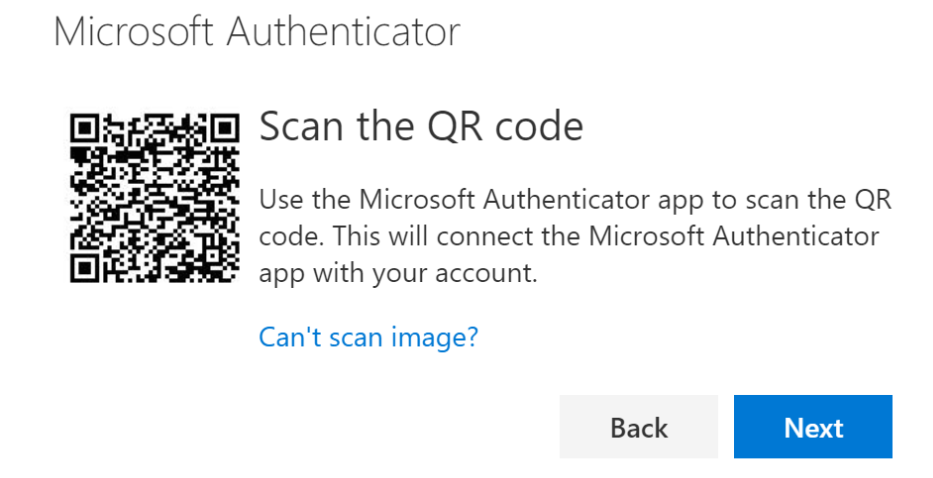
- When you reach a screen showing a QR phone, set your computer aside with the QR code displaying on screen
- Configure your mobile phone:
- On your mobile device, go to the App Store (iOS) or Google Play (Android).
- Search for Microsoft Authenticator and install it.
- With Microsoft Authenticator App open:
- click + (i.e. add account) at top right or left of your screen
- click open the option to scan QR code
- Allow permissions for your app to use your camera
- Scan the QR code showing on your computer screen with your phone
- go back to your computer and click Next
Remember to click
Once you have successfully scanned the QR code with your phone and clicked <Next> on your computer’s security center page (below the QR code), the process is complete. There are two more steps for you to take:
- Test your configuration:
- Entra will send you an MFA input code to test the setup as soon as the server detects the succesful QR scan. The procedure operates in the same way as SMS verification, but using Microaoft Authenticator App. The graphic at the top of this article demontrates what you can expect to see. Having gone to so much trouble to get this far, allow yourself the thrill of seeing this work – it is actually pretty cool!
- Review Microsoft Authenticator App settings, and also your mobile phone settings if necessary to choose personal preferences. For instance:
- You may want verification to include the added security of validating your fingerprint or retina.
- In some instances, your phone might ask you to sing into your phone before you can access Authenticator. Some people prefer this. Others prefer to bypass their phone sign-in screen so that they can respond to their MFA codes faster. This is a matter for personal preference.
- Lastly, you should enable backups and accept periodic updates.
Additional authentication methods using Microsoft Authenticator MFA for 365
The steps above are needed to minimally configure Microsoft Authenticator MFA setup. Read the next section to learn how to add optional authentication using SMS for redundancy.
Also, you can configure Microsoft Authenticator MFA for 365 with a second mobile phone. This is useful where in situations where an email account is shared between two geographically separate offices. Also, setting up Microsoft Authenticator MFA for 365 on an extra phone might be useful in situations where the first phone is at risk of loss or damage.
Create another Global Administrator account
Another way to protect access to your tenancy is to create another Global Administrator. You do not need to have a Microsoft 365 license to add a Global Administrator, and in large organizations the principal Global Administrator does not even use an email account – that way sensitive server-side functions can be handled without the usual risks associated with an email-enabled user. There are some considerations that need addressing to elevate privileges to enable some seucurity functions that are normally reserved for the tenancy owner. We can help configure a secondary Gloabl Administrator.
MFA - What To Do If You Change Your Phone
The easiest way to configure a new mobile phone is to do setup Microsoft Authenticator on your new phone while the old one is still working. With both phones available:
- Log into your security info page with your laptop/desktop
- Click + Add sign-in method
- Choose Authenticator App
- generate a QR code and set the computer aside for the time being
On your NEW phone:
- Install Authenticator and select Work or School account.
- Scan the QR code shown on your computer.
- Approve the authentication request on your new device.
- Remove the old device from the Security Info page.
Enable SMS Authentication (Optional but Recommended)
If your organization allows SMS as an MFA method:
- In the Security Info portal, click + Add sign-in method
- Select “Phone”
- Enter your mobile number and choose Text me a code
- Enter the verification code received via SMS when your mobile phone receives it
SMS is considered less secure than app-based authentication. So, by default, Microsoft Authenticator app will use MFA using either available WiFi or mobile phone signal to authenticate your Microsoft 365 sign-ins. SMS is a valuable backup method—especially if your primary device is unavailable.
Add a Second Device for Secondary Access
Sometimes, it helps to include a second mobile device to authenticate your Microsoft 365 sign-in. This might be necessary where authentication is necessary from two geographically separate locations. In this situation, the same mobile phone cannot be at the each location simultaneously. Also, a second phone might help avoid lockouts. This is optional, and not usually necessary However, if you need to include a second device for authenticating you can configure Microsoft Authenticator MFA for 365 with this additional step:
- Install Microsoft Authenticator on your second mobile phone
- Log into https://mysignins.microsoft.com/security-info from your desktop/laptop computer
- Add a new sign-in method and repeat the QR code scan process
- Be sure to scan the QR code with your SECOND DEVICE per the workflow outlined above
- Verify the second device by approving a test notification
This ensures you can still access your account if your principal mobile phone is lost or damaged.
When SMS is enabled, notice that when trying to sign in with an Autheticator code you will find options in your Authenticator pop up that provide for authentication by other means. This way, if MFA does not authenticate, you can opt to receive a conventional SMS/text.
Summary and Next Steps
Setting up and managing Microsoft Authenticator MFA for 365 helps to secure access to your Microsoft 365 account. If your organization has documentation for compliance, you should update it with your procedures so that you have a stated policy giverning sign-ins.
Next step – backup your MFA credentials
For added security, you can backup your Microsoft Authenticator App sign-in accounts. Even if your mobile phone is configured to backup your data, MFA credentials are excluded from Android/iOS backups unless provisioned in Microsoft Authenticator App.
Read this article to learn how to back up your Microsoft Authenticator settings and avoid losing access. Remember, MFA is now a user-level utility and admins/global admins cannot intervene on a user’s behalf. So, it is important to be sure that organizational users have MFA credential backups to ensure rapid restoration of services if they lose or damage their mobile phones.
Also, consider a stress test to learn what you need to be able to demonstrate to Microsoft if your Global Administrator loses MFA credentials. Read this article to learn about force majeur MFA recovery.
About ComStat.uk: Internet Service Provider Comstat provides IT support, web hosting, and media services including website design, Microsoft 365 setup, and audio/video production, serving businesses across Denbighshire, North Wales and Wirral from Ruthin, and Lancashire and the Northwest from Bolton.
How to Back Up MFA Credentials with Microsoft Authenticator Backup
Introduction: Why Microsoft Authenticator Backup is Essential
Multi-Factor Authentication (MFA) is a critical security layer for Microsoft 365 and other cloud services. If your mobile device is lost, stolen, or replaced, you risk losing access to your accounts unless your MFA credentials are backed up. Microsoft Authenticator backup enables you to restore your MFA settings to a new device.
Apple iPhone users – click here for our guidance note to connect Microsoft Authenticator to iCloud and iCloud keychain.
Where does Microsoft Authenticator backup my credentials?
MFA backups are not saved in Microsoft 365 accounts. This is because:
- Microsoft Authenticator can store credentials for your personal sign-ins too.
- If you are locked out of Microsoft 365, you cannot recover the credentials to restore them.
Depending on whether you use Android or iOS, Microsoft Authenticator offers different backup options—each designed to keep your credentials secure and recoverable. If you have a personal Microsoft account, you are already equipped to make Microsoft Authenticator backups.
You can configure Microsoft Authenticator to back up to iCloud and Google Drive too. If you are blocked from your iCloud/Google/Microsoft account (i.e. you have lost your password), there is still a partial workaround – see guidance under “alternative method” header. This requires you to have your existing device handy.
Click open the headers below to learn how to backup your MFA credentials. Please read through this entire article before starting the proceudure. Be sure to contact us for general advice if you are in doubt. Support options are available for professional assistance.
Microsoft Authenticator MFA Backup Features
Your MFA credentials are always excluded from your device’s usual iOS or Android backup precudures. So, Microsoft Authenticator MFA backup has to be enabled and scheduled using your Microsoft Authenticator App. This way, your MFA keys can be protected with enhanced securitization. When you configure Microsoft Authenticator MFA Backup, your app will include MFA accounts for other services that you rely on for OTP (One Time Passcode) or TOTP (Time-based OTP), too.
Microsoft Authenticator Backup features
Microsoft Authenticator Backup procedures are easy to schedule. You only need to be able to provide Microsoft Authenticator with your credentials when you configure backups for either a Microsoft personal account, iCloud account. Features include:
- You can connect to a Microsoft personal account, iCloud.
- iCloud and iCloud Keychain can handle backups automatically.
- Work and school accounts are supported.
- No admin action is required for organizations.
- Third-party TOTP credentials (like Google, Amazon, etc.) are included.
Android vs iCloud considerations
- On Android, backup is stored in the Microsoft cloud and tied to your Microsoft personal account.
- On iOS, backup is stored in iCloud and iCloud Keychain. Microsoft account backup is no longer supported on iOS
- Backups are not cross-compatible between Android and iOS. You cannot restore an Android backup on an iPhone or vice versa.
How Microsoft Entra Portal Supports MFA Management
Microsoft Entra ID (formerly Azure AD) uses a unified Authentication Methods Policy. This service is included in Microsoft 365 and it streamlines MFA setup and backup across all user types. Remember, Microsoft Authenticator MFA is a user-level process. This means that Global Administrators cannot configure MFA for you. Entra ID facilitates:
- Centralized control of MFA, SSPR, and passwordless options.
- Granular policy settings for different user groups.
- Future-proof integration with Microsoft’s evolving identity tools.
- Easier onboarding and recovery for users.
Step-by-Step: How To Configure Microsoft Authenticator MFA Backup
Configure Microsoft Authenticator Backup with a Microsoft Personal Account
- Open Microsoft Authenticator App on your mobile device.
- Click open the Hamburger icon (usually top right of your App’s screen).
- Click open Settings from the drop down list.
- Input your Microsoft (personal) account credentials.
- Review preferences and save settings.
You should review app settings periodically in future to check when your credentials were last backed up.
To recover your credentials using a new iOS or Android device, install Microsoft Authenticator, open the app, and sign into your personal Microsoft account. You will be prompted to restore accounts from backup. Once restored, you may need to re-verify some accounts, depending on 365 organizational policies/rules.
Configure Microsoft Authenticator Backup: iOS/iCloud Backup
- iOS 16 or later is required – check your device first.
- Enable iCloud and iCloud Keychain in your mobile device’s device settings.
- Open Microsoft Authenticator.
- Go to Settings > iCloud Backup in the Authenticator app and enable backup.
- This will back up your account names and TOTP (Time-based One-Time Password) credentials to iCloud.
- To verify that backup is enabled:
- Open Authenticator > Settings > iCloud Backup.
- Confirm that the status shows “Backup is on”.
You should review app settings periodically in future to check when your credentials were last backed up.
To recover your credentials with a new iOS device, install Microsoft Authenticator and sign in to iCloud in App settings. Your Microsoft Authenticator accounts will be restored automatically. Once restored, you may need to re-verify some accounts, depending on 365 organizational policies/rules.
Configure Microsoft Authenticator Backup: Android
- Open Microsoft Authenticator.
- Tap the three-dot menu > Settings.
- Enable Cloud Backup.
- Sign in to your Microsoft personal account when prompted.Go to Settings > Cloud Backup in the Authenticator app and enable backup.
- This will back up your account names and TOTP (Time-based One-Time Password) credentials to your Microsoft account.
You should review app settings periodically in future to check when your credentials were last backed up.
To recover your credentials to a new Android device, install Microsoft Authenticator and sign in to your Microsoft personal account in App settings. Your Microsoft Authenticator accounts will be restored automatically. Once restored, you may need to re-verify some accounts, depending on 365 organizational policies/rules.
Alternative Method: No Microsoft, iCloud, or Google account?
If you do not use iCloud or a microsoft account, follow this manual method:
- On your old device, go to Microsoft MFA Setup.
- Authenticate and access the Security Info page
- Click Add sign-in method > Microsoft Authenticator
- On your new phone, install Authenticator and select Work or School account.
- Scan the QR code shown on your computer.
- Approve the authentication request on your new device.
- Remove the old device from the Security Info page.
This method works for users who only use work accounts and want to avoid linking personal Microsoft accounts. However, it is not as robust as the settings detsailed above and should be considered as an option of last resort. For instance, this option might only be in contemplation if you had already lost your old device, which you need for this workflow. Instead, use one of the options above.
Enable SMS Authentication (Optional but Recommended)
If your organization allows SMS as an MFA method:
- In the Security Info portal, click + Add sign-in method
- Select “Phone”
- Enter your mobile number and choose Text me a code
- Enter the verification code received via SMS when your mobile phone receives it
SMS is considered less secure than app-based authentication. So, by default, Microsoft Authenticator app will use MFA using either available WiFi or mobile phone signal to authenticate your Microsoft 365 sign-ins. SMS is a valuable backup method—especially if your primary device is unavailable.
Add a Second Device for Secondary Access
Sometimes, it helps to include a second mobile device to authenticate your Microsoft 365 sign-in. This might be necessary where authentication is necessary from two geographically separate locations. In this situation, the same mobile phone cannot be at the each location simultaneously. Also, a second phone might help avoid lockouts. This is optional, and not usually necessary However, if you need to include a second device for authenticating you can configure
Microsoft Authenticator MFA for 365 with this additional step:
- Install Microsoft Authenticator on your second mobile phone
- Log into https://mysignins.microsoft.com/security-info from your desktop/laptop computer
- Add a new sign-in method and repeat the QR code scan process
- Be sure to scan the QR code with your SECOND DEVICE per the workflow outlined above
- Verify the second device by approving a test notification
This ensures you can still access your account if your principal mobile phone is lost or damaged.
When SMS is enabled, notice that when trying to sign in with an Autheticator code you will find options in your Authenticator pop up that provide for authentication by other means. This way, if MFA does not authenticate, you can opt to receive a conventional SMS/text.
Summary and Next Steps
Microsoft Authenticator Backup is a simple way for you to securely safeguard your MFA credentials. You can save your MFA credentials using your personal Microsoft account, iCloud, or Google Drive. Microsoft Entra ID security portal centralizes authentication policies, so managing MFA is simple and robust.
Whether you are a Microsoft 365 user, IT admin, or someone who values account security, do make sure your Authenticator app is backed up. It is the best way to avoid lockouts and keep your digital life secure. You can check your Microsoft Authenticator App settings occasionally to check when your last backup was made.
Stress Test
Even with good backup practices, things can still go wrong. Read our guidance in this article to understand what happens if MFA credentials fail and you cannot access 365. We recommend you review this guidance to learn how to deal with an eventuality in situations where a Global Administrator’s MFA credentials fail. Usually, monitoring backups is adequate, but if you are responsible for a multi-user tenancy it is worth testing a scenario to understand how to respond if the worst happens.
For instance, much of the information that Microsoft would ask for to restore access is easily found in a Global Administrator’s 365 dashboard. If your Microsoft 365 dashboard is not accessible, though, how would you compile the information needed to help restore services?
About ComStat.uk: Internet Service Provider Comstat provides IT support, web hosting, and media services including website design, Microsoft 365 setup, and audio/video production, serving businesses across Denbighshire, North Wales and Wirral from Ruthin, and Lancashire and the Northwest from Bolton.
Locked Out of Your Microsoft 365 Account? Here’s What to Do When MFA Recovery Fails
Introduction: Contacting Microsoft for Account Recovery
Despite best practices like setting up Microsoft Authenticator, enabling SMS fallback, configuring secondary devices, and using physical backup options – nothing is bulletproof and you could still find yourself locked out of your Microsoft 365 account. Emergency MFA recovery via Microsoft typically happens when:
- Your mobile device used for MFA is lost or damaged beyond repair.
- No backup or secondary authentication method is available.
- Recovery codes were never generated or stored securely.
- There is not another Global Administrator for your tenancy to revert to for help.
If this happens to a member of staff, Global Administrator can usually restore services. What do you do if YOU are Global Administrator, though? When this happens, contacting Microsoft is the last resort. Be prepared: the process is strict, time-consuming, and necessarily designed to protect your data. This article explains how to prepare for Microsoft intervention. You can avoid this difficult prospect by following our guidelines in this article:
Also, read about enabling secondary devices to reduce the risk of MFA recovery problems in this article:
Click open the headers below to learn about MFA Recovery if you cannot access your Microsoft 365 tenancy. Please read through this entire article before engage Microsoft for restoration of service. Be sure to contact us for general advice if you are in doubt. Support options are available for professional assistance.
What Microsoft Needs to Verify Your Identity
To recover your account if it is blocked, Microsoft must validate that you are the rightful owner of the tenancy. MFA Recovery involves:
- Filling out the Microsoft’s online questionnaire at:
- Providing a working email address:
- This is where Microsoft will send updates about your recovery request.
- Answering detailed questions about your account usage, including:
- Services used (365 licenses types and quantities)
- Previous passwords
- Billing information
- Devices and locations used to access the account
Verification is not easy – document and prepare a procedure
Microsoft’s online recovery form will detail more fully what you need to complete the document. Microsoft can take 24 hours or as long as several days or weeks to validate your identity. This is because of the catastrophic risk that both you face if Microsoft mistakenly provides MFA recovery credentials to a malicious party. So, Microsoft has no choice. ID verification is going to be laborious.
Therefore, even for legitimate tenancy owners, verification can be problematic. Larger organizations maintain thorough documentation to comply with GDPR, and occasionally they run stress tests to evaluate preparedness for this kind of eventuality. If you maintain thorough docuentation, verification will be easier to accomplish. If your GDPR compliance practices are well prepared, you may already have documented procedures.
Step-by-Step: MFA Recovery Workflow
Recovering access to your tenancy is not easily accomplished. This is because you are asking Microsoft for access to not just to your tenancy, but to Global Administrator privileges. Giving MFA Recovery credentials to the wrong entity could have catastrophic consequences for your business. Therefore, Microsoft have to be sure that you are the legitimate Microsoft 365 tenancy owner.
How to apply for MFA Recovery/restoration of access
- Try the Sign-In-Helper to try all alternative sign-in options.
- Prepare your information:
- Use a computer and location previously associated with your account:
- This helps Microsoft match geography and known hardware from past connections.
- Gather as much detail as possible about your account history.
- Use a computer and location previously associated with your account:
- Complete Microsoft’s online recovery form:
- Submit the form via the Account Recovery Portal
- Expect a preliminary response within 24 hours.
- If recovery fails:
- You may retry twice per day
How Long Does Successful MFA Recovery Take?
- Initial response: Within 24 hours.
- Full recovery can take several days depending on the accuracy of your information and the complexity of your account.
- Retry limit: Up to 2 attempts per day.
Summary - Prevention Is Better Than Cure
Microsoft’s MFA recovery process is intentionally rigorous. Microsoft enforces strict verification to protect sensitive data and prevent unauthorized access. Tenancy owners are strongly encouraged to:
- Set up multiple MFA methods. See this article for configuring secondary devices:
- Backup and store recovery codes securely. See this article:
If you have followed the guidance in Comstat’s setup and backup articles, this situation should be avoidable. Hopefully you are here to prepare a test-run for a GDPR Compliance stress test. If you are here because your credentials have failed, Microsoft’s MFA recovery form is your best hope.
About ComStat.uk: Internet Service Provider Comstat provides IT support, web hosting, and media services including website design, Microsoft 365 setup, and audio/video production, serving businesses across Denbighshire, North Wales and Wirral from Ruthin, and Lancashire and the Northwest from Bolton.
5 Best Calendar Booking Widgets for Sitejet Websites in 2025
Introduction
Calendar booking widgets are ideal for integrating with your Sitejet web site to allow customers, clients or patients to book appointments, reserve fixed-time slots, or buy tickets for events. Here, we explore widely used calendar booking widgets that work well with Sitejet. We will also explain how to embed calendar booking widgets easily—even if you are new to web design.
Click open the headers below to find out how more about expanding Sitejet Builder’s functionality with leading calendar booking widgets.
How to integrate your Calendar in Sitejet
Sitejet Builder makes it simple for you to add third-party calendar booking widgets, and for that matter any kind of widget, to your website. Here’s how:
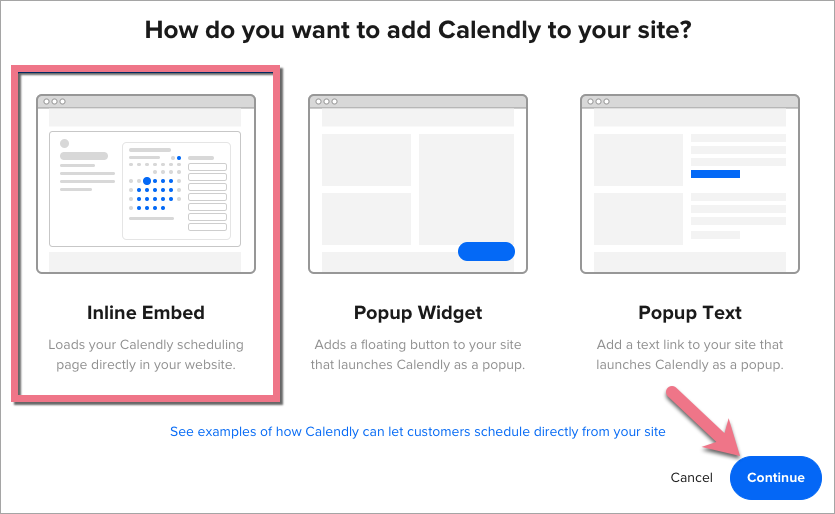
Embed a calendar booking widget with a Sitejet element
- Use Sitejet Builde’s HTML Element: In Sitejet’s editor, drag and drop the “HTML” element onto your page.
- Paste the Embed Code: Copy the embed code from your chosen calendar tool and paste it into the HTML box.
- Preview and Publish: Click “Preview” to see how it looks, then publish your site when ready.
Link your web page to a third party calendar host
Alternatively, you can link to an external booking page hosted by the calendar provider. This is useful if you prefer not to embed anything directly. If you do this, you may need to review the candar host’s terms and conditions to satisfy yourself that personal data is properly safeguarded for GDPR purposes.
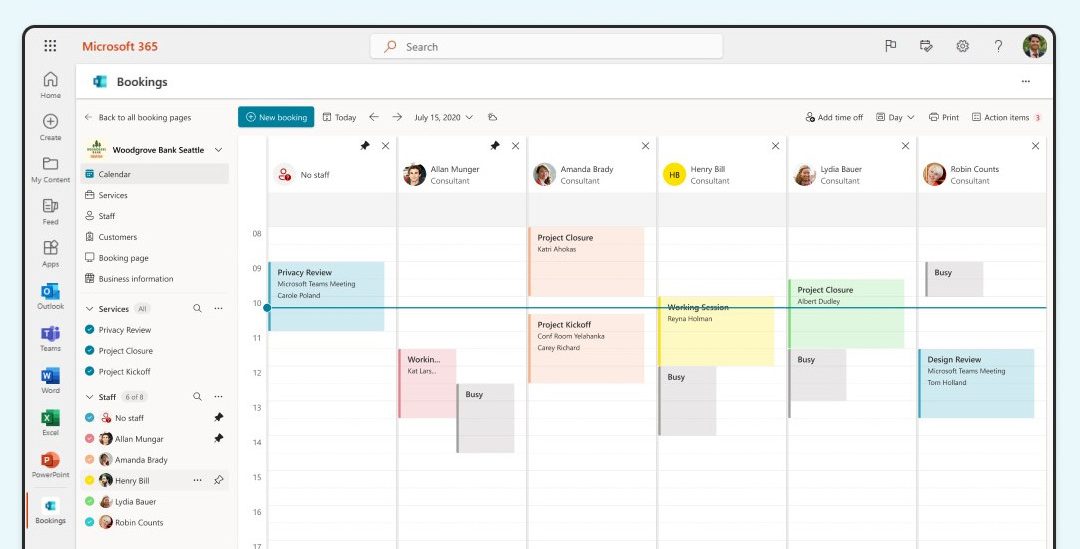
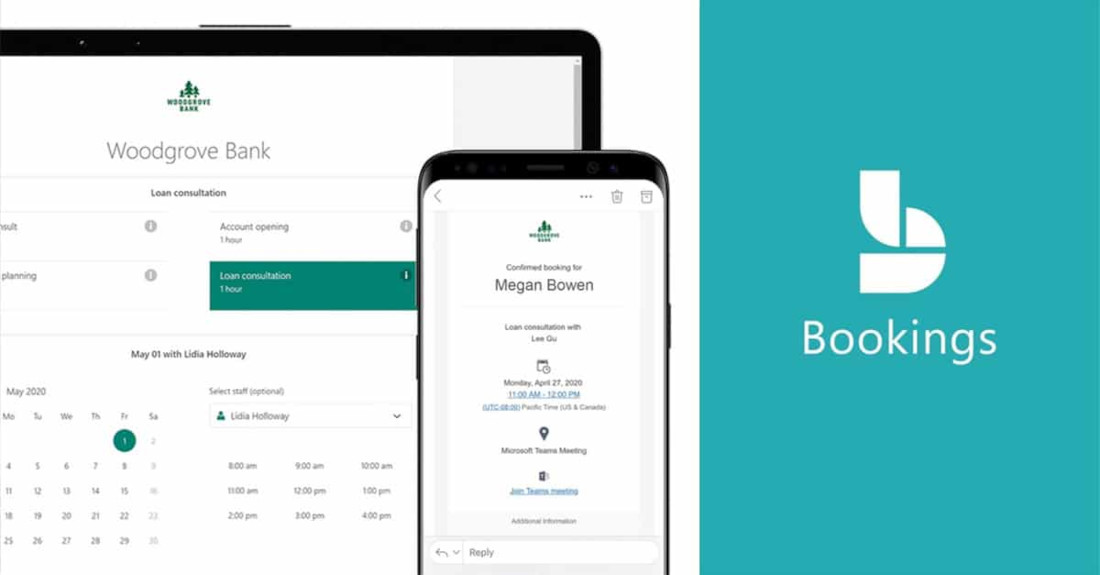
1. Microsoft Bookings (For Microsoft 365 Users)
Microsoft 365 subscribers with 365 Business or Enterprise licenses can integrate Bookings into their existing Exchange calendars. This provides GDPR compliance “out-of-the box” that many other calendar solutions do not provide. If Bookings is included in your subscription, there really is not a lot of point considering other calendar booking widgets. This is because Bookings leverages Microsoft’s dominant Exchange platform and provides options for multiple calendars, services, and much much more.
Strengths
- Seamless integration with Outlook and Teams
- Customizable booking pages for individual staff or teams
- Automatic email/SMS reminders (subject to geographical/license) to reduce no-shows
- Excellent booking reliability per Exchange’s Enterprise-grade Activesync
- Secure data storage within Microsoft 365
Weaknesses
- Requires a Microsoft 365 subscription (Business Basic or higher)
- Limited branding customization compared to other tools
Best For: Consultants, therapists, and solo practitioners. ComStat.uk uses Microsoft 365 Bookings to enable end users to book services – click here to view the page. This page is configured for servicing IT. Bookings can be flexibly configured within Microsoft 365 to suit industry sectors.
2. Calendly
Calendly is one of the world’s most wodely subscribed custom booking widgets. It is a leading scheduling platform with over 10 million users and a 21.45% market share, making it one of the most dominant tools in the appointment booking space. Its major features include seamless calendar integration (Google, Outlook, iCloud), automated reminders, timezone detection, and compatibility with over 100 apps like Zoom, Slack, and Salesforce. With 2.145 million paying customers and over 57,000 businesses using it globally, Calendly is especially popular among professionals and teams seeking a simple, user-friendly way to manage meetings and appointments.
Strengths:
- Easy to use and set up
- Integrates with Google, Outlook, and iCloud calendars
- Supports payments via Stripe and PayPal
- Offers automated reminders and timezone detection
Weaknesses:
- Free version has limited customization
- Branding options are restricted unless you upgrade
Best For: Consultants, therapists, and solo practitioners.
3. Common Ninja Calendar Widget
Common Ninja Calendar Widget is a flexible and visually appealing solution for displaying events on websites, catering to businesses, event organizers, and bloggers. It supports customizable designs, responsive layouts for mobile and desktop, and integration with popular calendar services like Google Calendar. Its ease of use and aesthetic focus make it ideal for users seeking a professional-looking event display without complex setup.
Strengths
- Drag-and-drop HTML embed setup
- No technical knowledge required
- multiple skins, color options, and layout views
- add images and media to calendar entries
Weaknesses
- No built-In booking or Payment System
- Best suited for basic booking needs
- Intended for event display, does not handle bookings natively
Best For: no-code deployment of visually impactful event showcasing
4. Google Calendar
Google Calendar can accept bookings from guest users, including those who do not have a Google account, through its Appointment Schedules feature. This makes Google Calendar a viable option for professionals and clinics who want to offer easy, no-login-required appointment booking. However, most people use Google Calendar in it consumer “free-to-use” offering, which poses risks for data protection. Also, Google does not provide any Service Level Agreement in its consumer product, so this should be considered carefully in cases where data is sensitive and critical.
5. Elfsight Appointment booking widget
Elfsight Appointment Booking is a popular resource for all kinds of website widgets. Indeed, Wix and Shopify users are no strangers to Elfsight’s widget library, including their flexible appointment and even calendars for small businesses, clinics, and service providers to streamline online appointment scheduling. The scheduler offers customizable calendar booking widgets with service descriptions, pricing, durations, and availability settings, along with automated email confirmations and Google Calendar integration to prevent double bookings. Trusted by over 2 million users, it is ideal for those seeking a professional, branded booking experience without needing technical expertise.

Strengths
- Easy Integration with Sitejet
- Google Calendar Sync
- Customizable and Professional Design
Weaknesses
- No Built-In Payment Processing
- Basic Rescheduling, advanced workflow and Confirmation procedure
Best for: not-for-profit organizations or social networking
Summary
Choosing the right calendar widget depends on your needs, budget, and technical comfort level. For Microsoft 365 users, Microsoft Bookings is a natural fit. If you’re in healthcare, Carepatron (not listed here) offers a robust free solution beyond the scope of bookings. Common Ninja Calendar Widget is ideal for publiscising events. For general use, Calendly and Google Calendar are reliable and widely adopted.
About ComStat.uk: Internet Service Provider Comstat provides IT support, web hosting, and media services including website design, Microsoft 365 setup, and audio/video production, serving businesses across Denbighshire, North Wales and Wirral from Ruthin, and Lancashire and the Northwest from Bolton.

Move a Sitejet website from a subdirectory to the root in cPanel
Move your website without losing anything
When you have built your Sitejet website in a subdirectory of the public_html folder on a virtual server managed by cPanel, the next stage is to move the website to the root directory of your public_html directory. Developers and novice IT users build websites this way to keep their live site untouched during development of their new content. Now you are ready to go live, it is time to move your Sitejet website to your web server’s root directory — and possibly replace an existing WordPress or other site.
This guide walks you through the process step-by-step, including how to back up your Sitejet website content, avoid common pitfalls, and enjoy a smooth transition.
Click open the headers below to find out how to publish your Sitejet website in your root directory.
Step 1: Backup your Sitejet website first
Before making any changes to your web site location, back up your Sitejet website using Sitejet’s built-in tools first. This is crucial in case something goes wrong during the move.
To back up your Sitejet site:
- Log into your Sitejet dashboard.
- Navigate to the project you want to back up.
- Use the Export or Backup feature to download your site files.
- Save the backup locally or to cloud storage.
This ensures you have a full copy of your site, including HTML, CSS, JS, and media files.
Step 2: Prepare your web server's root directory
Your Sitejet site will replace the current contents of the root directory (public_html). If there’s an existing WordPress or other site, you’ll need to:
- Backup your existing website using cPanel’s File Manager or your WordPress backup plugin if you use one.
- Delete or rename the current index.php or index.html file to avoid conflicts.
- Check for hidden files like .htaccess that might affect redirects or permissions.
You could rename a file like index.php or index.html to “index-old.php” or “index-old.html”. This way you can always the change the file name back to its original name to restore the file if you need to. Also, when checking for hidden files, it is a good idea to edit File Manager settings to “hide” files again. System files that have global significance to your web site are often hidden to prevent accidental delation during daily management.
Step 3: Move Sitejet files to your root directory
Understand Sitejet’s File Structure and Editing Model
When you publish a Sitejet website to a subdirectory (e.g., public_html/sitejet), Sitejet manages your website files there and allows you to edit content using Sitejet builder.
You could manually move your Sitejet files to the root (public_html) directory. If you do this, however, The pages will be rendered as static pages. When this happens, Sitejet will no longer recognize or manage those pages. There are some reasons why you might want to do this. However, it is likely that you would want to continue to edit and develop your website. Therefore, you can move the website to root and continue to edit it by changing the “publish path” in Sitejet Builder.
Change the Publish Path in Sitejet
In case you have not completed Step 2 above, be sure that you have done these things if you have an existing web site in root first:
- Back up any existing site (e.g., WordPress) using cPanel File Manger > Backup or a WordPress plugin.
- Remove or rename conflicting files like index.php, index.html, or .htaccess.
- Ensure the root directory is clean to avoid file conflicts.
This helps Sitejet publish cleanly and ensures your domain loads the correct content.
After making sure you have backed up any existing website in your root directory, this is how to relocate your website to your web server’s root directory so that you can continue to edit the website with Sitejet:
- Log into Sitejet and open your project.
- Go to Project Settings > Publishing.
- Change the publish path from /sitejet (or your current subdirectory) to /public_html or simply / depending on how Sitejet references the root.
- Save the changes
- Publish the website.
This way, Sitejet will deploy your website directly to the root directory, replacing any existing content there.
Step 4: Test and Confirm
Once you have published your web site to its new location in Sitejet Builder:
- Visit your domain (e.g., yourdomain.com) to confirm the Sitejet site is live.
- Log into Sitejet and verify you can still edit the site.
- Check for broken links or missing assets — especially if your site previously referenced the subdirectory.
Final notes:
- Do not manually move files from the subdirectory to the root if you want to keep editing access.
- Always use Sitejet’s publishing tools to relocate the site
- If you’re unsure about the correct publish path, Sitejet support can help confirm it based on your server setup.
About ComStat.uk: Internet Service Provider Comstat provides IT support, web hosting, and media services including website design, Microsoft 365 setup, and audio/video production, serving businesses across Denbighshire, North Wales and Wirral from Ruthin, and Lancashire and the Northwest from Bolton.
Create a Microsoft 365 Exchange Online connector
Configuring Microsoft 365 Connector for Web Server Email Relay
Use this summary to successfully configure a Microsoft 365 Exchange Online connector to relay email from a cPanel web server.
Some web server applications might not be equipped to connect to Microsoft 365 to relay email from your web server If you use Multifactor Authentication (MFA) to login to your email and 365 services.
Instead, an Exchange Online connector recognizes your web server as a legitimate mail server within your Micrsosoft 365 email environment. This means that a properly configured Exchange online connector relays email via Microsoft 365 to recipients without having to deal with MFA.
This article shows you how to configure an Exchange Online connector in Microsoft 365 to accept incoming traffic from your web server on port 25 using TLS. This assumes that your web server application, such as Clientexec, is:
- properly configured to send email using SMTP on port 25.
- your web server’s email routing configuration is established for “remote mailer”.
- your web server uses a static IP address
- in our default web server congiuration, you will need to contact us to arrange an IP address, which is subject to annually renewable cost.
Click open the headers below to find out more about how you can properly configure your Microsoft Exchange connector on your server.
1. Verify proper admin privileges in 365
Before you create an Exchange online connector, make sure your Microsoft 365 admin account has the correct permissions, even if you are already a Global Administrator:
- Go to Microsoft 365 Admin Center > Roles > Admin Roles
- Assign your account, or the user you want to authorize to <Organization Management> if not already enabled
To add your user account to Organization Management role, click open Organization Management and add your user account. If you belong to a group, you can add that group to this role too.

This role is required to access and configure TLS settings in connectors. Without this role, TLS options may be hidden even in the new Exchange Admin Center.
2. Access the New Exchange Admin Center
Use the Microsoft 365’s modern interface to create and edit an Exchange Online connector:
- Go to URL: https://admin.exchange.microsoft.com
- Navigate to Mail Flow > Connectors
Note: be sure you are logged in to the new Exchange Admin Center. The legacy admin center will not support the options you need. Log into the new Exchange admin centre for managing roles and mailflow > connectors. You can tell by checking that the path in your browser navigation bar includes the link above.
3. Create a New Connector
Use these settings:
- From: Partner organization
- To: Microsoft 365
- Purpose: Accept email from your web server
Important configuration steps:
- Connector Type: Must be set to Partner (not Internal)
- Sender IP Address: Add your web server’s public IP address
- TLS settings:
- Require TLS: Must be checked
- Require that the subject name of the certificate matches this domain name: Must be checked
- the domain name you enter must also be registered in your Microsoft 365 tenancy.
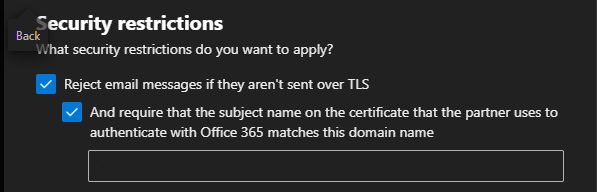
If you do not see these TLS preferences, you either have insufficient privileges, or you have chosen the wrong type of connector
The last preference enforces certificate validation during an SMTP handshake
4. Testing the Connector from the Web Server
Verify DNS and SMTP Connectivity
On your web server, use teh Linux “dig command to confirm mailflow routing using SSH or cPanel’s terminal. This demonstrates that by showing a Microsoft IP address in output, the outgoing message is not intercepted by Exim or other processes on your web server.
| # Check MX records dig “yourdomainname.com” MX |
Use openSSL to confirm TLS handshake with SMTP server with SSH or terminal. You may need to llok up your mailhost in 365. Usually it looks like “yourdomainname-com” rather than “yourdomainname.com”
| openssl s_client -starttls smtp -connect “yourmailhost”.mail.protection.outlook.com:25 |
Send a test email via PHP using a script like:
|
$to = “insert valid 365 email address”; if (mail($to, $subject, $message, $headers)) { |
Use different From: and To: addresses to avoid spoofing or loopback issues. Also, this can be saved as a script, uploaded to public_html on your web server, and run via a browser by pointing yout browser to the php file you have saved. Delete the file after testing.
5. Verify Connector Status with PowerShell
.Use Windows PowerShell 5.1 with the Exchange Online Management Module. Powershell 7.x does not currently carry the inventory of commandlets used for Exchange Online that v5.1 supports. If you are not familiar with Powershell, find help on checking and enabling “ExecutionPolicy” to enable scripts to run. Also, you may need to install a module called Connect-ExchangeOnline.
| # Connect with MFA Connect-ExchangeOnline -UserPrincipalName youradmin@yourdomain.com # List connectors Get-InboundConnector | Format-Table Name, ConnectorType, Enabled, RequireTLS, TlsSenderCertificateName # Detailed view Get-InboundConnector -Identity “YourConnectorName” | FL Name, ConnectorType, Enabled, RequireTLS, TlsSenderCertificateName, SenderDomains |
6. Understand Sent Items Behavior
Emails sent via the connector:
- Do not appear in Sent Items of the mailbox listed in the From: field
- Are treated as externally relayed messages, not user-initiated
Summary
Microsoft 365 connectors are powerful but require
- properly configured 365 admin roles
- TLS enforcement
- Correct connector type and IP configuration
- Careful testing from the sending server
About ComStat.uk: Internet Service Provider Comstat provides IT support, web hosting, and media services including website design, Microsoft 365 setup, and audio/video production, serving businesses across Denbighshire, North Wales and Wirral from Ruthin, and Lancashire and the Northwest from Bolton.

Email Management in cPanel: Save Space, Cut Costs, and Go Green
Introduction
Managing your ageing email is about more than keeping your inbox tidy — it is also about saving money and reducing your environmental impact. With a few simple habits and smart settings, you can keep your email system running smoothly while helping datacenters use less energy.
Click open the headers below to find out how you and your staff can control email storage at a user level.
Why Email Storage Matters
Every email stored on a server uses energy. Whether it is a short message or a large attachment, it takes power to keep that data alive. Multiply that by millions of users, and the energy cost becomes significant.
Storage means power consumption
Datacenters consume a growing share of global electricity use. For instance, according to a 2024 report by the U.S. Department of Energy (DOE), US datacenters are expected to reach up to 12% of the national power supply by 2028 in the United States. Datacenter power consumptions is predicted to increase similarly in developed nations.
Best Practices for Managing Mailboxes
To keep your email system efficient, you and your staff can follow these tips:
- Set sensible quotas: Assign mailbox limits between 500MB and 2GB for regular users. Heavy users may need more, but limits help prevent overload.
- Monitor usage: Use cPanel’s “Disk Usage” tool to track mailbox sizes and spot accounts that need cleanup.
- Clean regularly: Delete old messages, empty spam and trash folders, and remove large attachments.
- Use filters and forwarders: Set up rules to manage incoming mail and forward messages to reduce clutter.
- Send links: sending links to files in OneDrive, Dropbox, and Google Drive avoids file duplication, reduces mailbox size, and relieves network congestion.
User-level vs organizational level management
These tips above are aimed at user level management. GDPR-compliant businesses use archiving and “rules-based” policies to control email storage. Also, GDPR-compliant businesses exercise controls to prevent indiscriminate or malicious email deletion. So, even if you are a small organization, you should have a written policy to set out management procedures.
Email archiving
Microsoft 365 excels at archiving an rules-based managment and it is the email service of choice for “mailflow”, archving, and advanced functions like litigation locks. cPanel web servers can still achieve good housekeeping results. Admins can manage email accounts centrally. Also, users can:
- Manually move old emails to archive folders.
- Use an email client like Outlook or Thunderbird to automate archiving.
- Admins and ComStat.uk can provide custom scripts or cron jobs to archive or delete old emails based on age.
If you are a cPanel web server admin, you can refer to this article for more information about your cPanel email service.
Small Habits, Big Impact
Individual users can make a real difference by:
- Unsubscribing from unwanted newsletters and mailing lists.
- Monitoring spam and deleting it promptly.
- Avoiding digital hoarding—don’t keep every email forever.
Regular attention like this reduce the load on servers, cuts energy use, and helps data centers operate more sustainably.
Summary
Managing email storage is more than just good housekeeping — it is a step toward better performance, lower costs, and a greener internet. In reality, cleaning up your email might not save that much energy. However, if you left all your snail mail on the kitchen table for 15 or 20 years, you would have a mess to sort out. By setting limits, cleaning mailboxes regularly, and adopting smart habits, you can do your part to keep your inbox—and the planet—healthy.
About ComStat.uk: Internet Service Provider Comstat provides IT support, web hosting, and media services including website design, Microsoft 365 setup, and audio/video production, serving businesses across Denbighshire, North Wales and Wirral from Ruthin, and Lancashire and the Northwest from Bolton.

Schedule your social media posts with Social Bee
Automate your social media management
Social Bee, available via your web server’s cPanel dashboard, helps you post your social messages at scale across platforms like Facebook, Instagram, Linkedin, YouTube and more to save save time and improve your brand’s online presence.
Click open the headers below to find out more about how you can reduce overheads with Social Bee to schedule and post your content across multiple platforms.
What Is Social Bee?
Social Bee is a social media management tool. It lets you schedule posts, manage content, and track performance—all from one place. If your business uses Facebook, LinkedIn, Twitter, or Instagram, Social Bee helps you stay active without logging into each site to manually organise posts.
You do not need to be tech-savvy to use tools like this. Social Bee works directly from your cPanel dashboard. That means no extra software, no complicated setup, and no need for IT support. Instead, you can manage social media messaging with Social Bee to automate posts on social platforms like:
- Threads
- X
- TikTok
- YouTube
- Google Business Profile
- Bluesky
Why Use Social Bee?
Social Bee is available as a standalone subscription. However, by integrating the platform through your cPanel web hosting portal, you can:
- Share content on multiple networks at once
- Schedule posts in advance
- Re-use “evergreen” posts to keep your feed fresh
- See what works and improve your strategy with analytics
These features help you maintain a consistent online presence. This is important for building trust and attracting customers.
Easy Access via cPanel
Social Bee is already available through your web server’s cPanel dashboard, which is the control panel you use to manage your web hosting. Navigate to <Domains>, click on Social Media Management, and set up your account. After setting up your Social Bee account, log in to your server’s cPanel dashboard, navigate to <Domains>, click on Social Media Management, and start posting.

Social Bee is integrated with your cPanel web server dashboard.
Summary
Social Bee is a smart choice for busy business owners. It saves time, boosts your social media reach, and improves your content quality. Best of all, it is easy to use—even if you are not an IT expert.
Ready to simplify your social media? Try Social Bee today through your cPanel dashboard.
About ComStat.uk: Internet Service Provider Comstat provides IT support, web hosting, and media services including website design, Microsoft 365 setup, and audio/video production, serving businesses across Denbighshire, North Wales and Wirral from Ruthin, and Lancashire and the Northwest from Bolton.
2025 Email Security Guide for Business Owners: Avoiding Scams and Attacks
The Hidden Dangers of Business Email in 2025
Email remains a vital tool for business communication. But in 2025, it’s also a growing target for cybercriminals. From phishing scams to AI-powered fraud, threats are evolving fast. Let’s explore what business users need to watch out for—and how to stay safe.
Click on the headers below to find out more about email Inbox threats. Click on inmages to view at full-sized resolution.
Phishing Scams: Smarter, Sharper, and More Targeted
Phishing is no longer about mass emails with poor grammar. Today’s scams are precise and convincing. Attackers use generative AI to craft messages that mimic real people and companies according to Threatlabz. These emails often target HR, finance, and payroll teams—where sensitive data and money flow.
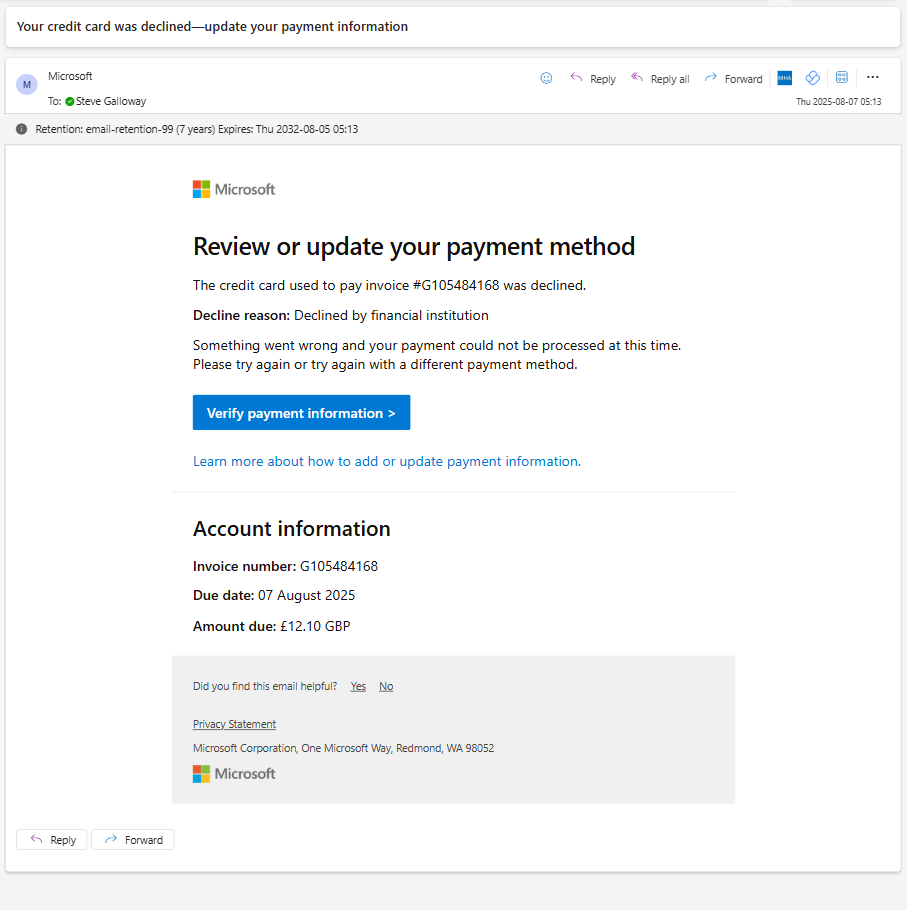
The only way to tell that this evidently legitimate email from Microsoft is a hoax was to hover over the “verify payment information” link to see that the link was not a valid Microsoft end point.
Key tactics include:
- Voice phishing (vishing): Scammers impersonate IT support over the phone.
- CAPTCHA-protected phishing sites: These look legitimate and bypass basic security.
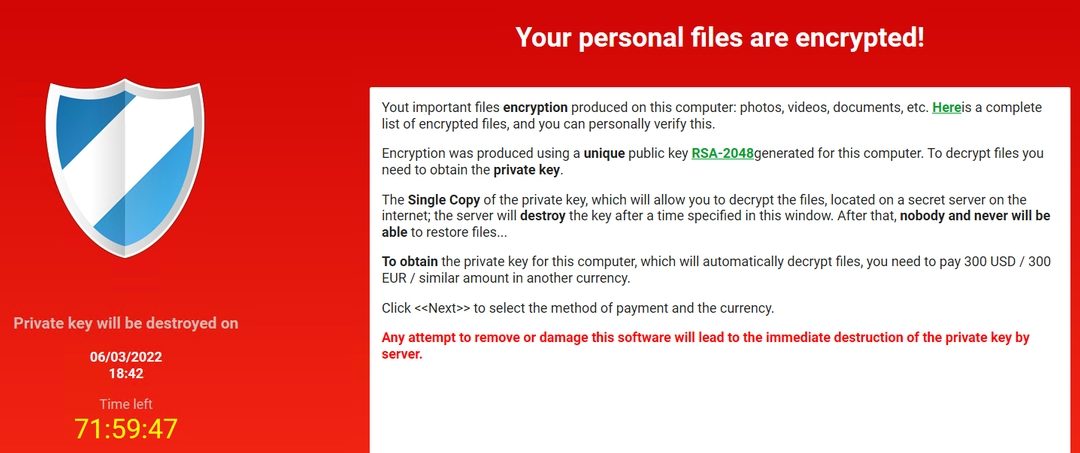
- Crypto wallet scams: Fake alerts trick users into giving up credentials.
Threatlabz goes on to say that even education sectors are under attack, with phishing up 224% in 2024. The goal? Steal data, money, or access to systems.
AI-Powered Fraud: A New Era of Deception
AI is changing the game. It helps scammers build fake websites, clone voices, and create deepfake videos [2]. These tools make fraud faster and harder to detect.
Common scams include:
• Fake job offers: AI-generated listings lure applicants into sharing personal info.
• E-commerce fraud: Entire storefronts are built with fake reviews and products.
• Tech support scams: Attackers pose as IT staff to gain remote access.
Microsoft reports that AI tools are being used to scan the web for company data. This helps attackers create highly personalized lures.
Summary
Customizing folder colours is a great way to help you and others find content easily, especially in large folder lists. Remember, you can also “favourite” a folder to help find your content faster.
Changing a folder’s colour in OneDrive will only be visible to you.
Changing a folder’s colour in Sharepoint will be visible to users who you share it to.
Since Teams stores folders and files in Sharepoint, Teams administrators can change folder colours by opening a Teams’ file library using <View in Sharepoint>.
Lastly, Sharepoint’s broader capabilities means that advanced users can automate folder properties including folder colours.
Business Email Compromise (BEC): The Silent Threat
BEC attacks are rising. These scams involve impersonating executives to request wire transfers or sensitive data according to Socium. AI helps attackers mimic writing styles and internal workflows.
Watch out for:
- Lookalike domains: Slight changes in email addresses trick employees.
- Predictive phishing: AI analyzes past emails to time attacks perfectly.
- Urgent requests: Messages often pressure staff to act fast without thinking.
BEC is costly and hard to detect. It’s one of the most damaging threats facing businesses today.
How to Stay Protected
Cyber threats are evolving, but so are defenses. Here’s how to stay ahead:
- Use multi-factor authentication (MFA) across all platforms.
- Train employees regularly with phishing simulations.
- Deploy AI-powered email filters to catch suspicious content.
- Secure mobile devices against smishing and app-based attacks.
- Consider enhanced security like Conditional Access, which limits access to approved devices.
Zero Trust principles and advanced threat detection tools are key. They help limit damage even if an account is compromised.
Summary
Email threats in 2025 are smarter and more dangerous than ever. AI is helping attackers craft believable scams that bypass traditional defenses. But with awareness, training, and the right tools, businesses can fight back.
It is difficult to explain the catastrophinc effect that a professional hack on a business has. Even with resources that companies like Marks & Spencer have, a well executed hack brings enormous costs and losses to bear. Worryingly, high profile hacks are only the tip of the iceberg – small business statistically bear the brunt of hacks than any other business class. Nor is it business that any IT professional wants to have to take one. Usually, this is because it was avoisdable in the first place. Talk to us first.
About ComStat.uk: Internet Service Provider Comstat provides IT support, web hosting, and media services including web design, Microsoft 365 setup, and audio/video production, serving businesses across Denbighshire, North Wales and Wirral from Ruthin, and Lancashire and the Northwest from Bolton.
Safeguard your .uk domain names – Nominet
Register an account with Nominet
Your domain name is a critically important part of your online services and your business identity. Your domain name is how customers find and trust you online. It is the jigsaw piece that has to work every time someone needs to see your website or send you an email. So, your domain name is strategically vital to your visibility and daily operations.
Click on the headers below to learn how to use a Nominet account to tighten control of your .uk domain names. Or, skip the sermon, and access Nominet Online Services here.
Contact us for help.
Compliance
UK businesses like yours are responsible for protecting personal data under statutory GDPR provisions. If your domain name is registered through a third party (like a web designer or IT supplier), and you do not have direct access to your domain name’s control panel, you do not know that your registration details are accurate. For instance, when you bought a domain name, were you even thinking about legal title? This can lead to compliance issues.
Ownership versus administrative control
There are good reasons why owners do not have daily access to their domain name. Domain names are like phone books which direct traffic to the services you need to operate. For instance, email might operate from Microsoft 365, and your web site operates from a server based at Canary Wharf, London. Your domain name controls all of your online services, and inadvertant edits to your records could catastrophically disrupt your services. Even a missing period or full stop could take your IT services down. So, unless you are expert in one of IT’s trickiest technologies – DNS – you need to rely on someone who is.
This is why, as businesses grow, owners delegate administrative conduct of their domain names to one or more IT professionals. In this situation, the owner stil owns their domain name, but an IT expert can manage the domain name from their own registry agencies. In a way. This allows for rapid intervention in the even of outages or equipment or datacenter failures.

Most owners give administrative custody to consultants at Registrar level, but do not secure their overriding rights at Nominet. This is a critical risk.
However you manage or delegate your domain name, you need a back door so that you have a trump card to change your admin, or transfer the domain name to another registrar. It is not really a matter of trust. An IT supplier might fail. A malicious hacker might gain access to your domain name with the intention of holding you to ransom. It is a matter of security, and therefore GDPR.
Nominet provides independant access to owners
Nominet is the not-for profit organistation which governs the operation of .uk domain names – about 10 million domain names at time of writing. You can buy directly through Nominet, however Nominet prefers to delegate daily conduct of new registrations, transfers and renewals to registrars like GoDaddy, TuCows, Enom, OpenSRS, Joker.com and many more. You probably have not heard much about Nominet and that is a tribute to its well regarded behind-the-scenes operations worldwide.
You probably had an email from Nominet when you bought your domain name asking you for some information. In most cases, we find that this email is ignored. Partly, this is because you might not know who Nominet is. Partly, this is because the domain name bears such an insignificant cost, the effort to seal loopholes seems pointless.
Protect Your IT assets
Take advantage of ownership privileges
Registering an account at Nominet helps you clarify legal title and other information that might not have been properly recorded at point-of-sale. For instance, Nominet might list you as owner because you had to use your name and address to get a credit card to work. However, the domain name should really be the property of a limited company. Owner information is legally binding, so seemingly small details at point of sale can cause problematic and costly issues at law in future.
Also, although you might need to delegate daily management of your domain names to an IT expert (unless you have a professional IT department), you can still exercise control as owner via your Nominet account. If you do have this kind of control, then your IT experts can transfer your domain name to other registrars who might provide better tools for DNS features that you need. Or, if someone hacks your registrar account and hijacks your domain name, you can resort to Nominet to recover control.
This security is overlooked to a worrying degree. Even organizations that puport to be fastidious about IT policy and GDPR rarely act to secure the one IT asset which can cause catastrophic damage to all online services instantly if compromised.
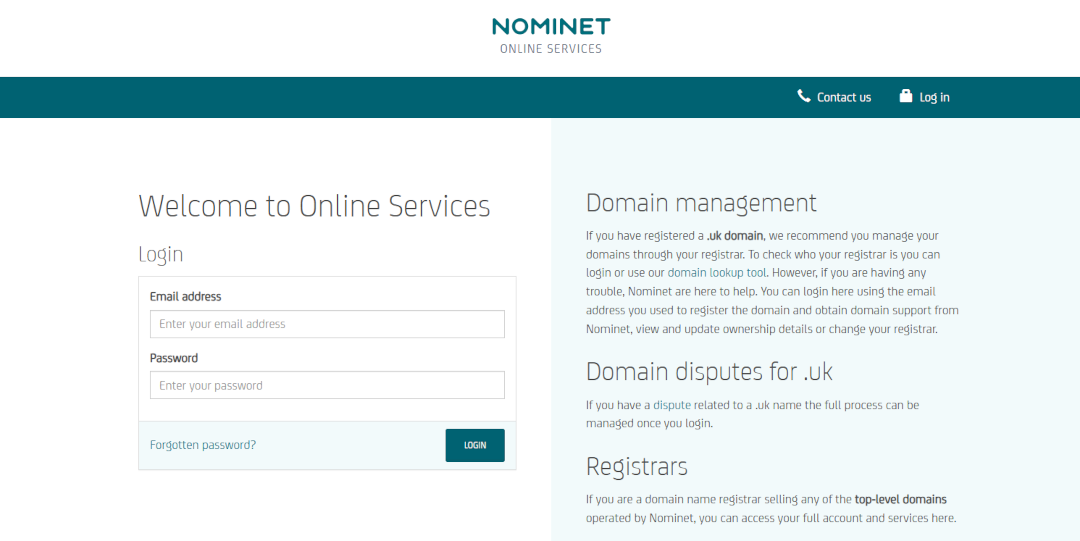
Nominet Online Services
Nominet has a facility that protects your global ownership for .uk domain names – Nominet Online Services.
Nominet’s online portal allows you to associate domain names that you own with your Nominet account which provides a haven of last resort in situations where a supplier fails, or a malicious entity attempts to hijack ownership of the domain, or other force majeur problems happen.
By associating your domain name with your own Nominet account, you can manage your data directly and ensure it is handled in line with GDPR requirements. Really, GDPR is not about penal legislation. Rather, GDPR is a framework to help you document what is common sense in the first place.
This kind of control is essential for business continuity and peace of mind. Access Nominet Online Services here.
Link Your Domain to Your Nominet Account
Take Action
If you own a .UK domain name, you can associate it with your Nominet account. This gives you full control over your domain and ensures you are protected. Access Nominet Online Services here. This service only operates for .uk domain names, so you could not include a .com domain name in your Nominet protfolio. .com and other domains use other tools to “harden” ownership, and we can give you advice about this if you need to follow this up.
About ComStat.uk: Internet Service Provider Comstat provides IT support, web hosting, and media services including web design, Microsoft 365 setup, and audio/video production, serving businesses across Denbighshire, North Wales and Wirral from Ruthin, and Lancashire and the Northwest from Bolton.