Adding background images with Sitejet
Background images in web pages
This note briefly describes how to use background images with Sitejet. Bcckground images are difficult for a few reasons. The biggest problem is rendering an image, or a repetition of an image as a “tiles” so that it appears consistently on large screens, laptops, tablets, and mobile devices. For background images, consider using expert help.

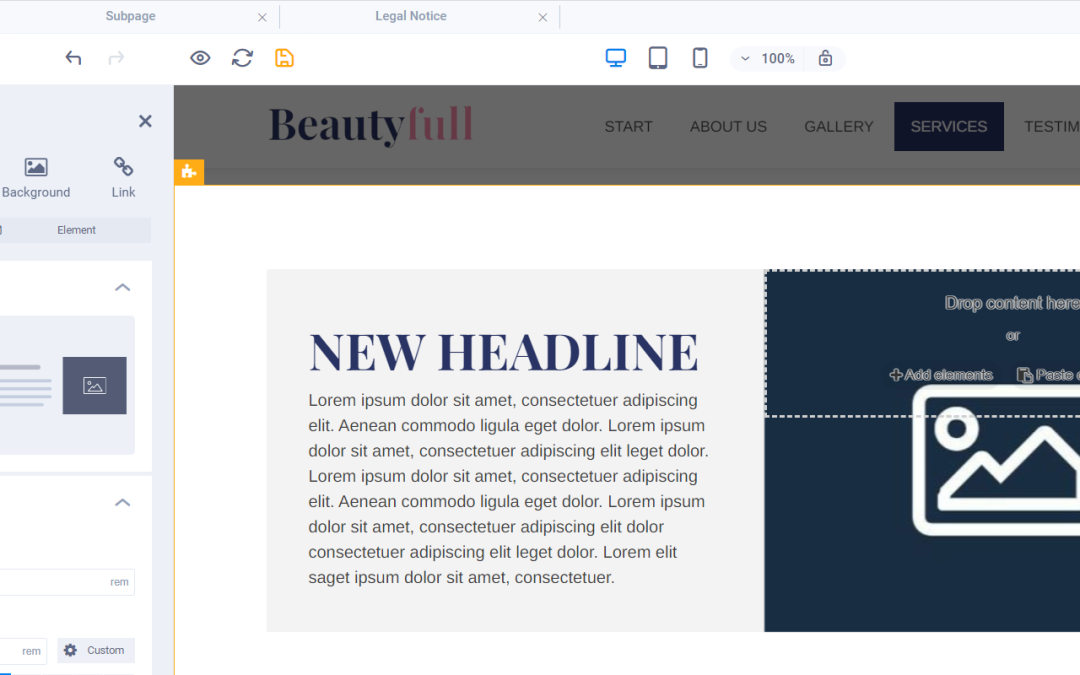
In this example, a website owner uses a semi-transparent section to overlay a background image.
Click on the headers below to learn more about managing background images using Sitejet Builder’s “no-code” option.
Where does the image belong?
A web page is not like a sheet of A4 paper – unless we specify an area in which to contain our content, a web page has limitless dimensions. So, the first issue to decide is where does an image belong?
Web site layout elements
Conventionally, a web page has a global element called a CONTAINER. Within a container there can be one or more SECTIONS, which in turn can have one or more MODULES.
Background images can be inserted in any of these elements. A background image can fill an entire container, or it can fill an element as finite as a row within a module. An image can fill any element in between. An image could include a simple solid fill colour like light grey to distinguish between alternate rows.
How big should the image be?
Image dimensions
Unfortunately, what works for one web site may be disastrous elsewhere, and image content itself can become a problem. You may have to crop or scale an image after seeing what it looks like when you insert the image into a background.
The best starting point is an image that measures 1920w x 1080h. This will usually resolve satisifactorily for desktop/laptops. However, background images need to be sized differently for tablet and mobile, so you may need 2 or 3 images which can be called upon to suit viewers’ devices. However, this is not an absolute rule. Headers (especially) and sections/rows may require a sizizing compromise to work efficiently with a page layout.
File size and type
Files should be no more than 500KB. For home use, file size is not critical, however mobile users may experience slow page loads in areas where mobile coverage is minimal, and those who carry minimum data limits are more susceptible to possible service drop-outs as they reach monthly targets.
webp may be desirable file formate for images that tend to err towards large file sizes. jog/jpeg is a standard file format for static images, and png is used for images where image transparency or other effects are required.
Image Considerations
How the image is programmed depends on a few factors. For instance, you may want a static image that “covers” the container area. A background image can be anchored to text as you scroll, but it can remain static so that text moves as you scroll. Also, a background image may need to have some opacity – i.e. fading so that textual content is clearly legible. This can be handled by your desktop graphics software before you add the picture to your web site image library. Or a background image can be managed by introducting “opacity” or “transparency” in html coding on your web site dashboard. This can make an image look like a watermark when heavily applied. If you are using a pattern, it would be possibe to use a small square or rectangular image which your web server replicates across a container area.
Embedding background image using Sitejet dashboard
This workflow is for a situation where an image is to be applied to a website page “container”. The options are available at section and module levels.
1. Select the Container: Click on the container you want to edit.
2. Open the Style Settings: In the right-hand panel, go to the “Style” tab.
3. Background Settings:
• Scroll to the Background section.
• Choose “Image” as the background type.
• Click to upload or select an image from your media library.
4. Adjust Display Options:
• Set background size (e.g., cover, contain).
• Choose position (e.g., center, top-left).
• Set repeat options if needed.
• Optionally, add a background overlay for contrast.
Options like “cover”, “contain” and placement all have drastic effects on rendering and may need individual configuration for tablet and mobile view.
Summary
Background colours, like a light grey or light blue solid colour, are effective and easily implented. Background images can be visually appealing, but are awkward to render and are probably better reserved for expert intervention unles you are prepared to spend a lot of time configuring layout settings. You can use Sitjet’s “no-code” approach to configure background images at container level, and the principle applies to section and module elements. Advanced effects may require using the HTML authoring tool in sitejet to configure xHTML features.
About ComStat.uk: Internet Service Provider Comstat provides IT support, web hosting, and media services including web design, Microsoft 365 setup, and audio/video production, serving businesses across Denbighshire, North Wales and Wirral from Ruthin, and Lancashire and the Northwest from Bolton.
How to configure DNS for a contact form
Integrating contact forms with an external email service
This guide walks you through modifications you need to make to your domain name’s DNS zone record so that your contact form mail can reliably connect to your external email service, like Microsoft 365 or another email supplier.

This article is written for web designers who know websites but may not be as familiar with DNS.
Click on the headers below to find out how to modify DNS records and other steps in the order shown. Click on images to view at full-sized resolution.
1. Why?
One of the biggest reasons spam happens is because a hacker can purport to be you by sending email using your email address from email servers that you do not control. This means end users have to constantly combat rogue email, and email services have to make educated guesses about what is good email before passing it to your Inbox.
These modifications to SPF, rDNS, DKIM, and DMARC help a receiving email server determine that the email it receives really does come from an email server in your control.
If a receiving server cannot validate the source of your email, the receiving server is likely to conclude that your email has been sent from a spammer, in which case the email will be dropped. Your server can implement some tools, but your domain name has to be configured to co-ordinate with your server too.
2. Scenario
This example assumes that a web site owner uses Microsoft 365 for email and the domain name which governs the web site and email is managed at a registrar like GoDaddy where the authoritative zone record is held. In reality, the registrar might be different. For instance, the domain name might be managed at Cloudflare or even Microsoft 365 itself.
The important point is to understand where your authoritative zone record is managed. the web server will have a zone record. However, if the domain name is regitered at a regisrar like Tucows and the domain name uses Tucow’s nameservers, then the authoritative nameserver for your domain is at Tucows.
This workflow assumes:
- Your website is hosted on at IP address 88.202.183.10
- The domain’s authoritative DNS is managed at a registrar like GoDaddy
- Email for the domain (e.g., yourdomain.co.uk) is handled by Microsoft 365
- You want your contact forms to send email from the domain (e.g., info@yourdomain.co.uk) using your web server’s mail system
This assumes that you already have a valid email address called info@yourdomain.co.uk. Also, this assumes that DKIM and DMARC are already configured for Microsoft 365. Microsoft organises its DKIM records using CNAME records – this means that Microsoft can handle DKIM identifiers in-house.
This is useful because most other entities use an A record which means multiple there would be multiple DKIM records in your authoritative zone. This is possible, but it might affect reliability. So, if you already have DKIM records in your authoritative zone to cope with another email server, it might be worth considering options.
Preparation
Review the existing authoritative zone record to check for SPF, DKIM, and DMARC. You will need:
- credentials for the domain name registrar control panel access
- credentials for cPanel to edit and get records from your web server
- credentials for any other services that might be implicated, like Microsoft 365
- if DKIM is not already configured, refer to this guidance note
- if DMARC is not already configured, refer to this guidance note
3. SPF (Sender Policy Framework)
SPF tells receiving email servers which IP addresses you have approved to send mail for your domain. Usually, this record is already posted in your zone record. In the example below, the record is only configured to recognize Microsoft 365:
v=spf1 include:spf.protection.outlook.com -all
So, now we need to include your web server’s IP address to verify that your web server is a valid email server too.
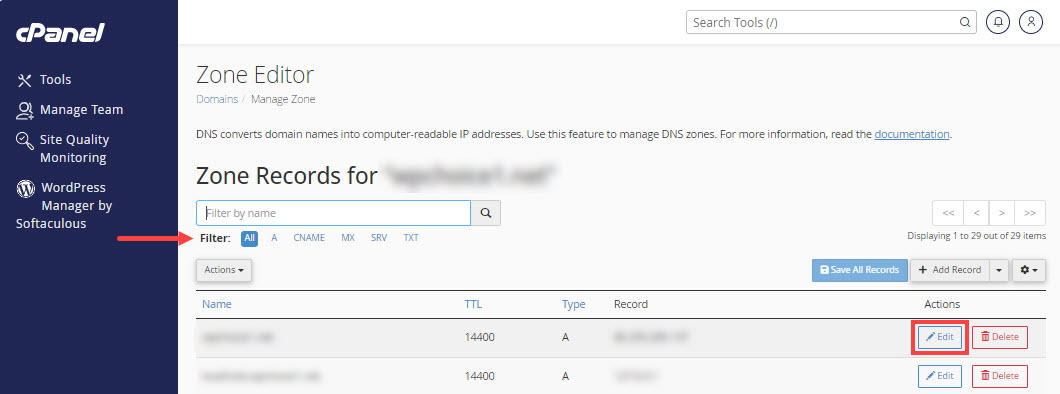
What to do:
- Log into the DNS editor where your domain name is managed (e.g. GoDaddy)
- Find your existing SPF TXT record (it starts with v=spf1).
- Add your server’s IP: ip4:88.202.183.10 before the -all.
Example:
v=spf1 include:spf.protection.outlook.com ip4:88.202.183.10 -all
The syntax is not absolute. For instance, the following record also works:
v=spf1 ip4:88.202.183.10 include:spf.protection.outlook.com -all
Adding your web server’s IP address to the SPF record authenticates both Microsoft 365 and your web server as valid mail servers for your domain.
4. rDNS (Reverse DNS / PTR Record)
Unless you rely on exceptional settings, you do not need to do anything about rDNS. A PTR record is already established in the reverse zone for our servers. This means that the IP address for your server is already mapped to your hostname.
A PTR record can only be created where a reverse zone is accessible. Usually, this means having to post a support ticket at your domain registrar, or asking the owner of the IP address you have been granted to map the setting for you.
5. DKIM (DomainKeys Identified Mail)
DKIM adds a digital signature to your emails.
Usually, DKIM is established with an A record. Microsoft 365 already uses DKIM via CNAME records. This is convenient. Other registrars might already require an A record that you rely on. It is possible to have multiple A records establishing DKIM records for different servers. This might cause some reliability issues though. So, you might need to monitor traffic flow after making this kind of change. In any event, your web server needs its own DKIM setup if it sends mail too.
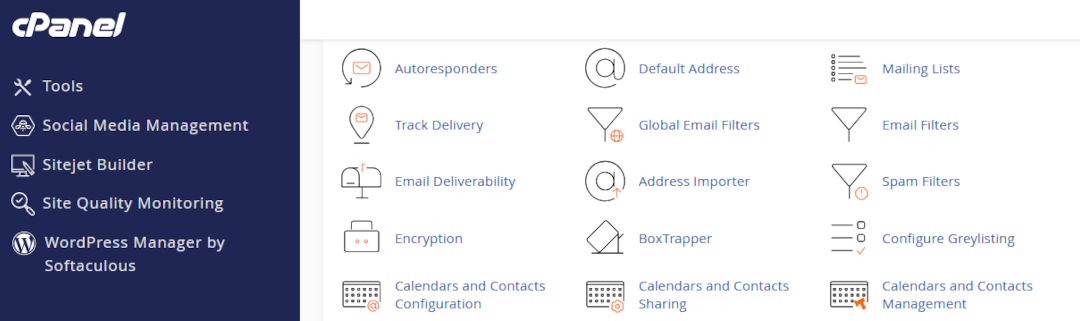
What to do in cPanel:
- Log into cPanel
- Go to Email > Email Deliverability
- Click open <Manage>
- Do not enable DKIM. Instead:
- Copy the TXT Name and Value fields shown for DKIM
- Add this TXT record to your DNS at GoDaddy
This allows receiving servers to verify that your server’s emails are legitimate.
6. DMARC (Domain-based Message Authentication, Reporting & Conformance)
DMARC tells receiving servers how to handle emails that fail SPF or DKIM checks. settings. This may already be established in your authoritative zone and that record would already be valid as long as:
- your SPF record already includes for your web server’s IP address
- or DKIM passes for your server (if you set it up)
Example
You can use the values suggested in cPanel > Email > Email Deliverability to create a DMARC record. DMARC uses an industry defined instruction set which is universally adhered to. For now, it is probably only necessary to operate DMARC in “test” mode. However, some services like Microsoft 365 may be sensitive (especially to “contact form” mail and require an elevated metric like p=quarantine.
Name: _dmarc.domainname.co.uk
Value: v=DMARC1; p=quarantine; rua=mailto:your-alias@domainname.co.uk
The three incremental states for DMARC are:
- p=none
- p=quarantine
- p=reject
8. cPanel Mail Routing
Lastly, check that your server expects email to be managed externally. As the records above are being added to your authotitative zone, cPanel will often detect that external email servers are now in use. However, you need to check this setting.
What to do:
- log into cPanel > Email > Email Routing
- check <Remote Mail Exchanger> if it is not already enabled
- save the setting
This ensures your server sends contact form emails to Microsoft 365 instead of trying to deliver them locally.
Testing and Summary
After updating your DNS:
- Use MXToolbox to check SPF, DKIM, and DMARC
- Send test emails from your contact form to Gmail or Outlook and inspect the headers
- Look for spf=pass, dkim=pass, and dmarc=pass
Summary
By configuring SPF, rDNS, DKIM, and DMARC correctly, your contact forms can send email reliably—even when Microsoft 365 or other suppliers handle your domain’s email. This setup helps prevent your messages from being flagged as spam and protects a client’s domain reputation and brand intact.
About ComStat.uk: Internet Service Provider Comstat provides IT support, web hosting, and media services including web design, Microsoft 365 setup, and audio/video production, serving businesses across Denbighshire, North Wales and Wirral from Ruthin, and Lancashire and the Northwest from Bolton.
Free AI website design
Sitejet - free AI website design generator
Your web hosting account includes free access to Sitejet AI website design generator. Sitejet builds fully functioning websites with as little as your trading name, business sector, and a few other details. Sitejet includes a website design editor so that you or your website designer can customize website elements and introduce special effects.

Sitejet usually costs from $15/mo as a standalone service at time of writing. We are now providing this feature in your cPanel dashboard as standard at no additionalt startup or ongoing cost.
Click on the headers below to find more about Sitejet. Click on images to view at full-sized resolution.
What does Sitejet do?
Sitejet AI is an innovative DIY website builder. By providing your company name, business type, and a few other details, Sitejet AI can generate a professional website that reflects your brand and services using professionally authored website templates. Finshed websites are “mobile responsive”, which means that website content is optimized for PC, laptops, and mobile devices. The process can take seconds to execute.
AI generated website design lowers cost barriers
Sitejet is perfect for business owners who:
- do not have IT expertise
- who want to establish an online presence
- who need to minimize cost
- who optionally want a proof-of-concept to minimize conventional development costs
At time of writing, Sitejet Studio costs from $15/mo as a standalone product. As a cPanel user, we are including this utility as standard in your web hosting dashboard for no charge
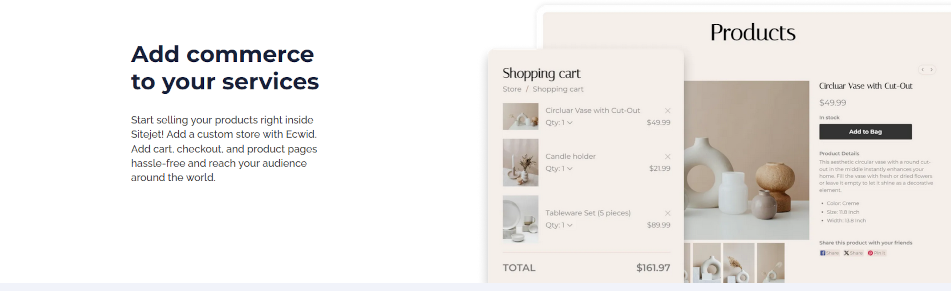
Sitejet includes Ecwid Shopping Cart. Note that this feature is subject to subscription for more than 5 product listings.
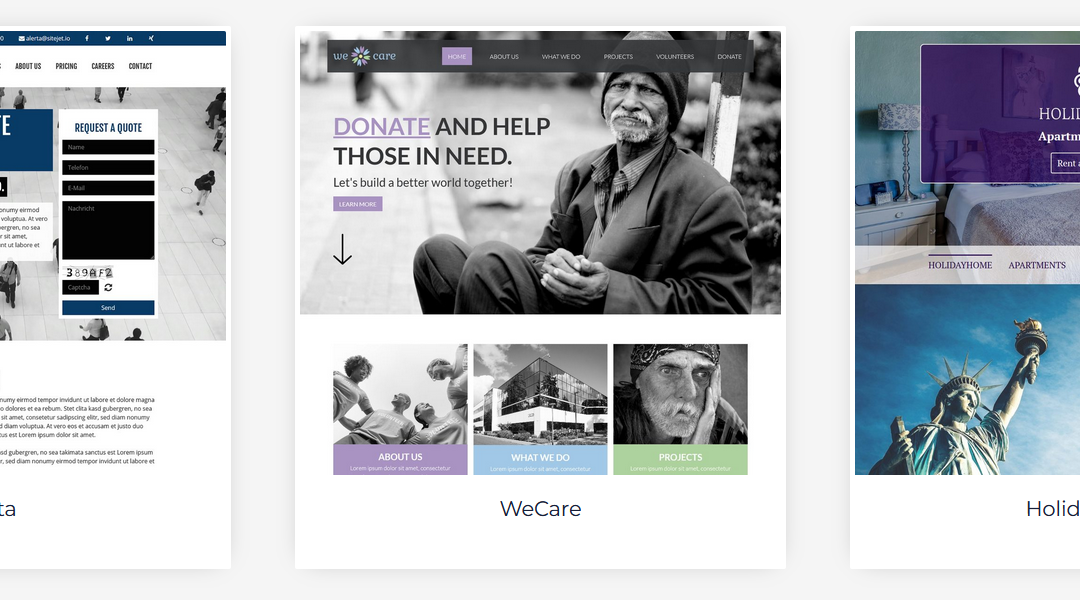
In addition to a customizable template library (about 150 mobile-responsive templates at time of writing), Sitejet includes:
- AI text generation and image/video galleries
- no-code drag and drop editor for layout editing
- AI co-ordinationwith business logos, and
- SEO meta and content optimization
- SEO reporting/metrics by Xovi Now
Read more about Sitejet AI here.
Your Sitejet Builder icon is already installed in your cPanel dashboard in the <Domains> section. If you already operate a web site, you should contact us first about how to deal with transition.
Save on Conventional Designer Costs
Hiring a professional web designer can be expensive. With Sitejet AI, you can bypass these costs and still achieve a high-quality website. The AI generator handles the heavy lifting, creating a site that is both functional and visually appealing. This means you can allocate your budget to other important areas of your business.

AI can make big inroads on web design costs. However, templates are often a “proof of concept” and in our experience users tend to want some kind of customization. Sitejet provides a dashboard for dealinng images, fonts, colour themes, and more. Read the next section to understand how you can use Sitejet AI templates to set the scene for your web designer to customize features.
Demonstrate Your Vision to Website Designers
Templates never quite get it right. This is why big business relies on professional help to achieve visual improvements and SEO optimization. So, AI website generation is not a replacement for professional website design at all. Instead, it works bes as a tool to help your website designer target qualitative improvements at a significant savings to you.
If you plan to hire a web designer for more detailed and customized effects, Sitejet AI can be incredibly useful. By generating a basic website as a “proof of concept”, you can clearly demonstrate your vision and requirements for quotations or tender. This saves time and also ensures that the final product better aligns with your expectations.
Summary
Sitejet provides you with no-code drag and drop editor to build your website from the ground up. Use it to design your own website or as a proof of concept to better equip your design team to achieve better results.
Sitejet usually costs about £150+ per annum, so this addition to your cPanel dashboard already brings enormous value to bear, compared to conventional design costs.
About ComStat.uk: Internet Service Provider Comstat provides IT support, web hosting, and media services including web design, Microsoft 365 setup, and audio/video production, serving businesses across Denbighshire, North Wales and Wirral from Ruthin, and Lancashire and the Northwest from Bolton.

Email migration from cPanel to Microsoft 365
Step-by-step guide
Use our workflow in this article to prepare for email migration from cPanel to Microsoft 365. This workflow explains how to migrate one account. If you have multiple email accounts, we recommend migrating one account at a time. It is possible to migrate an entire email resource, but this is complex and is not recommended unless you have expert in-house IT skillsets. Be advised that this is professional-level work. Your data could be at risk and if you are not confident, please contact us for help.
Click on the headers below to follow our migration workflow. Click on inmages to view at full-sized resolution.
Email migration - overview
- Preparation: Gather necessary information and prepare your environment
- Backup Emails: Ensure all emails are backed up
- Set Up Microsoft 365: Configure your Microsoft 365 environment
- Migrate Emails: Transfer emails from cPanel to Microsoft 365
- Update DNS Records: Point your domain to Microsoft 365
- Verify and Test: Ensure everything is working correctly
Preparatory Steps
1. Gather information:
- Delete junk email and deleted items from cPanel email accounts
- List and assess email accounts/data volumes to be migrated
- Assess broadband to calculate projected download/upload times
- Login credentials for cPanel and Microsoft 365 admin accounts
- Login credentials for your domain name registrar, or wherever your authoritative domain name’s zone record is managed. In some case this might be handled by your Microsoft 365 tenancy.
2. Backup emails:
cPanel does not have an email migration tool. Instead, use either:
- Outlook desktop to download a .pst file of your email account
- A paid solution like EML to PST Converter Wizard to export email accounts
3. Setup or review your Microsoft 365 tenancy
- Ensure you have the necessary Microsoft 365 licenses
- Use the Email Accounts tool to download emails as .mbox or .pst files
Email migration Process
1. Log into cPanel dashboard with your admin credentials
2. Export your emails
- Navigate to the Email section
- Use the <Email Accounts> tool to download emails as .mbox or .pst files
- You may have to use Outlook desktop or a paid third party tool e.g. Bitrecover
3. Log in to Microsoft 365 Admin Center with your global admin credentials
4. Set Up your 365 Migration Endpoint
- Go to the Exchange admin center
- Navigate to Recipients > Migration > More > Migration endpoints
- Create a new migration endpoint using the IMAP server details from cPanel
5. Create a Migration batch
- In the Exchange admin center, go to Recipients > Migration
- Click on “+” and select “Migrate to Exchange Online”
- Choose “IMAP migration” and follow the prompts to create a migration batch
6. Start the migration
- Start the migration batch and monitor progress
- Once the migration is complete, verify that all emails have been transferred
Update DNS Records
1. Log into your domain name registrar
- Access your domain registrar’s dashboard with your credentials
2. Update MX records
- Replace the existing MX records with those provided by Microsoft 365
- This ensures that new emails are delivered to Microsoft 365
3. Update other DNS records
- Update SPF, DKIM, and DMARC records as recommended by Microsoft 365
- Review rDNS and edit as necessary
Verify and Test
1. Check Email Delivery
- Send test emails to and from the migrated accounts to ensure proper delivery
2. Verify new 365 account settings
- Ensure that all email settings and folders are correctly configured in Microsoft 365
3. Monitor for Issues
- Keep an eye on the accounts for any issues over the next few day
Summary
These steps will migrate accounts from cPanel to Microsoft 365. Unless you are expert, you should migrate one email account at a time. This affords better scope for stepping back if you encounter issues, and also migration of accounts in bulk require practiced experience.
Large email accounts backups can take a lot of time to download especially with poor broadband, and uploading content can take even longer. Be prepared for some hours of outage if you have large backups and poor bandwidth.
Bear in mind that IMAP is an older technology and it is possible when migrating to Microsoft’s more modern ActiveSync environment, it accounts with large folder may appear corrupted. In this case, creating a new folder and copying content (rather than moving) usually resolves the problem.
If you encounter any issues, Microsoft’s support resources are well documented for additional help.
About ComStat.uk: Internet Service Provider Comstat provides IT support, web hosting, and media services including web design, Microsoft 365 setup, and audio/video production, serving businesses across Denbighshire, North Wales and Wirral from Ruthin, and Lancashire and the Northwest from Bolton.
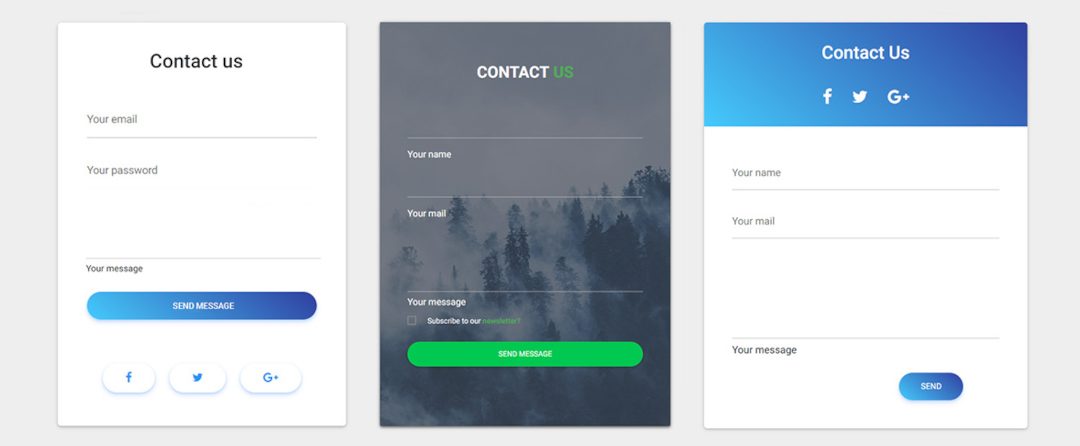
How to manage a web site contact form
Contact forms - understand your risk
Website contact forms are a convenient way for visitors to get in touch with you. However, they introduce potentially catastrophic risks that you should be aware of.
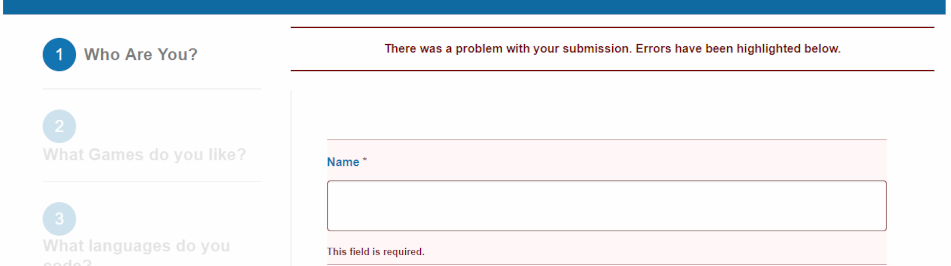
Validating form fields helps reduce risk of malicious injection which could hijack or destroy your web site.
Browse this article to explore inherent contact form risks and how to manage them, especially if you are a “self-serve customer. If you do not rely on our optional support, there may be charges for support requests.
Click on the headers below to find out how to find out more about contact form issues. Click on images to view at full-sized resolution.
Malicious infiltration, abuse, and DNS
Web site forms are problematic. It should be easy to display a form that asks for a name, email address, phone number, and message. It is easy to make the form look attractive. However each field in a contact form is an open invitation for a hacker to destroy your web site or orchestrate a bulk email of thousands of emails that you end up bearing the cost of. Without concerted attention, it is a matter of time before a hacker finds a vulnerable contact form.
Contact form problems fall into two areas:
Malicious infiltration and abuse
Contact forms are a significant target for malicious activity. Hackers look for vulnerable contact forms to inject harmful code into your website. Statistically, small businesses are the most frequently exploited victims. Malicious infiltration causes catastrophic trouble like data breaches or site crashes. Common attacks include SQL injection (aka vector attack) or cross-site scripting (XSS). Additionally, spammers might flood your form with junk messages, making it hard to find genuine inquiries.
DNS Issues and Email Validation
When someone submits a contact form message at your web site, the information is often sent to an external email address. If there are issues with your Domain Name System (DNS) settings, these emails will probably be dropped without notice to anyone. Since contact form abuse is such a significant target for abuse, email gateway servers are especially sensitive to improperly validated email headers. This means your email server has to be correctly configured with your web site’s IP address using SPF, rDNS, DKIM, and DMARC.
Usually, resolving your DNS for contact form validation needs expert attention and may be beyond the scope of a web designer or in-house expertise. This does not mean web designers do not know their job. Intead, DNS is its own skillset, requires specialised knowledge,and also needs to take account of broader IT processes in your organization.
How to secure your contact form
Here are the three most important things you can do to secure your contact form:
Validate form fields
If you do not restrict the size and content of a form field, anyone can inject source code (an executable program), click <send> and your web server will execute the code which could mean web site destruction or hijacking your identity. Either eventuality is catastrophic and it is easier to do than reading this article.
Therefore, validate fields to limit the length of text. For instance,
- <name> fields could be restricted to 20-30 characters
- numerical composition of a phone number might have to comply with a special formatting, like aaaaa bbb ccc
- email addresses might need to contain “@”, include a valid domain extension like “.co.uk”, and be limited to 40-50 characters
- “message” field could be restricted to 150, 250, 350 characters
This is all “client-side” operation. All of these seriously curtail options for hackers.
DNS
DNS is especially problematic. For instance, your email might be handled by your domain name registrar, or Microsoft 365, and your contact form has nothing to do with your organisation’s usual email server.
Usually, your domain name needs to be customised to include the location and characterisitcs of your contact form. This is “server-side”, and actually not even that because often these modifications might need scripting at a domain name registrar. This is what is called DNS, and it is one of the most difficult technologies to handle – even most web designers rely on upstream support for help with DNS.
Regular testing
Test your contact forms regularly. Keeping spam out of email Inboxes is a moving battlefield. The web server itself is not the problem – when instructed, it acts, and in some ways that is part of the problem – it does not know how to discriminate between good and bad content without form validation.
Hackers are creative, and organizations like Google, Microsoft, and Yahoo spend billions to keep up with evolving threats. In so doing, new security may render the source code you rely on for your contact form irrelevant, and the contact form programmer might not even know their source code is now outdated. Large organisation pay full time salaries just for someone to manage a contact form – daily. Moving to text-based chat bots is not designed to annoy customers – it is an attempt to avoid contact forms in the first place.
Summary and alternatives
Contact forms require constant owner-maintenance and are subject to ever-changing security threats. Also, because your form is programmed on “client-side” (e.g. in WordPress), owners assume responsibility for secure operation of their contact form.
Even if you undertake the overheads of managing your contact form, your contact form should only be one way for customers to contact you. For example, alternate channels like those below move direct risk away from your web server:
- Social media contact options like WhatsApp for Business, Facebook, Insta, etc.
- Microsoft 365 Forms or Google Forms, which can be embedded on your web site
Professional DNS annual support available
If you purchased your domain before you began using our servers and you want us to manage your domain for you, we can administer your domain name records (DNS) annually for £75, including periodic updates as they are required. Use the PayPal QR code on our home page for payment, or contact us to arrange invoicing for our DNS service. This is included in optional support arrangements that you may already subscribe to.
About ComStat.uk: Internet Service Provider Comstat provides IT support, web hosting, and media services including web design, Microsoft 365 setup, and audio/video production, serving businesses across Denbighshire, North Wales and Wirral from Ruthin, and Lancashire and the Northwest from Bolton.
Configure SPF, rDNS, DKIM, and DMARC for email
Introduction
Sending and receiving email should be straightforward, but a lot of background checks happen before your organization’s email is delivered reliably and securely. Use this article to activate SPF, rDNS, DKIM, and DMARC to make sure your email reaches recipients, and protects your email server from crippling outcomes like dropped email and public blacklisting.
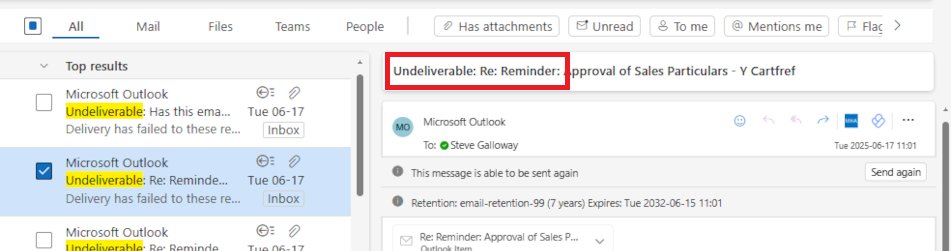
“Undeliverable”: What cost a lost email that you never know a recipient has not seen?
Click open the headers below to learn about email deiverability and “trust”. Please read through this entire article before starting to engage individual modifications to your email server. Changes you make are done so at your risk so be sure to contact us for general advice if you are in doubt. Support options are available for professional assistance. Click on images to view at full-sized resolution.
Why do these protocols matter?
If you do not put a postage stamp on a letter, it probably will not reach its destination, and without a return address you will certainly never know what happened to the letter.
Similarly, without SPF, rDNS, DKIM, and DMARC, email that you send will be erratic and unpredictable. This is because industry tools to assess “trust” are not operational. These protocols are like postage stamps. You may think “it has never been a problem before”. Partly this is because when email does not reach a recipient, you know you sent it but the recipient does not know it was supposed to be received.
Everyone has sent an email that has never reached its target. These protocols are why most failures happen, and in business communications…. it matters. The protocols we cover in this article enable your suppliers’ and customers’ email servers to “trust” your email and its “brand”.
“Postage stamps” for email
The one question we are posed by clients in 25 years of IT support more than anything else is the plaintive “why aren’t my emails getting through?”. Hopefully, it is only because of a badly spelled email address. Often, though, the answer is that outgoing email is not sending adequately “stamped” emails with “return addresses”.
Protecting your identity – “trust”
Protocols like SPF, rDNS, DKIM, and DMARC are email’s a little bit like postage stamps. When the bar code on a postage stamp is recognized as authentic, the envelope is sent to its destination. Similarly, protocols enable receiving email servers to measure and “trust” the authenticity of your communication. Put another way, these protocols protect your email from being measured as spam or malicious email.
Self serve guides for implementing email protocols
Your web server is optimised for delivering your web pages. If email is included in your package, we have made sure that an email server is enabled with necessary email tools. However, like flat-pack furniture, your email server is minimally configured and the protocols described here need to be aligned with your domain name.
These domain name modifications can only be manually configured by you or your agent. If we look after your domain name, we would configure these modifications within your ongoing support. If we do not have admin privileges for your domain name’s “zone record”, and you have elected against support, then you need to configure your domain name’s zone record.
If you do not have expert in-house IT skills, consider our DNS configuration service and ongoing support plans.
DNS Configuration – Professional support
DNS is awkward technology, even for IT pros. If you purchased your domain before you began using our servers and you want us to manage your domain name records for you, we can still administer your domain name records (DNS) annually for £75, including periodic updates as they are required. Use the PayPal QR code at the bottom of our home page for to send us payment, or contact us to arrange invoicing for our DNS service. This is included in optional support arrangements that you may already subscribe to.
DNS Configuration – self-service option
Use our “self-serve” guides linked below to implement SPF, rDNS, DKIM, and DMARC. There are a few ways to deal with these modifications, and it really depends on how your domain name, and your authoritative nameservers are configured. Read more about deciding where to manage your authoritative nameserver here. So these articles might not be exactly on point for your situations. Again, ask us for advice. Implement the protocols in the order listed:
- How to configure SPF
- How to configure rDNS
- How to configure DKIM
- How to configure DMARC
Tips and tricks
- some protocols may take up to 24-72 hours to resolve
- read through each guide before starting
- monitor email for a week or so before enabling the next protocol
- do not make DNS modifications during heavy traffic/important projects
- document what you do (e.g. screen shots) so that you have a note of “last known” working state
Bear in mind that changes made to domain names happen in real time, and errors can cause web site and email outages that could take up to 72 hours to restore. If in doubt, contact us first.
Summary
Email is vulnerable to malicious attacks that pose risks to your online identity, reputation, and hijack. Implementing SPF, rDNS, DKIM, and DMARC helps to ensure that your outgoing email reaches recipients.
Implementing these kinds of services is challenging without experience. If you do not have expert in-house IT skills, consider our email configuration service and ongoing support plans. We are glad to quote on request.
Create a new email address with cPanel
Set up a new email account
Set up email accounts using cPanel’s email module. You can create new email accounts and manage multiple users with cPanel’s extensive utililties.
See our other articles about email to plan email storage quotas, ongoing management, and security implementation like SPF, rDNS, DKIM, and DMARC. For advice, we can help you design policies and procedures.
Click on the headers below to learn how to create an email account. Click on images to view at full resolution.
Create a new email account
Log into your cPanel web server home page
- open your web browser
- navigate to the URL in your web server info sheet
- enter your credentials and click <Enter>
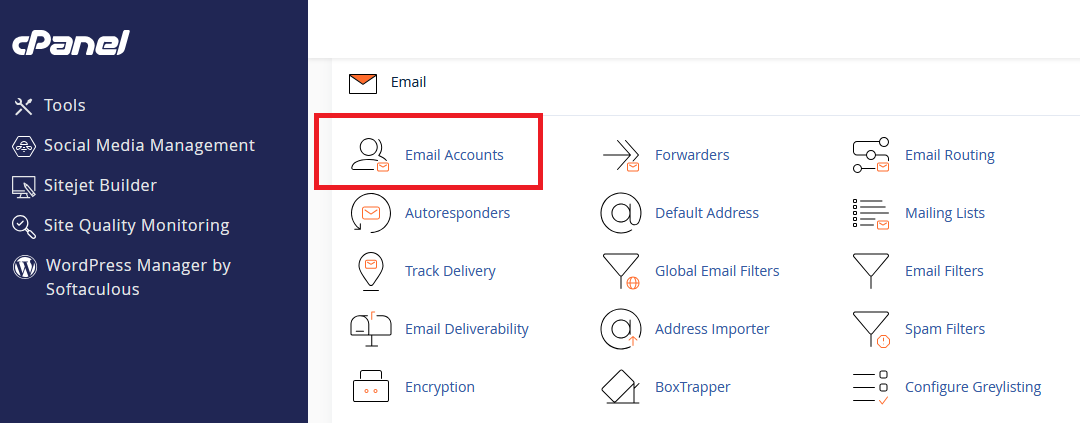
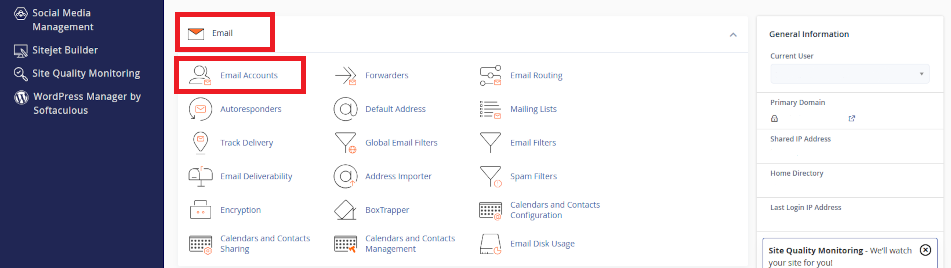
Navigate to cPanel’s Email module
- look for the <Email> section on the cPanel home page
- click on <Email Accounts>
cPanel’s email module features tools for implementing your email policies.
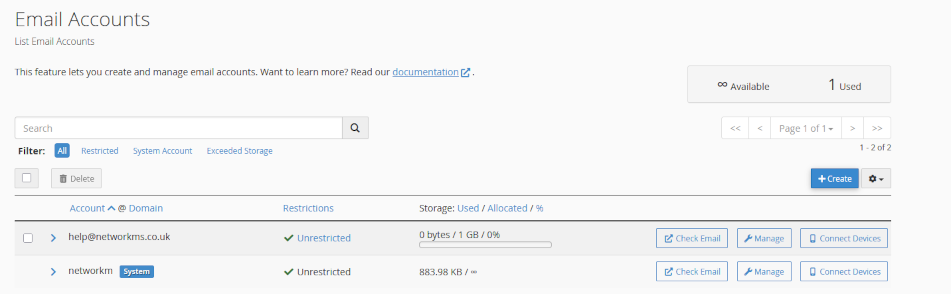
Create your new email account
- In your Email Account menu, click <Create> to add a new account
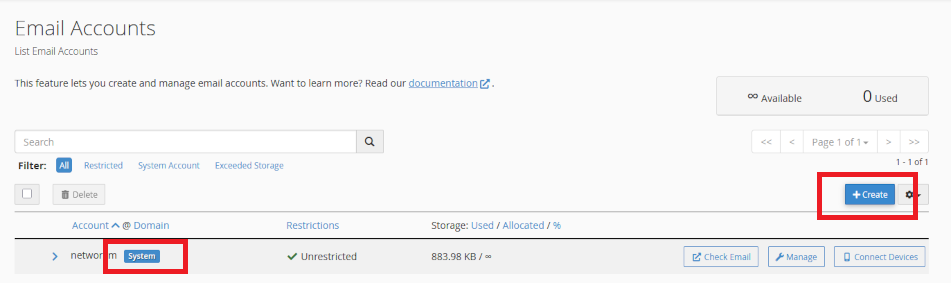
Important Note: when your server is built, it is programmed with a system account. This is for admin use and should not be used for daily email activity. For instance, your System email account is necessary for establishing a centralised address book, shared calendar, and system functions.
Fill in the following fields:
- Username: Enter the part of the email address before the @ symbol (e.g. info for info@your-domain.com)
- Domain: Select the domain for the email address if you have multiple domains
- Password: Enter a strong password or use the “Generate” button to create one
- Storage Space: Set the mailbox quota (default is 1GB)
- Click <Create> to set up the email account
Using a new email account
cPanel provides a fully featured Webmail utility called Horde. Access Horde Webmail by pointing their web browsers to the URL detailed in your web server info sheet. Click here to find out more about Horde Webmail/calender.
Your web server provides utilities to auto-configure devices to user’s email accounts. Users should configure email using IMAP to permit multi-device access.

Your web server provides email auto-configuration files for popular email clients. Users can download the files to execute from their Webmail preference pages.
Summary
cPanel provides a complete suite of tools to create email accounts and a webmail service for users to manage their email with.Also, the system email account can be used to create a centralised contact list which is an important GDPR consideration. The system account can create shared calendars too.
Email does not look after itself and ever changing threats require ongoing attention to protect you from email storage overruns and risks like blacklisting which could prevent you and your users sending email.
Read this article for more guidance on email management
For expert help about email policies and fully supported management, please contact us for help.
About ComStat.uk: Internet Service Provider Comstat provides IT support, web hosting, and media services including web design, Microsoft 365 setup, and audio/video production, serving businesses across Denbighshire, North Wales and Wirral from Ruthin, and Lancashire and the Northwest from Bolton.
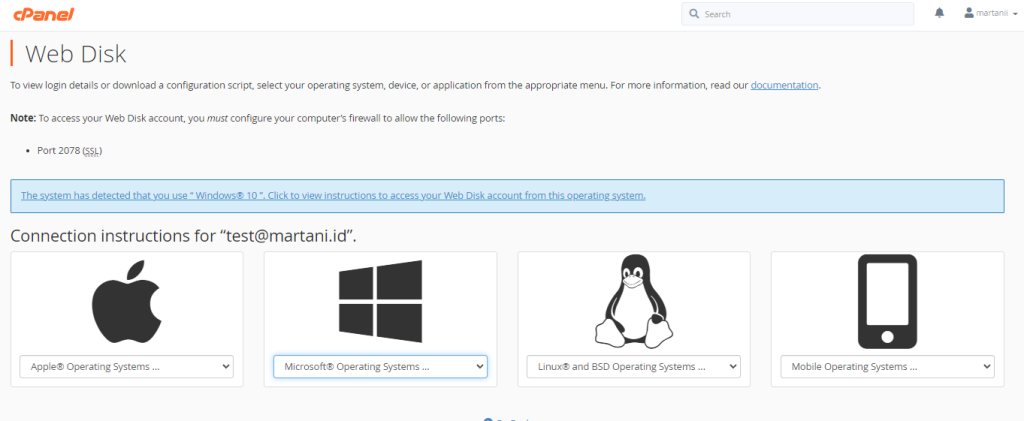
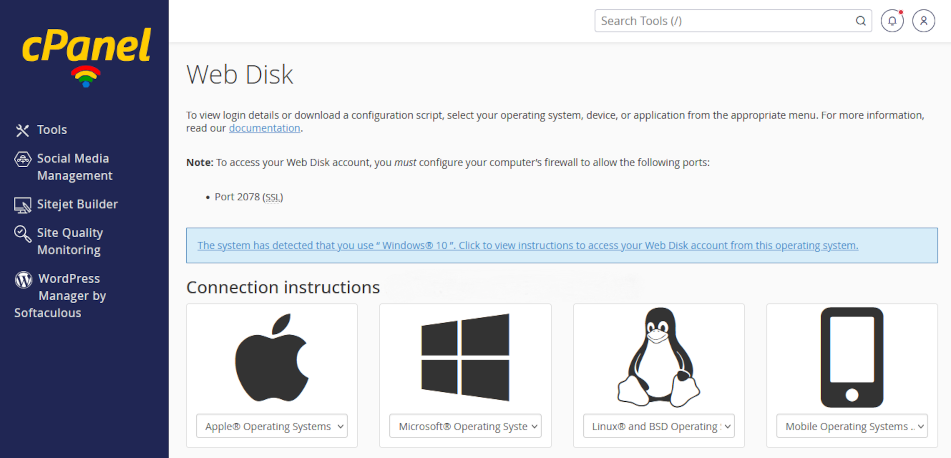
How to use cPanel Web Disk
cPanel Webdisk
Use cPanel Web Disk as a Cloud storage facility for managing and sharing your documents and files. Create Web Disk accounts in cPanel and save connections in your devices as network drives to provide access on your local devices.
Click on the headers below to find out how to use cPanel’s Web Disk module. Click on images to see in full resolution.
Plan a Web Disk folder structure
Web disk is a useful resource for saving files for access from computers and mobile devices that have been configured to connect to Web Disk user profile. Some organizations use the utility for off-site file backup.
Create a folder structure with user accounts
First, plan a folder structure (directory in Linux parlance) that can scale as your needs grow and change. For instance, you might create a user account for Accounting, and a user account for Marketing. This way, you can control how staff connect to the right files. Web Disk may be a useful mechanism for backing up local files, too.
Next, create a “sandbox” account to test account creation and connectivity. Then, you ca establish user accounts in cPanel and download connection scripts which can be installed on desired devices.
Your server can generate cconnection scripts that you can install on devices to create a permanent connection to files from computers and mobile devices.
Secure data transfer
Connections between your web server and connected devices leverage your web server’s SSL certificate. This means that your connected computer can connect to a Web Disk drive so that the Web Disk location appears in Windows File Explorer or Mac OS Finder. If you need to connect to multiple Web Disk accounts, download a script for each account you have privileges to connect to.
File sharing
Modern approaches to file sharing reduce the risk of duplication and version problems that have plagued workgroups in the past. Solutions like Microsoft 365 provide GDPR-compliant utilities to control versions and multi-user editing in real time. Web Disk does not include these kinds of tools.
There are third party add-on solutions that expand file sharing options for Web Disk to emulate Microsoft 365’s capabilities. Be aware that Web Disk may not be a suitable for you if your organization relies on version control and simultaneous multi user editing.
Create a new Web Disk account
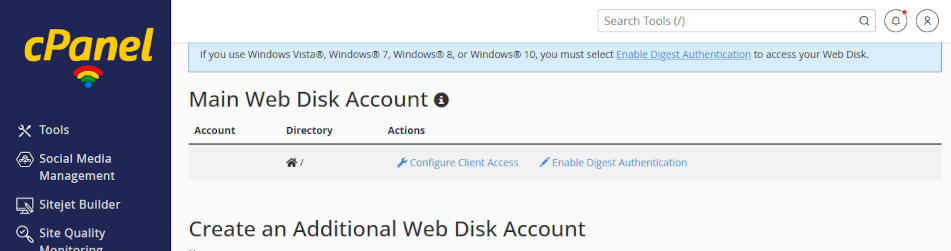
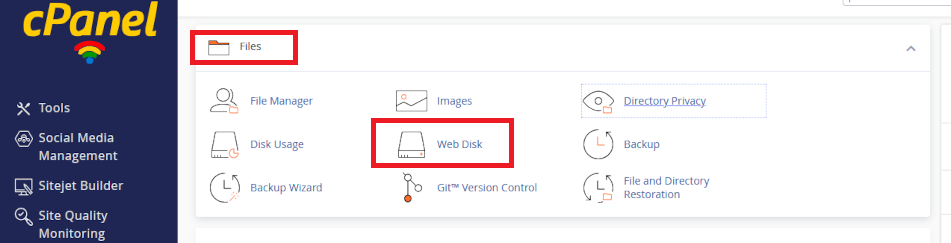
Only the web site owner can create Web Disk Accounts. Log into cPanel using the data sheet we have provided you with and navigate to Files > Web Disk. Click open the utility.
Leave your primary user account alone
When you open Web Disk, you will see that a user account is already established. Leave this primary account alone. Your primary Web Disk account has access to all directories on your web server, including your web site pages and database. Sharing credentials for the primary accounts which poses a catastrophic risks if shared.
Instead, adding accounts makes it is easier to manage and revoke access for individual users without affecting the primary account. Also, creating a hierarcy of accounts helps you track/change/remove users and privileges.
Add an account
- Scroll down the Web Disk page and click open Create an Additional Web Disk Account
- Fill in the fields, including user name and permissions
- Use the recomended directory location
- Enable <Digest Authentication> (for Windows users)
- Review the account privileges and click <Create>

Edit new and existing accounts under the <Manage Additional Web Disk Accounts> heading
Download and install connection script
Once your account is created you can edit properties, change passwords, and download connection scripts for that account. Distribute connection scripts to users or devices that need connecting to the account.
To install the installation script, click on the downloaded file and follow the prompts. When you enter your login credentials you will need to enter the full syntax for the account (e.g. marketing@my-server-name, not “marketing”). This will connect you to your web disk account on your web server. In future, you will find a link to your Web Disk account in File Manager or Finder.
Your server can generate connection scripts that you can install on devices to create a permanent connection to files from computers and mobile devices.
If you are connecting to multiple folders, download a script for each account. Also, if you are the web site owner, you have automatic privileges to all directories on your server.
Create file links for email
Today, organizations send file attachments using links. Email file attachment links:
- reduces email storage costs
- reduces bandwidth usage
- helps control file version problems
- reduces the risk of emails being rejected by recipients who restrict file attachment sizes.
As email users and storage increase over time, organizations of all sizes have to deal with bloat. So it is important to establish a policy to address this looming problem. There are options to do this with Webdisk and add-on software.
Enable file sharing permissions individually
To grant an email recipient access to a linked file, access Webdisk using cPanel File manager, right clicking on a file and changing permissions to 644 and finally right clicking on the file to get a direct link to paste into your email. This is less tricky than it sounds. However, making files publicly accessible over time poses problems over time and may not be suitable for GDPR compliance.
Enable file-sharing permissions at directory level
Files for email attachment can also be stored in a public directory which can be created with 755 permissions. This kind of directory could be called “email attachments” or “shared with everyone. Since sharing permissions are already established, it only remains for a user to get the file link to include in an email. Also, directory contents can be reviewed over time to deal with compliance issues.
Third party add-ons and Webdisk customization
You can use third party apps like Cyberduck to extend Webdisk’s finctionality to include more streamlined file links and more. Also, link expiration policies can be set at server level to control data loss or leakage. Please contact us for help with Webdisk customizations.
Summary
Web Disk provides a simple centralised file management system. Using Linux “user” privileges, you can create a directory hierarchy to manage user or device access to “departmental” files.
Web Disk does not natively provide multi-user real time editing or document version options. You can use add-on software to improve functionality. You may need to develop an in-house system to notify workgroup users when a file they may want to edit is already being edited by another user. As files become more widely shared and/or users need to collaboratively edit documents, consider Microsoft 365 to address workgroup needs.
Web disk might be a good way to back up files stored on premises. However, if Web Disk is your primary file location, be aware that backup remains your responsibility and you should implement a workflow within your GDPR documentation to manage backups.
For expert help about Webdisk, and fully supported management please contact us.
About ComStat.uk: Internet Service Provider Comstat provides IT support, web hosting, and media services including web design, Microsoft 365 setup, and audio/video production, serving businesses across Denbighshire, North Wales and Wirral from Ruthin, and Lancashire and the Northwest from Bolton.
How to back up your web server with cPanel
Backup vs Backup Wizard
Use our cPanel utilities to backup and restore web site data content, databases, and other data on your web server.
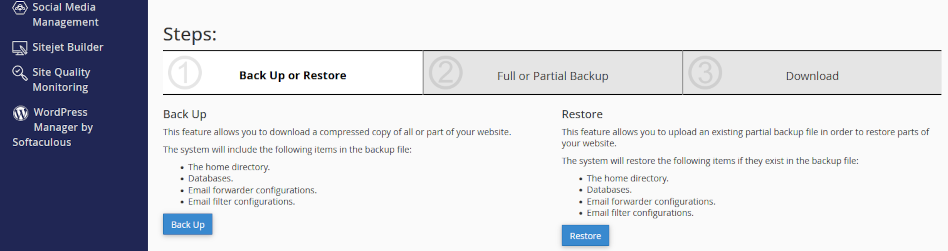
cPanel backup utility provides workflows for backing up and restoring web site and email content
Using cPanel’s Backup utility, you can select from data sets we have already backed up and download the files to your local drives for safekeeping.
Using cPanel’s Backup Wizard utility, you can design your own backups. You can backup some or all or your content. Also, you can backup incremental backups which are useful when you only need to backup minor changes since your last full backup. You can store your files locally, restore them to your server, and you can use the content when migrating to a new server.
Click on the headers below to find out how to use cPanel Backup and Backup Wizard. Click on images to view full size.
Download Backups using cPanel Backup
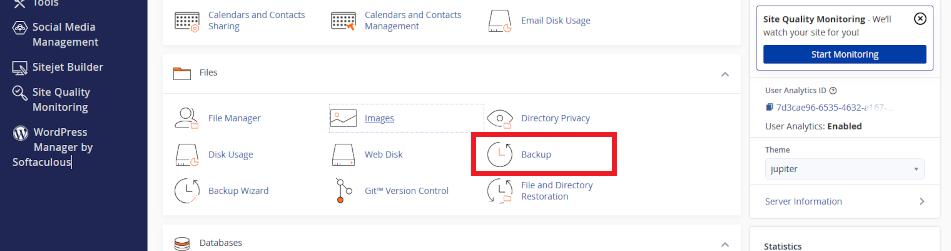
Log into your web server’s control panel – we call it cPanel. You can find how to log into your services from the web server data sheet we have provided you with.
At your cPanel dashboard, either search for Backup or scroll to the section called Files and click on the optin called Backup.
About cPanel Backup
cPanel Backup lists backups that are already made and stored on your web server. These are available in a pulldown list, including full and partial backups, that you can download. The list includes backups that we have executed as we deal with daily mantenance. You can download these backups,
Export backup from server
We recommend that you download backups to your local drives, and you can find help for copying backups at datacenter speeds to Google Drive, OneDrive, Dropbox, etc. Also, to conserve space and improve web page delivery speeds, note that we rotate backups so that (at time of writing) we only maintain the two latest backups.
About Restore
In cPanel Backup, there is an option to restore backups. If you are restoring full and partial backups, be aware that you should restore data sets in date order, starting with the earliest date stamp.
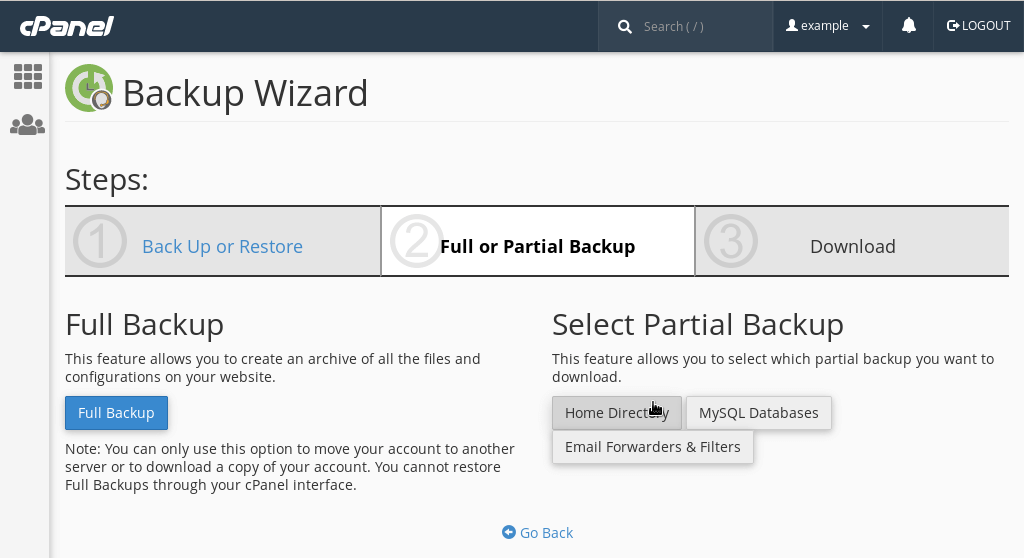
Create backups and restore with Backup Wizard
Use cPanel Backup Wizard to create and download backups. Also, you can restore backups using this option.
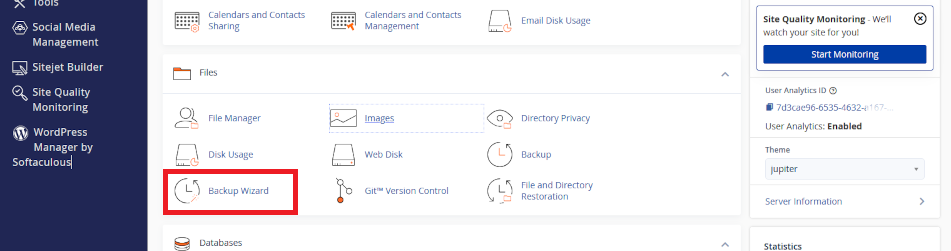
Backup Wizard – more options
Backup Wizard offers more granularity, giving you the option to select individual data sets, like your WordPress site, or your MySQL database which attaches to your WordPress site, or your email. Also, you can execute partial backups if changes that you have made to your web site are minimal.
Using Backup Wizard you can create your own backup profile. Downloading files that we have created may limit what you are able to do.
Summary
cPanel’s backup utilities have proven to be reliable, however a lot of things can go wrong with backups. Your server might backup files accurately, but the data could be corrupted as it is saved because of a power brownout. Or, data might be damaged in transit as the data set is transferred elsewhere. So, although we take “snapshots” of your web site, they are not guaranteed, and we only keep updates that are current over the last 2-4 weeks.
Therefore, you should only rely on our working backups as part of your risk management. Professionals use an array of tools to provide duplication and/or availability. In some cases, professionals mirror two or more geographically remote servers to cover a primary server failure. In some cases, this is economical and we can implement these kinds of services.
You can protect against a single point of failure failure by developing a strategy which covers two or more methods to secure data. For instance, your web designer may keep backups. Usually these conserve work in progress so that there is a “last known working state”. You might need to maintain a longer history of backups.
Your web designer will be glad to discuss backup strategies with you because you might mutually and economically share utilities and avoid extra cost. Also, we are always glad to help if you do not have a professional developer but need advise about strategy and products.
About ComStat.uk: Internet Service Provider Comstat provides IT support, web hosting, and media services including web design, Microsoft 365 setup, and audio/video production, serving businesses across Denbighshire, North Wales and Wirral from Ruthin, and Lancashire and the Northwest from Bolton.
Microsoft Outlook Categories
Microsoft Outlook's "Categories" Feature
Use Microsoft 365 Categories to organize and manage your Outlook email, calendar, contacts, and tasks.
Tag your Outlook content with Categories to visually distinguish projects and priorities with colour-coded tags to visually differentiate content at-a-glance.
Find things fast with Categories
Categories help you visually target important content in your ever-growing email folders, calendars, and more. Also, you can search across Outlook for emails, events, and tasks that are tagged with the same category. Used in a well planned scheme, you can use categories to filter an Inbox to create virtual folders on demand. This avoids duplicated content in unwieldy folder structures which leads to broken email threads and lost attachments.
Click on the headers below to find out how to create and customize your categories. Click or tap on images to see in full screen.
What are categories for?
Outlook Categories help you organize and manage email, contacts, calendar events, and tasks. For instance, instead of moving or copying emails to folders, you can keep emails in your Inbox and tag emails with categories. This way, you can filter your Inbox on demand to show one or more categories.
Categories reduce confusion
In situations where an email is saved in two folders which might lead to multiple email threads for the same message, it is more efficient to keep the original email in your Inbox and assign two categories to that email.
Using tags you can:
- create category names and colours
- tag and group related emails
- organize your calendar events by type, such as meetings, personal appointments, or deadlines
- group your contacts as family, friends, colleagues, or clients
- organize your tasks by project, priority, or status
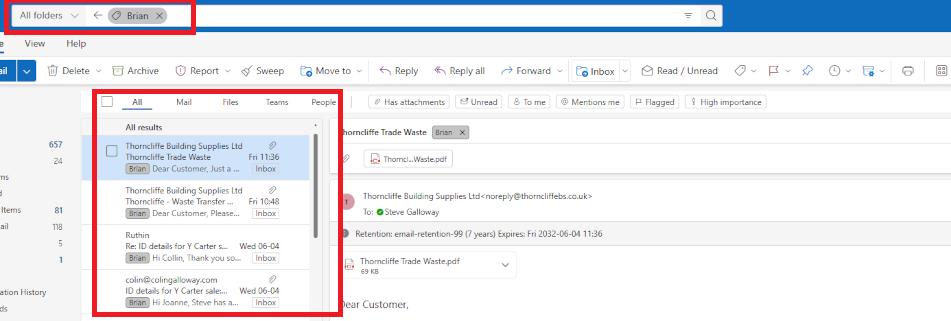
Enter the name of a category you want to filter in “search” and turn your Inbox into a dynamically generated folder which lists activty associated with the tag. e.g all items tagged with “Brian” in this screenshot.
Categories are usually used at an individual level. However A shared email account would rely on categories established for that account. Uniform categories can be established at an organizational level. This requires adminstrator-level knowledge.
How to create and manage tags
Use this workflow to start creating and customizing your tags:
- create a new email in Outlook
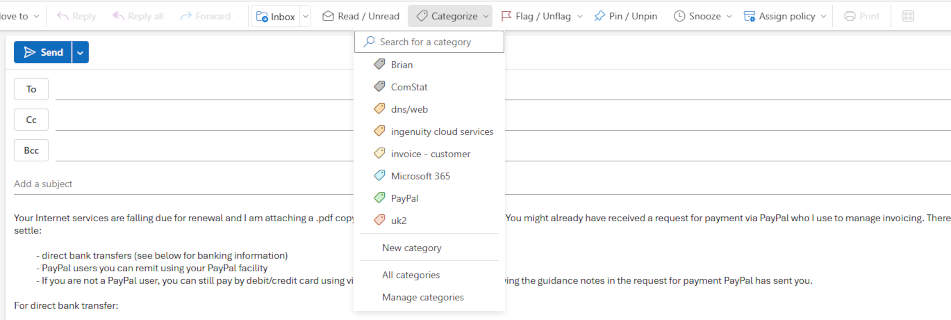
- click open the <Categories> dropdown list.
Outlook always lists a few categories. These are intended as a starting point. In the illustration below notice that there are user-defined categories instead of the defaults. This means Outlook’s original categories have been customized, and new categories added to the user’s library. Notice towards towards the bottom of the list the options for creating, edit, and showing categories. Click on <New category> to create a new category.
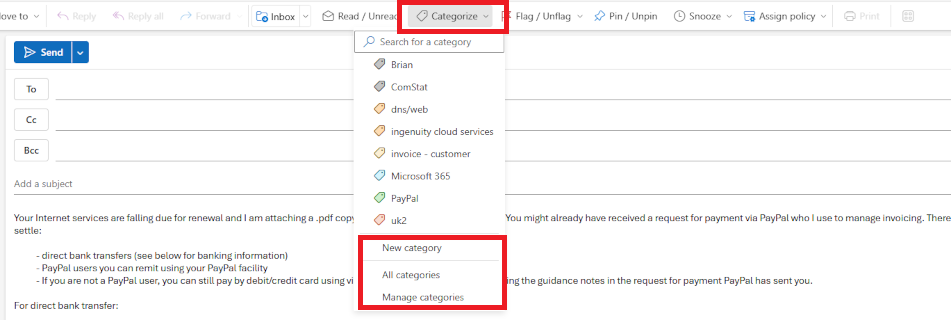
Use <all categories> to view categories. You can use the <search> field at the top of the dropdown box to pinpoint categories. Once you create a category, the same tag can be used in Email, Calendar, Contacts, and Tasks.
Editing and managing categories
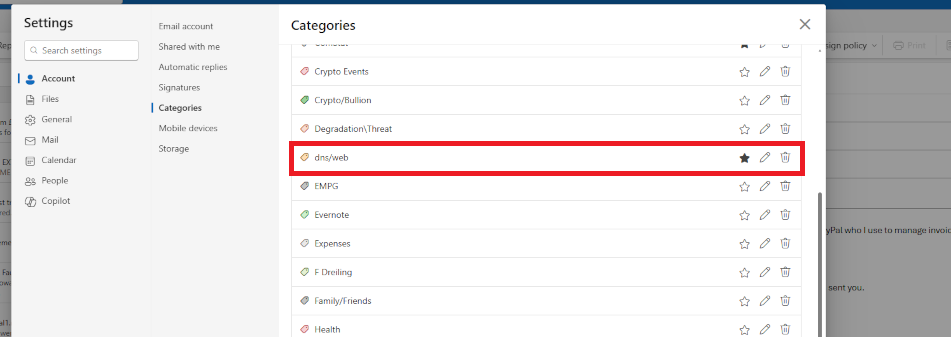
You can edit existing tags to change names and colours. In any email composition and calendar event windows, pull down the <categories> dropdown menu and click open <Manage categories>. Her you can “fave” categories, and you can click on the pencil icon to edit category properties. In the image below, clicking on the pencil in the DNS/web row would open the properties for that category.
Planning Categories
Exit strategies matter. Plan a structure for your categories to avoid duplication and confusion. Unchecked, category libraries can become so large that users forget what categories they already have.
For instance, if you are tagging customers, it might makes sense to have a category for “customer”, but also a drill-down or sub-heading category called “customer”-“customer surname-initials”. For example, a <heading>-<sub-heading> category might look like:
- customer-smith-a
This way “customer” is a global header, and the other fields are sub heading. Organising a strategy for categories helps you manage your list as it grows. This can be likened to departments, which is a common feature in charts of accounts.
Summary
Outlook Categories add a flexible and visual way to keep your Outlook items organized, making it easier to manage and search your communications and schedules as your database grows.
Categories are intended for individual use, but organizations might opt to have individual users follow a common colour-coding theme and defined list defined by a manager to adopt in their own instance of Outlook. Categories can be established at organizational level. This requires administrator level implementation.
About ComStat.uk: Internet Service Provider Comstat provides IT support, web hosting, and media services including web design, Microsoft 365 setup, and audio/video production, serving businesses across Denbighshire, North Wales and Wirral from Ruthin, and Lancashire and the Northwest from Bolton.