
cPanel Disaster Recovery Backups: Ownership responsibility

cPanel Disaster Recovery Backups: your data is yours to protect

Comstat maintains disaster recovery backups for your web server content and data strictly for our own administrative and disaster recovery purposes. This article sets out our backup policy which, in common with industry convention, relies on the principle that responsibility for data protection rests with the owner of the virtual server or hosting account.

This article explains how our disaster recovery backups are used within our hosting and virtual server environments — and just as importantly, how they are not used.

Click open the headers below to learn more about our policy regarding disaster recovery backups. Support options are available for professional assistance, and at the end of the article you can find links to guidance and help for implementing backups. You can return to our Index of Articles by clicking here.

Data is the responsibility of the owner

In all hosting environments managed by Comstat, the responsibility for data protection rests with the owner of the virtual server or hosting account.

That includes, but is not limited to:

  • Website content and uploads
  • Databases
  • Email data
  • Application‑specific files
  • Configuration changes made by the account holder

This is in line with Internet Service Provider (ISP) practice. For instance, neither Google nor Outlook.com undertake to back up your email or files. Although Microsoft 365 guarantees service level availability, data remains the responsibility of the owner.

Every website owner should maintain their own backup strategy that aligns with their business, regulatory, and operational needs. This may include one or more of these approaches:

  • cPanel backup (provided with your server)
  • Backup utilities like Backuply which you can install using WordPress or cPanel Softaculous library
  • off‑platform backups
  • third‑party backup services
  • or application‑level backup tools

We are glad to help you decide what is the best solution for your needs.

Importantly, although we do keep temporary backups which may be helpful as a last resort, our platform is not positioned as a primary backup service for end users.

Who Is Responsible for Data?

Responsibility for data protection rests with the owner of the virtual server or hosting account. In the case of the services we provide to you, this includes but is not limited to:

  • Website content and uploads
  • Databases
  • Email data
  • Application‑specific files
  • Configuration changes made by the account holder

Every website owner should maintain their own backup strategy. This makes sense because your strategy needs to align with your business, regulatory, and operational needs. This might include using:

  • solutions available to you with your hosting (e.g. Backuply, Softaculous WordPress Manager)
  • solutions provided to you by agreement with your agents
  • off‑platform backups
  • third‑party backup services
  • application‑level backup tools

Our data recovery backups are designed to cope with force majeure risks that your hardware is exposed to. Therefore, our platform is not positioned as a primary backup service for end users.

Why Comstat Takes Backups at All

Although responsibility for content and data ownership lies with an account holder, Comstat performs disaster recovery backups for clear and limited reasons:

  • Platform‑level disaster recovery
  • Server migration
  • Administrative resilience
  • Infrastructure failure scenarios
  • Major security incidents

In this way, our backup regime exists to protect the integrity of the hosting platform as a whole, not to replace user‑managed backup solutions.

Our backup framework is designed to support hardware management and recovery in exceptional circumstances—not routine file restoration or historical data retrieval.

How Our Backup Policy Works

Unfortunately, web site owners do not always deal with backups. In this situation, our operational backups might be able to restore a recent working configuration. However, this might not accomplish a most recent known working configuration. Also, our backup library extends to a 90-day rolling window.

Backup Scope

  • Full cPanel account backups
  • Incremental – file changes made since baseline/last increment
  • No guarantee of granular file‑level recovery
  • No long‑term archival storage
  • System files are excluded

Retention Model

  • Daily backups: retained for 7 days
  • Weekly backups: retained for 4 weeks
  • Monthly backups: retained for 3 months

This schedule provides a maximum recovery window of approximately 90 days, which is appropriate for disaster recovery while avoiding unnecessary data retention.

Backup Access

  • Backups are governed using native WHM and cPanel tools
  • Restore actions are typically administrator‑controlled
  • In some cases, backups may be visible to account holders in cPanel
  • Access is provided only as a last resort, not as a service guarantee

This model ensures that cPanel disaster recovery backups remain predictable, auditable, and aligned with platform boundaries.

Why We Use Native WHM Backups

Firstly, it helps to understand how a web server operates.

WHM – Web Host Manager

Web server (platform) administrators use an operating system called WHM (Web Host Manager) to manage servers. Think of WHM as an equivalent of Microsoft Windows (admin user). Usually, web site owners do not have access to this hierarchy level. This is because WHM requires specialist knowledge

cPanel – where daily work happens

Web site owners typically use cPanel (Windows standard user) to manage their web site, email, etc.cPanel provides a broad toolset to deal with web sites, email, file management, and many other end-user features. Like a Windows (standard) user, cPanel users have daily control of the web server for email, WordPress, and other features. However, some functions are omitted because they are not likely to be needed, and pose elevated security or operational risk.

How our backup policy fits

We operate backups at WHM level. These backups are executed by a WHM admin account which is not available to the web site owner. Using WHM’s built‑in backup utilities offers several advantages, but some limitations, too:

  • Tight integration with cPanel account structure
  • Correct handling of permissions and metadata
  • Well‑tested restore paths during emergencies
  • Clear separation between platform and user responsibility

Custom or script‑based backup systems can introduce ambiguity, complexity, and increased operational risk. For disaster recovery, reliability and predictability matter more than flexibility. This also means that because our backups are executed at an “admin” level, restoration of data usually requires adjustment to ownership and read/write permissions. This is why owner-operated backups work more efficiently. Also, restoration from our WHM environment entails cost.

What This Means for Website Owners

In practical terms:

  • You must maintain your own backups
  • You should not rely on platform backups for routine “restores”
  • Platform backups may help in exceptional circumstances
  • No backup availability is guaranteed beyond the defined retention window

This approach keeps expectations clear and ensures that responsibility is properly aligned.

Summary - Next Steps

If you have questions about suitable backup strategies for your workload, we are always happy to discuss best practices. Backup utilities are already available to you at cPanel level, including Backup for cPanel which allows you to download and store your site in a backup file. WordPress can be backed up using plugins like Backuply, and your installation can also be backed up using Softaculous WordPress Manager. This is available on your server too. Lastly, we publish articles about options like:

We continually introduce new content to our support section, so please do check our How To pages periodically.

Bear in mind that different solutions have their own merits. For instance, Softaculous WordPress Manager is great for ease of use. If you want to export your WordPress website to a new server, though, it is not a viable option. For that eventuality the second article in the list above is desirable. Admittedly, this approach is seemingly daunting, and you may need to contact us about this methodology. So, when you plan a backup strategy, you should define what the backups need to accomplish.

Remember, ownership of the data remains exactly where it should be: with you.

If you need help adopting this workflow, or you need disaster recovery planning or assistance, please get in touch, or use our contact page to organize an appointment which suits your timetable. You can return to our Index of Articles by clicking here .
cPanel WordPress Backup: A Practical Guide for Virtual Host Owners

Introduction

If you manage your own virtual host, you need a cPanel WordPress backup  strategy. While you can configure cPanel a few ways to automate backups, the truth is that using cPanel Terminal or SSH is more comprehensive. It also affords maximum flexibility when restoring content.

For instance, Softaculous and other third party backup utilities impose attributes during backup/export that can obstruct access to files during restoration.

Instead, cPanel’s CLI (Command Line Interface) provides means to rename directory/file ownership and avoid WordPress ID codes that can render backups unusable.  This guide shows you how to back up and restore your WordPress site, database, and (optionally) email quickly and reliably.

Important: this article gives an overview of a backup procedure assuming conventional configurations. You may need to tailor this workflow according to your virtual host’s LAMP, PHP, WordPress (or nested WordPress), and MySQL versions. If in doubt, you should contact us especially for production web sites for professional help.

Click open the headers below to learn more about using simple command line instructions to secure maximum flexibility for data restoration. Support options are available for professional assistance. You can return to our Index of Articles by clicking here.

What You Need Before You Start

To follow this cPanel WordPress backup workflow, you will need:

  • SSH access to your server
  • Your cPanel username and password credentials
  • Basic command-line familiarity
  • Permission to run backup commands

You may need to contact us for SSH access. SSH is usually restricted for improved security, and we are happy to enable it should you want SSH on an ongoing basis.

Step 1: Back Up WordPress Files

Your WordPress site lives in the public_html directory in your server’s home directory. Use this command to create a compressed archive:

tar -czf /home/username/public_html.tar.gz -C /home/username public_html

This creates a clean file backup that includes:

  • Themes
  • Plugins
  • Media uploads
  • Configuration files

This is the first part of your cPanel WordPress backup process. 

Step 2: Back Up your WordPress Database

WordPress stores your web site’s content in a MySQL database. Credentials for your database are stored “server side” in a WordPress file called wp-config.php. You can open this file with a text editor to make a note of these credentials:

  • DB name
  • DB user
  • DB password

Next, using your SSH command line, run this command:

mysqldump -u dbuser -p dbname > /home/username/database.sql

This database dump contains:

  • Posts and pages
  • Users
  • Site settings

You can alternately export the database using phpMyAdmin. This is another efficient option, and it is secure because the database “dump” is downloaded to your local workstation. 

Step 3 (OPTIONAL) Back Up Email

Email is stored separately from your website. Usually, email is handled via Microsoft 365, Gmail, or another email service. If you manage email via your web server, though, you need to back up your email. To capture this content use:

tar -czf /home/username/email.tar.gz -C /home/username mail etc

This captures:

  • Mailboxes and messages
  • Email account configuration

You can back up all accounts at once or target individual mailboxes if needed.

Step 4: Store Your Backups Safely

Once created, download your backups or move them to a safe location. For example:

scp username@server:/home/username/*.tar.gz ./

This command copies files from the server to your local machine. You can use cPanel File Explorer to do the same thing. Sometimes, using a mouse is a more familiar way to deal with files. Either way, keeping copies off the server ensures you can recover even if the original host fails.

Restoring your WordPress site

There are a few reasons backups are useful:

  • you want to restore a last known working condition
  • you want to migrate your web site to a new web server
  • you may need to re-house your web site using a different domain name

Using Linux commands using cPanel’s SSH access is the only way to allow these eventualities to happen.

Restore your WordPress site

This cPanel WordPress backup workflow makes recovery simple. If you are restoring files to your existing server, skip to step 2.

  1. Recreate the cPanel Account
    1. Set up a new account with the same username if possible.
  2. Restore WordPress Themes/Plugins/Admin files
    1. tar -xzf public_html.tar.gz -C /home/username
  3. Restore Database
    1. mysql -u dbuser -p dbname < database.sql
  4. Fix Permissions
    1. chown -R username:username /home/username/public_html
  5. Check configuration
    1. Ensure wp-config.php matches the database details.

Restore email (optional)

If you included email in your cPanel backup WordPress process:

  1. Recreate email accounts in cPanel
  2. Restore files:
    1. tar -xzf email.tar.gz -C /home/username
  3. Reset permissions:
    1. chown -R username:mail /home/username/mail

Mail clients should then resynchronise automatically.

Why This Method Works Well

There are a few ways to backup a WordPress installation. Most methods become problematic because of limitations that backup utilities offer. Sometimes, this is to suit a limited purpose in the first place. This cPanel WordPress backup approach gives you:

  • Independence from cPanel restore tools
  • Fast, lightweight backups
  • Full control over restoration
    • including file naming
    • ignoring WordPress ID codes that might prohibit import
    • renaming and credentialling WordPress databases
  • Clean rebuilds without legacy issues
Summary

A manual cPanel WordPress backup workflow using SSH is simple, reliable, and efficient. It suits users who want clarity and control during migrations or recovery.

Used alongside standard cPanel tools, our cPanel WordPress backup workflow  gives you both flexibility and peace of mind.

If you need help adopting this workflow, or you need disaster recovery planning or assistance, please get in touch, or use our contact page to organize an appointment which suits your timetable. You can return to our Index of Articles by clicking here .
How to Backup Microsoft 365 Outlook Email to a PST File

Introduction

Backing up your email is one of the most important steps you can take to protect your data. If you use Microsoft Outlook for desktop app, you can backup Outlook email to create a PST file to save your emails, contacts, and calendar entries. This guide explains how even non-technical users can do this easily, why PST files are useful, and what limitations exist.

Click open the headers below to learn more about  Microsoft 365 work accounts. Support options are available for professional assistance.

What is a PST File and Why Use It?

A PST file (Personal Storage Table) is a data file used by Outlook to store your email messages, contacts, and calendar items. Here’s why it matters:

  • Backup: If something goes wrong with your mailbox, you can restore your data from the PST file.
  • Migration: Moving to a new computer? A PST file lets you transfer your Outlook data easily.
  • Archiving: Free up space in your mailbox by storing older emails in a PST file.

Important: You can only backup Outlook email this way using Outlook for desktop. The feature is not available in Outlook Web Access (OWA). This is because OWA is server-based (not PC-based), so Microsoft does not provide a PST export option OWA.

In Exchange Online, network administrators backup Outlook email mailbox using Exchange Admin Center (EAC) or PowerShell export tools, which require admin-level permissions and technical expertise. You can read about these procedures here. If you are not familiar with Powershell or admin-level procedures in Exchange Online please contact us for help. 

What Can You Backup with a PST File?

When you create a PST file, you can include:

  • Emails from all folders or just one mailbox.
  • Contacts so you don’t lose important details.
  • Calendar entries for meetings and reminders.

You can even export specific folders or individual mailboxes if you don’t need everything.

Step-by-Step: How to Create a PST File in Outlook

Follow these steps to backup Outlook email, and/or contacts, and/or calendars:

  1. Open Outlook (Desktop Version).
  2. Click File > Open & Export > Import/Export.
  3. Choose Export to a file and click Next.
  4. Select Outlook Data File (.pst) and click Next.
  5. Select the folders you want to back up (e.g., Inbox, Contacts, Calendar).
  6. Choose a location to save the PST file and click Finish.
  7. (Optional) Add a password for extra security. If you add a password, record the password in a place that you can be sure to refer to in future. If you lose this password, you will not be able to access the backup.

Your PST file is now ready. You can store it on an external drive or cloud storage for safekeeping.

Limitations and Advanced Options
  1. You can only backup Outlook email using Outlook for desktop. The feature is not available in Outlook Web Access (OWA), for reasons explained above.
  2. You can backup Outlook email using Exchange Admin Center (EAC): PST export/import is possible here, but it requires advanced skills. See these guidance notes. In addition to importing/exporting individual accounts, network administrators can manage procedures at scale. For instance, EAC is appropriate for importing multiple user accounts simultaneously. If you need this kind of support, contact us for expert help.

How to Back Up MFA Credentials with Microsoft Authenticator Backup

Introduction: Why Microsoft Authenticator Backup is Essential


Multi-Factor Authentication (MFA) is a critical security layer for Microsoft 365 and other cloud services. If your mobile device is lost, stolen, or replaced, you risk losing access to your accounts unless your MFA credentials are backed up. Microsoft Authenticator backup enables you to restore your MFA settings to a new device.

Apple iPhone users – click here for our guidance note to connect Microsoft Authenticator to iCloud and iCloud keychain.


Where does Microsoft Authenticator backup my credentials?

MFA backups are not saved in Microsoft 365 accounts. This is because:

  1. Microsoft Authenticator can store credentials for your personal sign-ins too.
  2. If you are locked out of Microsoft 365, you cannot recover the credentials to restore them.

Depending on whether you use Android or iOS, Microsoft Authenticator offers different backup options—each designed to keep your credentials secure and recoverable. If you have a personal Microsoft account, you are already equipped to make Microsoft Authenticator backups.

You can configure Microsoft Authenticator to back up to iCloud and Google Drive too. If you are blocked from your iCloud/Google/Microsoft account (i.e. you have lost your password), there is still a partial workaround – see guidance under “alternative method” header. This requires you to have your existing device handy.

Click open the headers below to learn how to backup your MFA credentials. Please read through this entire article before starting the proceudure. Be sure to contact us for general advice if you are in doubt. Support options are available for professional assistance.

Microsoft Authenticator MFA Backup Features

Your MFA credentials are always excluded from your device’s usual iOS or Android backup precudures. So, Microsoft Authenticator MFA backup has to be enabled and scheduled using your Microsoft Authenticator App. This way, your MFA keys can be protected with enhanced securitization. When you configure Microsoft Authenticator MFA Backup, your app will include MFA accounts for other services that you rely on for OTP (One Time Passcode) or TOTP (Time-based OTP), too.

Microsoft Authenticator Backup features

Microsoft Authenticator Backup procedures are easy to schedule. You only need to be able to provide Microsoft Authenticator with your credentials when you configure backups for either a Microsoft personal account, iCloud account. Features include:

  • You can connect to a Microsoft personal account, iCloud.
  • iCloud and iCloud Keychain can handle backups automatically.
  • Work and school accounts are supported.
  • No admin action is required for organizations.
  • Third-party TOTP credentials (like Google, Amazon, etc.) are included.

Android vs iCloud considerations

  • On Android, backup is stored in the Microsoft cloud and tied to your Microsoft personal account.
  • On iOS, backup is stored in iCloud and iCloud Keychain. Microsoft account backup is no longer supported on iOS
  • Backups are not cross-compatible between Android and iOS. You cannot restore an Android backup on an iPhone or vice versa.

How Microsoft Entra Portal Supports MFA Management

Microsoft Entra ID (formerly Azure AD) uses a unified Authentication Methods Policy. This service is included in Microsoft 365 and it streamlines MFA setup and backup across all user types. Remember, Microsoft Authenticator MFA is a user-level process. This means that Global Administrators cannot configure MFA for you. Entra ID facilitates:

  • Centralized control of MFA, SSPR, and passwordless options.
  • Granular policy settings for different user groups.
  • Future-proof integration with Microsoft’s evolving identity tools.
  • Easier onboarding and recovery for users.
Step-by-Step: How To Configure Microsoft Authenticator MFA Backup

Configure Microsoft Authenticator Backup with a Microsoft Personal Account

  • Open Microsoft Authenticator App on your mobile device.
  • Click open the Hamburger icon (usually top right of your App’s screen).
  • Click open Settings from the drop down list.
  • Input your Microsoft (personal) account credentials.
  • Review preferences and save settings.

You should review app settings periodically in future to check when your credentials were last backed up.

To recover your credentials using a new iOS or Android device, install Microsoft Authenticator, open the app, and sign into your personal Microsoft account. You will be prompted to restore accounts from backup. Once restored, you may need to re-verify some accounts, depending on 365 organizational policies/rules.

Configure Microsoft Authenticator Backup: iOS/iCloud Backup

  • iOS 16 or later is required – check your device first.
  • Enable iCloud and iCloud Keychain in your mobile device’s device settings.
  • Open Microsoft Authenticator.
  • Go to Settings > iCloud Backup in the Authenticator app and enable backup.
    • This will back up your account names and TOTP (Time-based One-Time Password) credentials to iCloud.
  • To verify that backup is enabled:
    • Open Authenticator > Settings > iCloud Backup.
    • Confirm that the status shows “Backup is on”.

You should review app settings periodically in future to check when your credentials were last backed up.

To recover your credentials with a new iOS device, install Microsoft Authenticator and sign in to iCloud in App settings. Your Microsoft Authenticator accounts will be restored automatically. Once restored, you may need to re-verify some accounts, depending on 365 organizational policies/rules.

Configure Microsoft Authenticator Backup: Android

  • Open Microsoft Authenticator.
  • Tap the three-dot menu > Settings.
  • Enable Cloud Backup.
  • Sign in to your Microsoft personal account when prompted.Go to Settings > Cloud Backup in the Authenticator app and enable backup.
    • This will back up your account names and TOTP (Time-based One-Time Password) credentials to your Microsoft account.

You should review app settings periodically in future to check when your credentials were last backed up.

To recover your credentials to a new Android device, install Microsoft Authenticator and sign in to your Microsoft personal account in App settings. Your Microsoft Authenticator accounts will be restored automatically. Once restored, you may need to re-verify some accounts, depending on 365 organizational policies/rules.

Alternative Method: No Microsoft, iCloud, or Google account?

If you do not use iCloud or a microsoft account, follow this manual method:

  1. On your old device, go to Microsoft MFA Setup.
  2. Authenticate and access the Security Info page
  3. Click Add sign-in method > Microsoft Authenticator
  4. On your new phone, install Authenticator and select Work or School account.
  5. Scan the QR code shown on your computer.
  6. Approve the authentication request on your new device.
  7. Remove the old device from the Security Info page.

This method works for users who only use work accounts and want to avoid linking personal Microsoft accounts. However, it is not as robust as the settings detsailed above and should be considered as an option of last resort. For instance, this option might only be in contemplation if you had already lost your old device, which you need for this workflow. Instead, use one of the options above.

Enable SMS Authentication (Optional but Recommended)

If your organization allows SMS as an MFA method:

  1. In the Security Info portal, click + Add sign-in method
  2. Select “Phone”
  3. Enter your mobile number and choose Text me a code
  4. Enter the verification code received via SMS when your mobile phone receives it

SMS is considered less secure than app-based authentication. So, by default, Microsoft Authenticator app will use MFA using either available WiFi or mobile phone signal to authenticate your Microsoft 365 sign-ins. SMS is a valuable backup method—especially if your primary device is unavailable.

Add a Second Device for Secondary Access

Sometimes, it helps to include a second mobile device to authenticate your Microsoft 365 sign-in. This might be necessary where authentication is necessary from two geographically separate locations. In this situation, the same mobile phone cannot be at the each location simultaneously. Also, a second phone might help avoid lockouts. This is optional, and not usually necessary However, if you need to include a second device for authenticating you can configure
Microsoft Authenticator MFA for 365 with this additional step:

  1. Install Microsoft Authenticator on your second mobile phone
  2. Log into https://mysignins.microsoft.com/security-info from your desktop/laptop computer
  3. Add a new sign-in method and repeat the QR code scan process
    1. Be sure to scan the QR code with your SECOND DEVICE per the workflow outlined above
  4. Verify the second device by approving a test notification

This ensures you can still access your account if your principal mobile phone is lost or damaged.

When SMS is enabled, notice that when trying to sign in with an Autheticator code you will find options in your Authenticator pop up that provide for authentication by other means. This way, if MFA does not authenticate, you can opt to receive a conventional SMS/text.

Summary and Next Steps

Microsoft Authenticator Backup is a simple way for you to securely safeguard your MFA credentials. You can save your MFA credentials using your personal Microsoft account, iCloud, or Google Drive. Microsoft Entra ID security portal centralizes authentication policies, so managing MFA is simple and robust.

Whether you are a Microsoft 365 user, IT admin, or someone who values account security, do make sure your Authenticator app is backed up. It is the best way to avoid lockouts and keep your digital life secure. You can check your Microsoft Authenticator App settings occasionally to check when your last backup was made.

Stress Test

Even with good backup practices, things can still go wrong. Read our guidance in this article to understand what happens if MFA credentials fail and you cannot access 365. We recommend you review this guidance to learn how to deal with an eventuality in situations where a Global Administrator’s MFA credentials fail. Usually, monitoring backups is adequate, but if you are responsible for a multi-user tenancy it is worth testing a scenario to understand how to respond if the worst happens.

For instance, much of the information that Microsoft would ask for to restore access is easily found in a Global Administrator’s 365 dashboard. If your Microsoft 365 dashboard is not accessible, though, how would you compile the information needed to help restore services?

About ComStat.uk: Internet Service Provider Comstat provides IT support, web hosting, and media services including website design, Microsoft 365 setup, and audio/video production, serving businesses across Denbighshire, North Wales and Wirral from Ruthin, and Lancashire and the Northwest from Bolton.

How to back up your web server with cPanel

Backup vs Backup Wizard

Use our cPanel utilities to backup and restore web site data content, databases, and other data on your web server.

cPanel backup wizard

cPanel backup utility provides workflows for backing up and restoring web site and email content

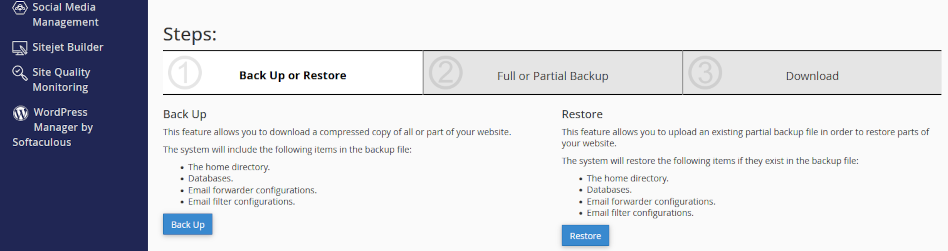
Using cPanel’s Backup utility, you can select from data sets we have already backed up and download the files to your local drives for safekeeping.

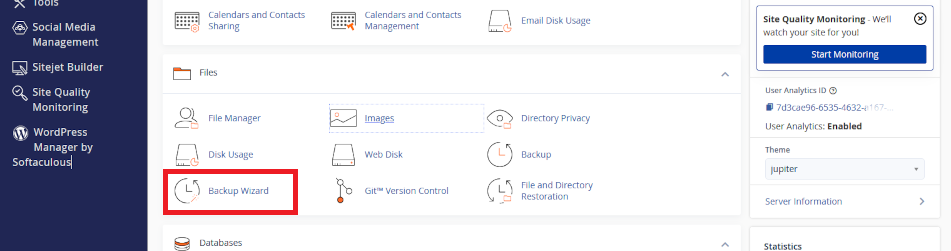
Using cPanel’s Backup Wizard utility, you can design your own backups. You can backup some or all or your content. Also, you can backup incremental backups which are useful when you only need to backup minor changes since your last full backup. You can store your files locally, restore them to your server, and you can use the content when migrating to a new server.

Click on the headers below to find out how to use cPanel Backup and Backup Wizard. Click on images to view full size.

Download Backups using cPanel Backup

Log into your web server’s control panel – we call it cPanel. You can find how to log into your services from the web server data sheet we have provided you with.

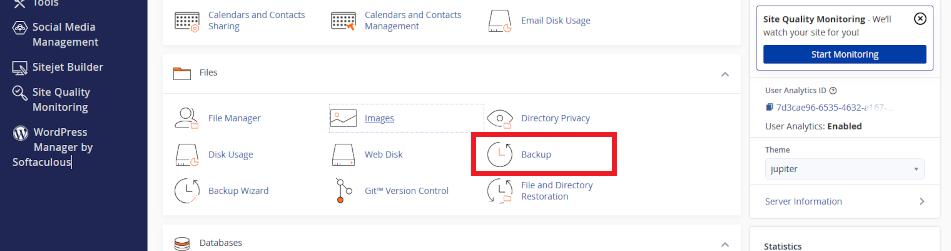
At your cPanel dashboard, either search for Backup or scroll to the section called Files and click on the optin called Backup.

cPanel backup option

About cPanel Backup

cPanel Backup lists backups that are already made and stored on your web server. These are available in a pulldown list, including full and partial backups, that you can download. The list includes backups that we have executed as we deal with daily mantenance. You can download these backups,

Export backup from server

We recommend that you download backups to your local drives, and you can find help for copying backups at datacenter speeds to Google Drive, OneDrive, Dropbox, etc. Also, to conserve space and improve web page delivery speeds, note that we rotate backups so that (at time of writing) we only maintain the two latest backups.

About Restore

In cPanel Backup, there is an option to restore backups. If you are restoring full and partial backups, be aware that you should restore data sets in date order, starting with the earliest date stamp. 

Create backups and restore with Backup Wizard

Use cPanel Backup Wizard to create and download backups. Also, you can restore backups using this option.

cPanel backup wizard


Backup Wizard – more options

Backup Wizard offers more granularity, giving you the option to select individual data sets, like your WordPress site, or your MySQL database which attaches to your WordPress site, or your email. Also, you can execute partial backups if changes that you have made to your web site are minimal.

Using Backup Wizard you can create your own backup profile. Downloading files that we have created may limit what you are able to do.

Summary

cPanel’s backup utilities have proven to be reliable, however a lot of things can go wrong with backups. Your server might backup files accurately, but the data could be corrupted as it is saved because of a power brownout. Or, data might be damaged in transit as the data set is transferred elsewhere. So, although we take “snapshots” of your web site, they are not guaranteed, and we only keep updates that are current over the last 2-4 weeks.

Therefore, you should only rely on our working backups as part of your risk management. Professionals use an array of tools to provide duplication and/or availability. In some cases, professionals mirror two or more geographically remote servers to cover a primary server failure. In some cases, this is economical and we can implement these kinds of services.

You can protect against a single point of failure failure by developing a strategy which covers two or more methods to secure data. For instance, your web designer may keep backups. Usually these conserve work in progress so that there is a “last known working state”. You might need to maintain a longer history of backups.

Your web designer will be glad to discuss backup strategies with you because you might mutually and economically share utilities and avoid extra cost. Also, we are always glad to help if you do not have a professional developer but need advise about strategy and products. 

About ComStat.uk: Internet Service Provider Comstat provides IT support, web hosting, and media services including web design, Microsoft 365 setup, and audio/video production, serving businesses across Denbighshire, North Wales and Wirral from Ruthin, and Lancashire and the Northwest from Bolton.