What Is BoxTrapper in cPanel and Why Email Users Should Care
BoxTrapper in cPanel: A Simple Yet Effective Spam Filter
BoxTrapper is a built-in spam filtering tool available in cPanel web hosting dashboards. It works by using a challenge-response system: when someone emails you, BoxTrapper checks if the sender is on your approved list. If not, it sends a verification email asking them to confirm they’re human. Only verified senders get through.
BoxTrapper is useful for users who receive a lot of unsolicited emails or run public-facing contact forms. It is a straightforward way to reduce inbox clutter without needing advanced filtering rules or third-party tools.
Click on the headers below to learn about BoxTrapper. Click on images to view at full-sized resolution. For guidance about BoxTrapper, please contact us for help.
Why BoxTrapper Is Useful for Everyday Email Users
Spam filters usually rely on complex algorithms or blacklists. BoxTrapper takes a different approach—putting the sender to the test.
For example, imagine you run a small business and get dozens of emails daily. Most are genuine, but some are spam bots trying to sell you things. With BoxTrapper enabled, those bots never make it to your inbox unless they reply to the verification email—which they rarely do.
This keeps your inbox clean and ensures you only deal with real people. It is especially handy for users who do not want to manage detailed filtering rules or pay for premium anti-spam services.
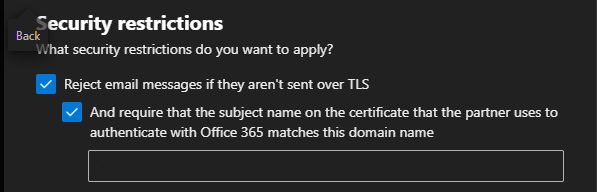
How BoxTrapper Differs from Microsoft 365 and Exchange Online Filtering
Microsoft 365 and Exchange Online use advanced filtering systems powered by AI and threat intelligence. These platforms scan email content, sender reputation, and attachments to detect spam, phishing, and malware.
BoxTrapper, by contrast, is much simpler. It does not scan content or use AI—it just asks senders to verify themselves. While this can be effective for basic spam control, it lacks the nuance and automation of enterprise-grade solutions.
For users who need granular control, reporting, or integration with security policies, Microsoft’s tools are more powerful and flexible. For small websites or personal email accounts hosted on cPanel, BoxTrapper offers a low-maintenance alternative.
Managing BoxTrapper as a Virtual Host Account Administrator
BoxTrapper is configured at server level, not email account level. If you have server admin privileges, you can enable, configure, and manage BoxTrapper from your cPanel web server control panel:
- Log into cPanel and go to the Email section.
- Click on BoxTrapper.
- Select the email account you want to protect.
- Enable BoxTrapper and customise the verification message.
- Add trusted senders to your whitelist.
- Review logs and manage queue messages as needed.
You can also set up auto-whitelisting for people you reply to, reducing friction for regular contacts. Admins can manage multiple accounts and tweak settings to suit different users. For current BoxTrapper specifications, see this article at cPanel Docs.
Summary
BoxTrapper is a simple way to reduce incoming spam. Server admins can apply BoxTrapper selectively on email accounts, or globally. However, BoxTrapper’s success depends on users white-listing approved email addresses. This means that senders may not understand that they need to respond to a verification email to successfully dispatch an email to you. Also, email users need to pay attention to their email whitelists.
Micrsoft 365 provides a more naunced approach, however this can be subject to someone understanding the intricacies of Exchange Online to micro-manage spam-filtering.
About ComStat.uk: Internet Service Provider Comstat provides IT support, web hosting, and media services including web design, Microsoft 365 setup, and audio/video production, serving businesses across Denbighshire, North Wales and Wirral from Ruthin, and Lancashire and the Northwest from Bolton.