
cPanel WordPress Backup: A Practical Guide for Virtual Host Owners

Introduction

If you manage your own virtual host, you need a cPanel WordPress backup  strategy. While you can configure cPanel a ferw ways to automated backups, eventually the truth is that using Secure Shell (SSH) is more direct. It also affords maximum flexibility when restoring content.

For instance, Softaculous and other third party backup utilities impose attributes during backup/export that can obstruct access to files during restoration.

Instead, cPanel’s CLI (Command Line Interface) provides means to rename directory/file ownership and avoid WordPress ID codes that can render backups unusable.  This guide shows you how to back up and restore your WordPress site, database, and (optionally) email quickly and reliably.

Important: this article gives an overview of a backup procedure assuming conventional configurations. You may need to tailor this workflow according to your virtual host’s LAMP, PHP, WordPress (or nested WordPress), and MySQL versions. If in doubt, you should contact us especially for production web sites for professional help.

Click open the headers below to learn more about using simple command line instructions to secure maximum flexibility for data restoration. Support options are available for professional assistance. You can return to our Index of Articles by clicking here.

What You Need Before You Start

To follow this cPanel WordPress backup workflow, you will need:

  • SSH access to your server
  • Your cPanel username and password credentials
  • Basic command-line familiarity
  • Permission to run backup commands

You may need to contact us for SSH access. SSH is usually restricted for improved security, and we are happy to enable it should you want SSH on an ongoing basis.

Step 1: Back Up WordPress Files

Your WordPress site lives in the public_html directory in your server’s home directory. Use this command to create a compressed archive:

tar -czf /home/username/public_html.tar.gz -C /home/username public_html

This creates a clean file backup that includes:

  • Themes
  • Plugins
  • Media uploads
  • Configuration files

This is the first part of your cPanel WordPress backup process. 

Step 2: Back Up your WordPress Database

WordPress stores your web site’s content in a MySQL database. Credentials for your database are stored “server side” in a WordPress file called wp-config.php. You can open this file with a text editor to make a note of these credentials:

  • DB name
  • DB user
  • DB password

Next, using your SSH command line, run this command:

mysqldump -u dbuser -p dbname > /home/username/database.sql

This database dump contains:

  • Posts and pages
  • Users
  • Site settings

You can alternately export the database using phpMyAdmin. This is another efficient option, and it is secure because the database “dump” is downloaded to your local workstation. 

Step 3 (OPTIONAL) Back Up Email

Email is stored separately from your website. Usually, email is handled via Microsoft 365, Gmail, or another email service. If you manage email via your web server, though, you need to back up your email. To capture this content use:

tar -czf /home/username/email.tar.gz -C /home/username mail etc

This captures:

  • Mailboxes and messages
  • Email account configuration

You can back up all accounts at once or target individual mailboxes if needed.

Step 4: Store Your Backups Safely

Once created, download your backups or move them to a safe location. For example:

scp username@server:/home/username/*.tar.gz ./

This command copies files from the server to your local machine. You can use cPanel File Explorer to do the same thing. Sometimes, using a mouse is a more familiar way to deal with files. Either way, keeping copies off the server ensures you can recover even if the original host fails.

Restoring your WordPress site

There are a few reasons backups are useful:

  • you want to restore a last known working condition
  • you want to migrate your web site to a new web server
  • you may need to re-house your web site using a different domain name

Using Linux commands using cPanel’s SSH access is the only way to allow these eventualities to happen.

Restore your WordPress site

This cPanel WordPress backup workflow makes recovery simple. If you are restoring files to your existing server, skip to step 2.

  1. Recreate the cPanel Account
    1. Set up a new account with the same username if possible.
  2. Restore WordPress Themes/Plugins/Admin files
    1. tar -xzf public_html.tar.gz -C /home/username
  3. Restore Database
    1. mysql -u dbuser -p dbname < database.sql
  4. Fix Permissions
    1. chown -R username:username /home/username/public_html
  5. Check configuration
    1. Ensure wp-config.php matches the database details.

Restore email (optional)

If you included email in your cPanel backup WordPress process:

  1. Recreate email accounts in cPanel
  2. Restore files:
    1. tar -xzf email.tar.gz -C /home/username
  3. Reset permissions:
    1. chown -R username:mail /home/username/mail

Mail clients should then resynchronise automatically.

Why This Method Works Well

There are a few ways to backup a WordPress installation. Most methods become problematic because of limitations that backup utilities offer. Sometimes, this is to suit a limited purpose in the first place. This cPanel WordPress backup approach gives you:

  • Independence from cPanel restore tools
  • Fast, lightweight backups
  • Full control over restoration
    • including file naming
    • ignoring WordPress ID codes that might prohibit import
    • renaming and credentialling WordPress databases
  • Clean rebuilds without legacy issues
Summary

A manual cPanel WordPress backup workflow using SSH is simple, reliable, and efficient. It suits users who want clarity and control during migrations or recovery.

Used alongside standard cPanel tools, our cPanel WordPress backup workflow  gives you both flexibility and peace of mind.

If you need help adopting this workflow, or you need disaster recovery planning or assistance, please get in touch, or use our contact page to organize an appointment which suits your timetable. You can return to our Index of Articles by clicking here .
How to Change Your Email Password in Roundcube Webmail

How to Change Your Email Password using Roundcube Webmail

The easiest and safest way to update or change your email password is through Roundcube Webmail. Roundcube is the Webmail utility you access your email with using a laptop or desktop computer.

You could change your email password using cPanel. Unlike cPanel, which includes advanced server management tools, Roundcube focuses on email functionality. So, managing your email preferences including out-of-office responders, redirects, etc. reduces the risk of accidental changes to your other web server settings while still giving you full control over your account credentials.

When you need to contact us

If you do not know your current password, please contact Comstat Support so we can securely reset it for you.

Click open the headers below to learn how to change your email password.  

Step 1: Log in to Roundcube

Using your desktop computer, laptop, or tablet, open your web browser and go to your webmail login page using your browser’s navigation field, not your Google Search field.

Your Webmail URL will depend on the domain name you own. For example, if your domain name you use for your email is “yourdomain.com” you would follow these steps.

  1. Point your browser to https://yourdomain.com/webmail substituting your own domain name.
  2. Enter your email address
  3. Enter your password
  4. Click “Log In”


Step 2: Access Settings

Once you have succesfully log in to Roundcube, you will either land on your Roundcube home page. You might have configured Roundcube to go straight to your inbox.

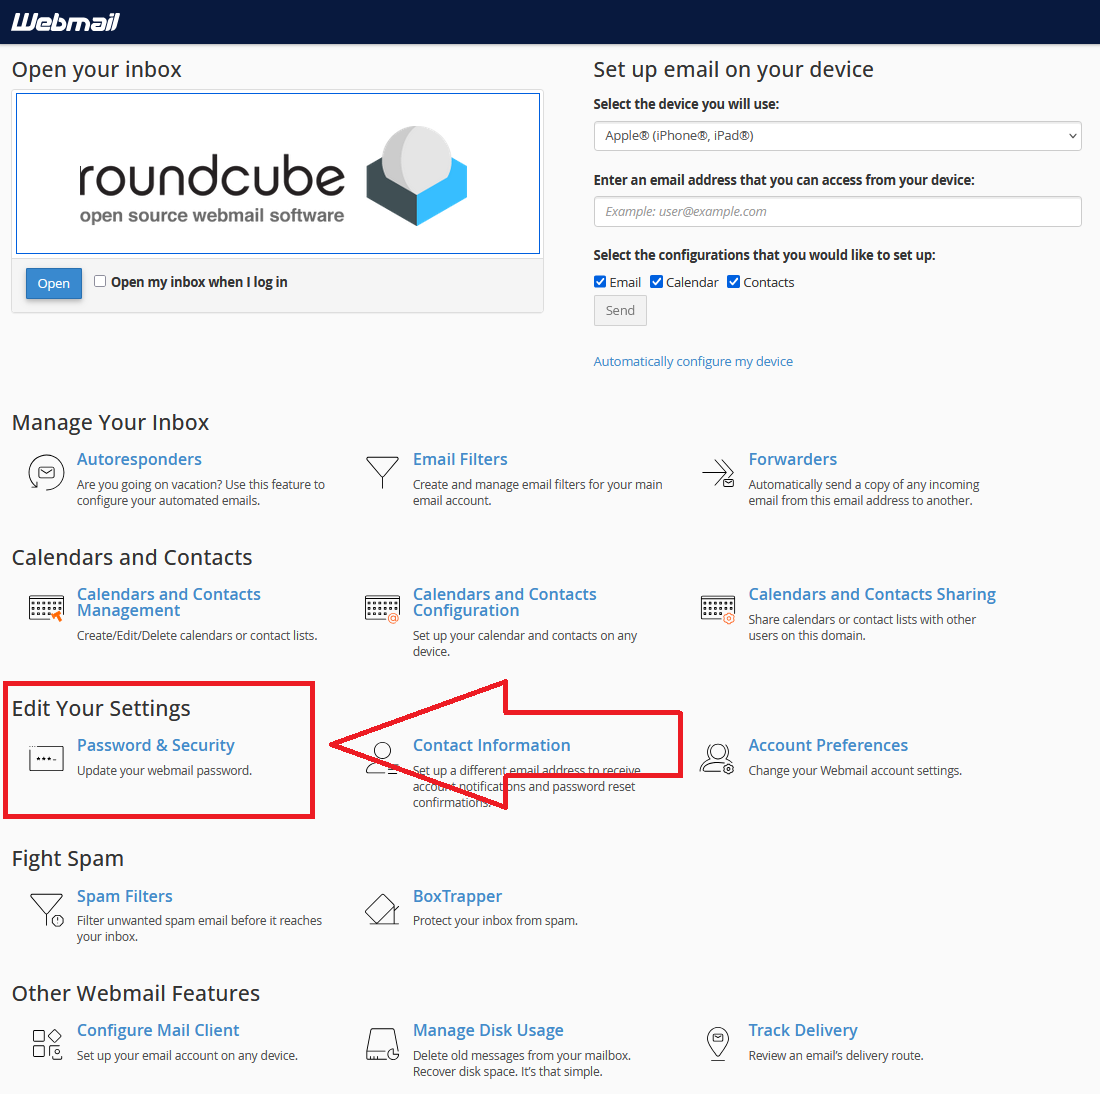
change your email password using Roundcube Webmail home page

Change your email password using Roundcube Home Page

  1. Scroll down to <Edit Your Settings>
  2. Click <Password & Security>
  3. Change your password
  4. Click Save or Update

Tip: Use a strong password with uppercase, lowercase, numbers, and symbols. Avoid reusing old passwords.

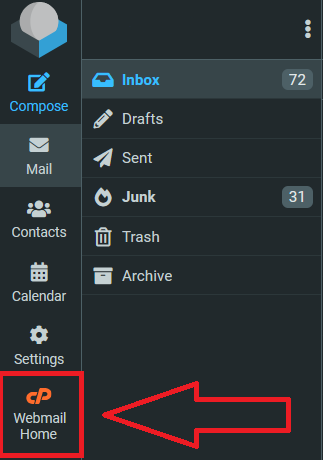
Change your email password from your Inbox

From the preferences bar on (usually on the left of your Inbox page)

  1. Click <Webmail Home>
  2. Scroll down to <Edit Your Settings>
  3. Click <Password & Security>
  4. Change your password
  5. Click Save or Update

change your email password using Roundcube Webmail

Tip: Use a strong password with uppercase, lowercase, numbers, and symbols. Avoid reusing old passwords.

Your Webmail home page includes a fully featured list of utilities, including:

  • instructions for configuring email accounts on Windows, Apple, Linux, and Android devices.
  • Spam controls.
  • Autoforwarding
  • email tracking
  • much more.
Step 3: Update Your Devices

After changing your password, you will have to modify the password in al the devices that you use to connect to your email account.

Best Practices and Summary
  • Change passwords regularly.
  • Never share your password.
  • • Contact support immediately if you suspect unauthorized access.

Roundcube is a comprehensive email solution and you can find answers to issues here.

How to Backup Microsoft 365 Outlook Email to a PST File

Introduction

Backing up your email is one of the most important steps you can take to protect your data. If you use Microsoft Outlook for desktop app, you can backup Outlook email to create a PST file to save your emails, contacts, and calendar entries. This guide explains how even non-technical users can do this easily, why PST files are useful, and what limitations exist.

Click open the headers below to learn more about  Microsoft 365 work accounts. Support options are available for professional assistance.

What is a PST File and Why Use It?

A PST file (Personal Storage Table) is a data file used by Outlook to store your email messages, contacts, and calendar items. Here’s why it matters:

  • Backup: If something goes wrong with your mailbox, you can restore your data from the PST file.
  • Migration: Moving to a new computer? A PST file lets you transfer your Outlook data easily.
  • Archiving: Free up space in your mailbox by storing older emails in a PST file.

Important: You can only backup Outlook email this way using Outlook for desktop. The feature is not available in Outlook Web Access (OWA). This is because OWA is server-based (not PC-based), so Microsoft does not provide a PST export option OWA.

In Exchange Online, network administrators backup Outlook email mailbox using Exchange Admin Center (EAC) or PowerShell export tools, which require admin-level permissions and technical expertise. You can read about these procedures here. If you are not familiar with Powershell or admin-level procedures in Exchange Online please contact us for help. 

What Can You Backup with a PST File?

When you create a PST file, you can include:

  • Emails from all folders or just one mailbox.
  • Contacts so you don’t lose important details.
  • Calendar entries for meetings and reminders.

You can even export specific folders or individual mailboxes if you don’t need everything.

Step-by-Step: How to Create a PST File in Outlook

Follow these steps to backup Outlook email, and/or contacts, and/or calendars:

  1. Open Outlook (Desktop Version).
  2. Click File > Open & Export > Import/Export.
  3. Choose Export to a file and click Next.
  4. Select Outlook Data File (.pst) and click Next.
  5. Select the folders you want to back up (e.g., Inbox, Contacts, Calendar).
  6. Choose a location to save the PST file and click Finish.
  7. (Optional) Add a password for extra security. If you add a password, record the password in a place that you can be sure to refer to in future. If you lose this password, you will not be able to access the backup.

Your PST file is now ready. You can store it on an external drive or cloud storage for safekeeping.

Limitations and Advanced Options
  1. You can only backup Outlook email using Outlook for desktop. The feature is not available in Outlook Web Access (OWA), for reasons explained above.
  2. You can backup Outlook email using Exchange Admin Center (EAC): PST export/import is possible here, but it requires advanced skills. See these guidance notes. In addition to importing/exporting individual accounts, network administrators can manage procedures at scale. For instance, EAC is appropriate for importing multiple user accounts simultaneously. If you need this kind of support, contact us for expert help.

How to Manage Microsoft 365 Email Signatures for Small Business Admins

Why Email Signatures Matter for Small Businesses

Microsoft 365 email signatures are more than just contact details—they’re a branding tool, a compliance requirement, and a way to maintain professional consistency across your organisation. In small businesses, it’s common for employees to create their own signatures in Outlook or Outlook Web App (OWA). While this offers flexibility, it can lead to:

  • Inconsistent branding
  • Broken formatting
  • Blocked images
  • Compliance risks

To avoid these issues, Microsoft 365 offers both user-level and server-level options for managing email signatures. Lastly, email signatures can be used as a method for generating email templates.

Click open the headers below to learn how to use Microsoft 365 email signatures. Please read through this entire article before starting the proceudure. Be sure to contact us for general advice if you are in doubt. Support options are available for professional assistance.

User-Level Signature Management

Admins can guide users to create their own signatures in Outlook or OWA. This is suitable for small teams but requires oversight to ensure consistency.

How to create a signature in Outlook (Desktop)

  • Go to File > Options > Mail > Signatures
  • Click New, name your signature
  • Add contact info, branding, and disclaimers
  • Set default signature for new emails and replies

How to create a signature in Outlook Web App (OWA)

  • Go to Settings > Mail > Compose and Reply
  • Create or edit your signature
  • Choose when it should be applied (new messages, replies)

Formatting tips

  • Use web-safe fonts (e.g., Arial, Calibri)
  • Avoid large images or logos that may be blocked
  • Keep layout simple for mobile compatibility
Server-Level Signature Management with Microsoft 365

For better control, admins can create organisation-wide signatures using Exchange Online mail flow rules. Using Microsoft 365 email signatures this way prevents end users from using email signatures that could be inaccurate or misleading. It gives your business the chance to guarantee uniformityy and accuracy.

Benefits

  • Centralised management
  • Consistent branding
  • Automatic application to all outgoing emails

How to set up server-side Microsoft 365 signatures

  1. Go to Microsoft 365 Admin Center > Exchange Admin Center
  2. Navigate to Mail Flow > Rules
  3. Create a new rule: “Apply disclaimers or signatures”
  4. Set conditions (e.g., apply to all users or specific groups)
  5. Add HTML-formatted signature content
  6. Save and test the rule

Note: Server-side signatures are appended after the email is sent, so users won’t see them while composing.


Using Signatures as Email Templates

Signatures can also be used creatively as email templates. This is useful for:

  • Customer service replies
  • Standard form memos
  • Internal announcements

How to use signatures as templates using Outlook (Desktop) or Outlook OWA

  • Create multiple signatures for different scenarios
  • Include full email body text along with contact info
  • Select the appropriate signature when composing a message

Using Microsoft 365 email signatures this way is a creative solution for quickly inserting pre-written content, saving time and ensuring consistency. Micrsoft Outlook does provide a utility for template generation, however user feedback indicates that Outlook’s approach to generating templates is awkward. Another solution for templates is to use Outlook’s Resend Message option. See this article for help with “Resend Message”

Summary

Microsoft 365 email signatures maintain professionalism, brand identity, and compliance. Whether you choose user-level or server-level management—or a mix of both—make sure formatting and image use are carefully considered, and check output with users in Gmail and Apple envirnments to check how your output works. Lastly, do not overlook the power of signatures as a simple way to build a library of reusable email templates.

About ComStat.uk: Internet Service Provider Comstat provides IT support, web hosting, and media services including website design, Microsoft 365 setup, and audio/video production, serving businesses across Denbighshire, North Wales and Wirral from Ruthin, and Lancashire and the Northwest from Bolton.

What Is BoxTrapper in cPanel and Why Email Users Should Care

BoxTrapper in cPanel: A Simple Yet Effective Spam Filter

BoxTrapper is a built-in spam filtering tool available in cPanel web hosting dashboards. It works by using a challenge-response system: when someone emails you, BoxTrapper checks if the sender is on your approved list. If not, it sends a verification email asking them to confirm they’re human. Only verified senders get through.

BoxTrapper is useful for users who receive a lot of unsolicited emails or run public-facing contact forms. It is a straightforward way to reduce inbox clutter without needing advanced filtering rules or third-party tools. 

Click on the headers below to learn about BoxTrapper. Click on images to view at full-sized resolution. For guidance about BoxTrapper, please contact us for help.

Why BoxTrapper Is Useful for Everyday Email Users

Spam filters usually rely on complex algorithms or blacklists. BoxTrapper takes a different approach—putting the sender to the test.

For example, imagine you run a small business and get dozens of emails daily. Most are genuine, but some are spam bots trying to sell you things. With BoxTrapper enabled, those bots never make it to your inbox unless they reply to the verification email—which they rarely do.

This keeps your inbox clean and ensures you only deal with real people. It is especially handy for users who do not want to manage detailed filtering rules or pay for premium anti-spam services.

How BoxTrapper Differs from Microsoft 365 and Exchange Online Filtering

Microsoft 365 and Exchange Online use advanced filtering systems powered by AI and threat intelligence. These platforms scan email content, sender reputation, and attachments to detect spam, phishing, and malware.

BoxTrapper, by contrast, is much simpler. It does not scan content or use AI—it just asks senders to verify themselves. While this can be effective for basic spam control, it lacks the nuance and automation of enterprise-grade solutions.

For users who need granular control, reporting, or integration with security policies, Microsoft’s tools are more powerful and flexible. For small websites or personal email accounts hosted on cPanel, BoxTrapper offers a low-maintenance alternative.

Managing BoxTrapper as a Virtual Host Account Administrator

BoxTrapper is configured at server level, not email account level. If you have server admin privileges, you can enable, configure, and manage BoxTrapper from your cPanel web server control panel:

  1. Log into cPanel and go to the Email section.
  2. Click on BoxTrapper.
  3. Select the email account you want to protect.
  4. Enable BoxTrapper and customise the verification message.
  5. Add trusted senders to your whitelist.
  6. Review logs and manage queue messages as needed.

You can also set up auto-whitelisting for people you reply to, reducing friction for regular contacts. Admins can manage multiple accounts and tweak settings to suit different users. For current BoxTrapper specifications, see this article at cPanel Docs.

Summary

BoxTrapper is a simple way to reduce incoming spam. Server admins can apply BoxTrapper selectively on email accounts, or globally. However, BoxTrapper’s success depends on users white-listing approved email addresses. This means that senders may not understand that they need to respond to a verification email to successfully dispatch an email to you. Also, email users need to pay attention to their email whitelists.

Micrsoft 365 provides a more naunced approach, however this can be subject to someone understanding the intricacies of Exchange Online to micro-manage spam-filtering.

About ComStat.uk: Internet Service Provider Comstat provides IT support, web hosting, and media services including web design, Microsoft 365 setup, and audio/video production, serving businesses across Denbighshire, North Wales and Wirral from Ruthin, and Lancashire and the Northwest from Bolton.