Windows Recovery Drive: Why You Should Create a New One
A Windows Recovery Drive helps you repair your computer if Windows fails to start normally. It contains recovery tools that may help fix startup issues, restore your system, or reinstall Windows when other options have failed.
When should you create a Windows Recovery Drive?
When Microsoft installs a major Windows 11 feature update, it is a good idea to create a new Windows Recovery Drive. This ensures the recovery tools and system files on the USB drive match the version of Windows currently installed on your computer. Aim to create a new Windows Recovery Drive not less than annually.
What do you need?
You can either re-use an existing recovery USB drive from a previous year or create a new one using a spare 64GB USB flash drive. In an ideal world, we recommend using a new USB stick. This is because your Windows Recovery Drive is a tool of last resort. In other words, when you need your recovery tools, you need to be certain that the Windows Recovery Drive itself is unimpaired.
How long does it take?
The process takes a little time, but it could save you hours of frustration and costly disaster recovery work if your computer develops a catastrophic problem in the future. Fortunately, the process is straightforward and is accomplished with minimal risk if you follow these instructions. So, be sure to read through this entire article first to understand the methodology. If you are not confident and you need help, please get in touch.
Click open the headers below to learn more about how to create your Windows Recovery Drive. Support options are available for professional assistance. You can return to our Index of Articles by clicking here.
Before You Start
Creating a Windows Recovery Drive will completely erase the contents of the USB drive you select.
Preparation
- We recommend using a new or unused USB memory stick:
- an existing USB memory stick used for Windows Recovery Drive is minimally acceptable.
- If you are using a spare USB memory stick, check for any files and save files you need elsewhere.
- Make sure you know which PC drive letter your computer will assign to your Windows Recovery Drive
- Leave any other USB devices connected exactly as they are
Taking a few minutes to identify the correct drive can help prevent accidental data loss. Also, ensuring that your “target’ drive is free of important files will save permanent loss of data you may need later. We will explain how to do this below.
Check Which USB Drives Are Already Connected
Before you insert the USB drive you plan to use for your Windows Recovery Drive, check which USB drives are already connected to your computer. Do not take a shortcut at this stage and skip this step.
- Open File Explorer from your Windows taskbar.
- Select This PC from the left-hand menu.
- Look under Devices and drives.
- Make a note of the drives currently displayed.
For example, you may see:
- Local Disk (C:)
- Data Drive (D:)
- USB Drive (E:)
Making a note of the drive letters already in use will make it easier to identify the correct USB drive later when you insert your recovery drive USB drive. We call this the “target” drive.
Insert the USB Drive for your new Windows Recovery files
Insert the USB flash drive that will become your new Windows Recovery Drive.
Wait a few moments while Windows detects the device.
Return to This PC in File Explorer and look for a new drive letter that was not listed during your earlier check. For example:
Before insertion
- Local Disk (C:)
- Local Disk (D:)
- USB Drive (E:)
After insertion
- Local Disk (C:)
- Local Disk (D:)
- USB Drive (E:)
- F:
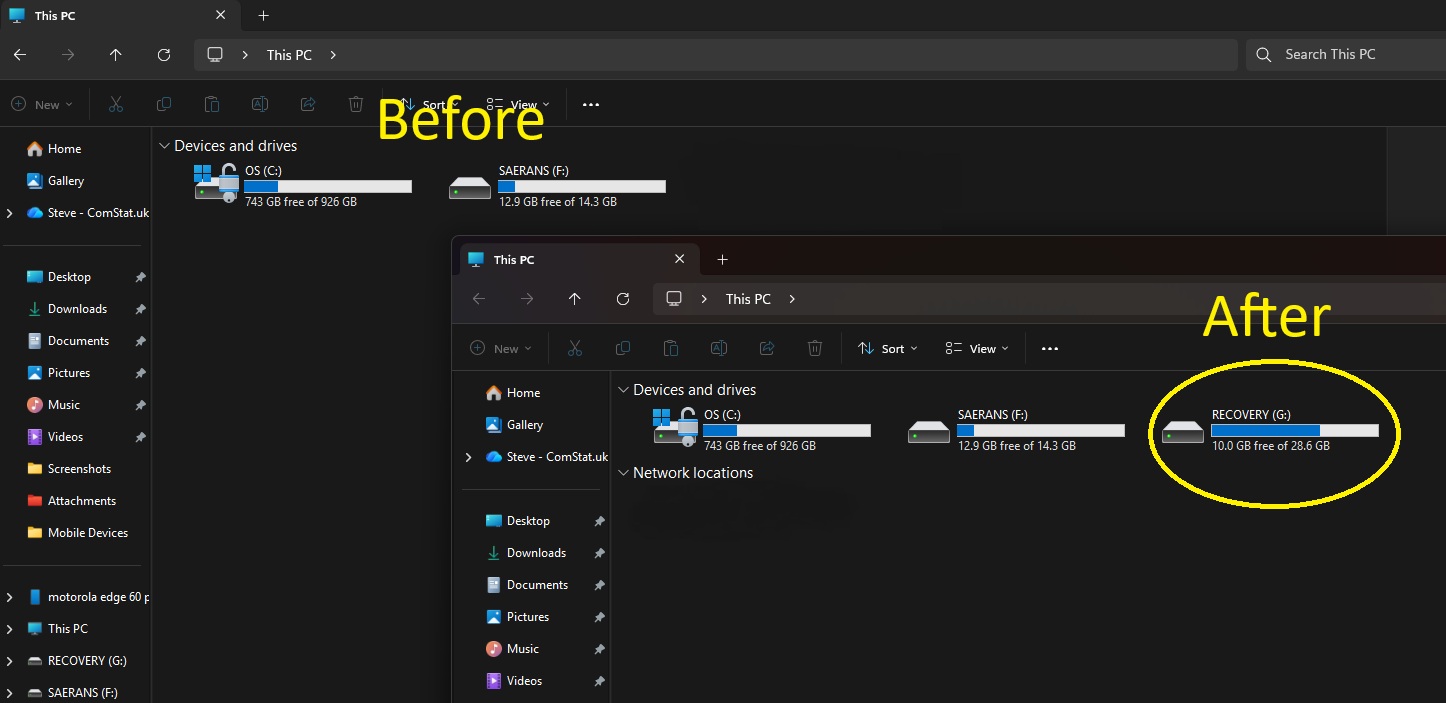
In this example, F: is the newly detected drive. Windows has allocated it with “F”. In this example, F: is the USB stick you have just connected. In this way, remember which letter File Explorer has designated for the memory stick you have inserted to create your Windows Recovery Drive.
This simple check helps ensure that you do not accidentally select and erase important files from the wrong USB drive. Here, only two drive letters are assigned, and when we insert a new USB stick (which is incidentally an existing Windows Recovery Drive), we see that the drive assigned for our target is G:
Create the Windows Recovery Drive
Now that you have inserted your USB drive and you have identified which drive letter you need to use, you can create your Windows Recovery Drive without risking unintended data loss. Close File Explorer and follow these steps:
Windows Recovery Drive: How-to
- Click the Start button or click into the Search field, both on your Windows desktop taskbar.
- Start typing Recovery Drive into either search box.
- Click open Recovery from the search result
- Select Create a recovery drive.
- If Windows asks for permission, click Yes.
Windows will take a few moments to prepare the Recovery Drive wizard. Wait for the Recovery Drive wizard to open.
When the wizard appears:
- Make sure Back up system files to the recovery drive is selected*.
- Click Next.
* Including the system files makes the Windows Recovery Drive more useful because it can provide additional recovery and reinstall options if Windows becomes damaged.
You may notice a short pause while Windows prepares the required information. This is completely normal.
Select the Correct USB Drive
Windows will display the USB drives available for use.
Carefully select the drive letter you identified earlier. In the example we used above, we noticed that Windows designated our target drive as F:. The letter you are assigned depends on how many USB devices are already installed/engaged.
Check again!
Before continuing, Windows will display a warning explaining that all data on the selected drive will be deleted. Read the warning carefully. When Windows deletes the contents of your target USB drive, any data and files will be permanently lost. If in doubt, start again.
When you are certain you have selected the correct USB drive:
- Click Create.
- Allow Windows to begin creating the Windows Recovery Drive.
Wait for the Process to Complete
Creating a Windows Recovery Drive will take some minutes.
The duration of this kind of job depends on your computer’s processing power and the USB drive’s write (i.e. recording) speed.
The good news is that you can continue using your computer while the recovery drive is being created. You can browse the web, read email, or carry out most everyday tasks as normal.
Avoid removing your USB drive until Windows confirms that the process has completed successfully.
When the recovery process finishes, Windows will display a message confirming that the Windows Recovery Drive is ready.
Click Finish and safely remove the USB drive.
Store Your Recovery Drive Somewhere Safe
A Windows Recovery Drive is only useful if you can find it when you need it. Do not save other content on your Windows Recovery Drive
Consider:
- Labelling the USB drive clearly.
- Keeping it with important computer documents.
- Storing it in a known drawer or filing location.
- Attaching it to the computer’s power cable using a small cable tie.
- Recording its location with your IT support provider.
Computer problems have a habit of happening unexpectedly. Knowing exactly where your recovery drive is stored can make recovery much quicker and less stressful.
Final Thoughts
A Windows Recovery Drive is one of the simplest forms of protection available to Windows users. Creating a fresh recovery drive after a major Windows 11 update ensures that you have the latest recovery tools available if something goes wrong. This avoids having to re-install Windows upodates that were installed after a Windows Recovery Drive was created. Also, compared to costly third party intervention, this is a cheap solution.
The task only takes a few minutes to do its job and Windows can work on this in the background while you continue working. For many users, it is a small investment of time that could prove invaluable when a computer refuses to start. In a worst case scenario catastrophic failures could lead to hardware loss and expensive disaster recovery costs. So an inexpensive 64GB USB stick and a few minutes taken to create a Windows Recovery Drive is cheap at the price.
Related Content:
- Windows Recovery drive – why Microsoft recommends it
- PC recovery tools vs Windows Recovery
- Windows 11 System Restore: How to Create and Manage Restore Points Safely
See also:
If you would like help creating your Windows Recovery Drive, feel free to get in touch, or use out contact page to organize an appointment which suits your timetable. You can return to our Index of Articles by clicking here