Index of articles
Click open the Index headers below to browse FAQ
Our support articles address the most common issues we deal with “in the field” about Windows, Microsoft 365 Business, web server support, and web design. Click open the accordion sections below to look for self-serve help. Often, issues rely on a knowledge of IT concepts and language. Also, Microsoft, cPanel, and other software houses featured in these articles often update practice notes and procedures without notice. We review our pages regulalry, however you are advised to contact us for further help about these articles especially concerning issues around sovereign account identity and Multifactor Authentication (MFA).
Microsoft Windows 11
- Windows Pro or Windows Home? A Practical Guide for Business Owners
- Windows Restart vs Shut Down, and Daily Power Management
- Laptop Battery Health: Tips to Prolong Your Battery’s Lifespan
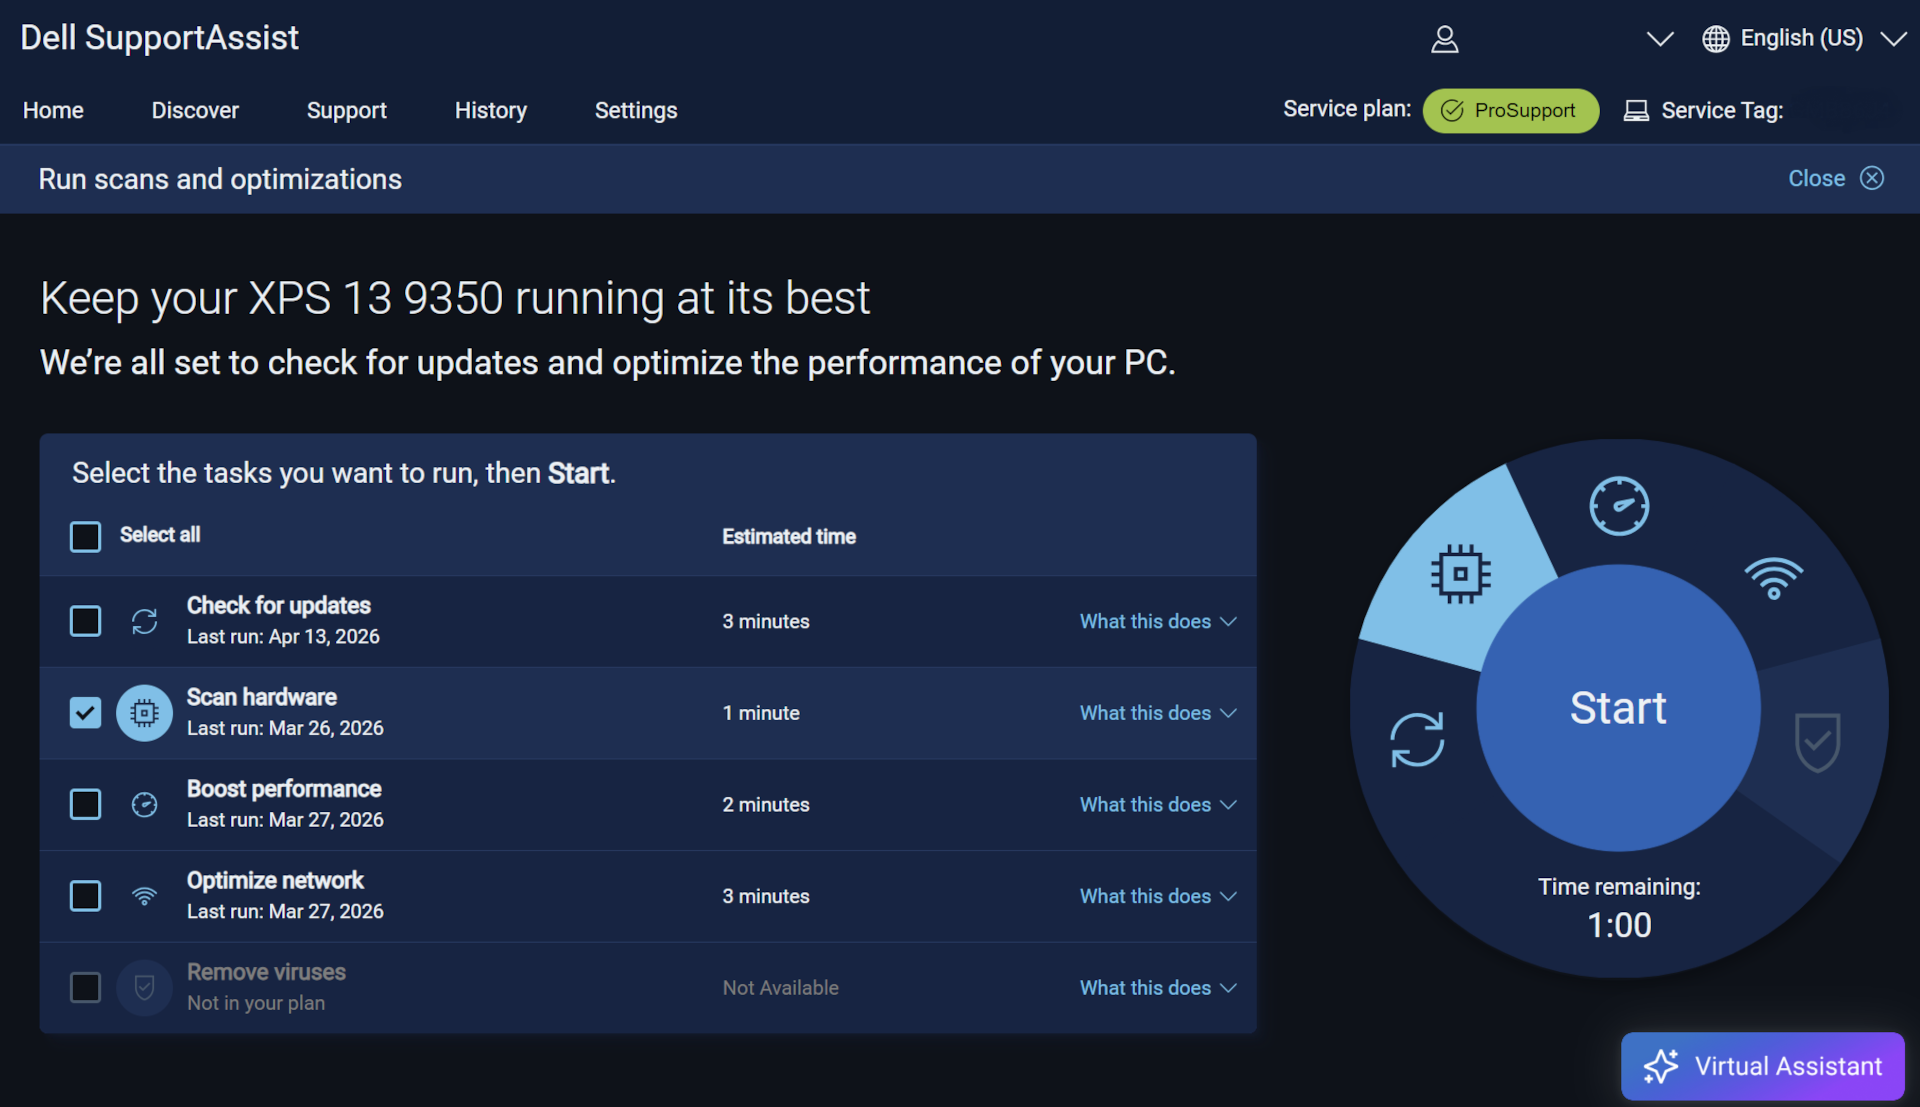
- Windows 11 System Restore: How to Create and Manage Restore Points Safely
- Windows Recovery drive – why Microsoft recommends it
- PC recovery tools vs Windows Recovery
- Why BitLocker for Small Business Matters
- Why Small Businesses Struggle With Microsoft 365 on Windows Home PCs
- How to Set Up a New Windows PC to Sign In Directly with a Microsoft 365 Work Account
- Windows 11 Setup Guide: 1. How to Configure Your PC Securely with Microsoft Accounts
- Windows 11: Why One Microsoft Account Isn’t Enough for Home and Small Business Users
- Windows 11 Setup for Privacy-Focused Users: Why Microsoft 365 Business Matters
Microsoft 365 setup, licensing and user management
- How to Set Up Microsoft 365 for a Small Business
- Why Small Businesses Struggle With Microsoft 365 on Windows Home PCs
- Microsoft 365 Global Administrator: Why Business Continuity needs 2 global admins
- Microsoft 365 Global Administrator: Why You Need a Second Admin and How to Assign Roles
- How to Set Up a New Windows PC to Sign In Directly with a Microsoft 365 Work Account
- How to add a new employee with Microsoft 365 User Onboarding
- How to manage Microsoft 365 when an employee leaves
- Email System Audit and Recovery Review
- How to Set Up Microsoft Authenticator MFA for 365
- How to Back Up MFA Credentials with Microsoft Authenticator Backup
- Microsoft Authenticator iPhone backup
- Locked Out of Your Microsoft 365 Account? Here’s What to Do When MFA Recovery Fails
- What Is a Shared Mailbox in Microsoft 365 and Why Your Business Should Use One
- Change Microsoft 365/email password
- Change Office 365 credit/debit card information
- Why Switching PC Users to Microsoft 365 Sign-In Matters for Small Businesses
- How to Transition PC Users to Microsoft 365 Sign-In and Entra ID
- How to Use Microsoft 365 MailTips to Improve Email Performance
Microsoft 365, Exchange Online and Outlook
- How to Backup Microsoft 365 Outlook Email to a PST File
- How Outlook Categories Transform Email Management
- Microsoft 365: Outlook Categories
- How to Search by Category in Outlook
- How to Manage Microsoft 365 Email Signatures
- About Microsoft 365 Outlook templates
- What Is a Shared Mailbox in Microsoft 365 and Why Your Business Should Use One
- How to Use Microsoft 365 MailTips to Improve Email Performance
- How to Use Outlook Sweep to Declutter Your Outlook Inbox
- Email migration from cPanel to Microsoft 365
- How to Use Microsoft 365 Inline Email Archiving
- Create a Microsoft 365 Exchange Online connector
- 2025 Email Security Guide for Business Owners: Avoiding Scams and Attacks
Microsoft 365 configuration and user tips and tricks
- Why Professional IT Support Still Matters in the Age of AI
- How to Use Folder Color Coding in Microsoft 365 to Boost Productivity
- How to Set Up a Microsoft 365 SharePoint Site for a Small Business
- OneNote Sync Troubleshooting
- Create a Microsoft 365 Exchange Online connector
- Configure SPF, rDNS, DKIM, and DMARC for email
The following articles can be found using <Search> or scrolling through our list of articles. Procedures may have changed since and therefore this content is either being eidted or deprecated. So, although we are editing this content, you might still find useful information to help with issues.
- – Exchange Online – room and equipment resources
- – Reset Office 365 password expiration policy
- – Exchange Email – EOP antivirus/spam
- – Exchange Online Protection – EOP
- – Microsoft 365 Exchange Email – data leakage & loss protection
- – Microsoft ActiveSync
cPanel - web server | email |DNS
- How to Change Your Email Password in Roundcube Webmail
- How cPanel Spam Filters Work
- What Is cPanel BoxTrapper And Why Email Users Should Care
- Email Management in cPanel: Save Space, Cut Costs, and Go Green
- 2025 Email Security Guide for Business Owners: Avoiding Scams and Attacks
- Email System Audit and Recovery Review
- Safeguard your .uk domain names – Nominet
- Email migration from cPanel to Microsoft 365
- How to manage a web site contact form
- How to configure DNS for a contact form
- Configure SPF, rDNS, DKIM, and DMARC for email
- Create a new email address with cPanel
- How to use cPanel Web Disk
- cPanel Disaster Recovery Backups: Ownership responsibility
- How to back up your web server with cPanel
- cPanel WordPress Backup: A Practical Guide for Virtual Host Owners
- Add SPF to your DNS zone record
- Configure DMARC using cPanel
- Configure DKIM in cPanel
- Configure Reverse DNS (RDNS)
- cPanel email account considerations
- Why Authoritative Nameservers Matter for Your Web Hosting Setup